How to clear CMOS on GIGABYTE B550M DS3H (and AC) Motherboard: 2 Methods
Summary: This article explains how to perform a BIOS, or CMOS reset and clear the NVRAM on your GIGABYTE B550M DS3H (and AC) motherboard.
There are several possible causes for BIOS data corruption. Power outages, incorrect BIOS settings, hardware incompatibilities resulting from specific configurations, etc. Clearing CMOS to its original settings is a common solution in such circumstances to reset BIOS to factory defaults.
Somtimes it’s also recommend to clear CMOS and resetting BIOS before installing a new CPU on the GIGABYTE B550M DS3H (and AC) motherboard.
There are 2 methods to clear CMOS and reset BIOS on the GIGABYTE B550M DS3H (and AC) motherboard:

Sale
$129.99 $99.99
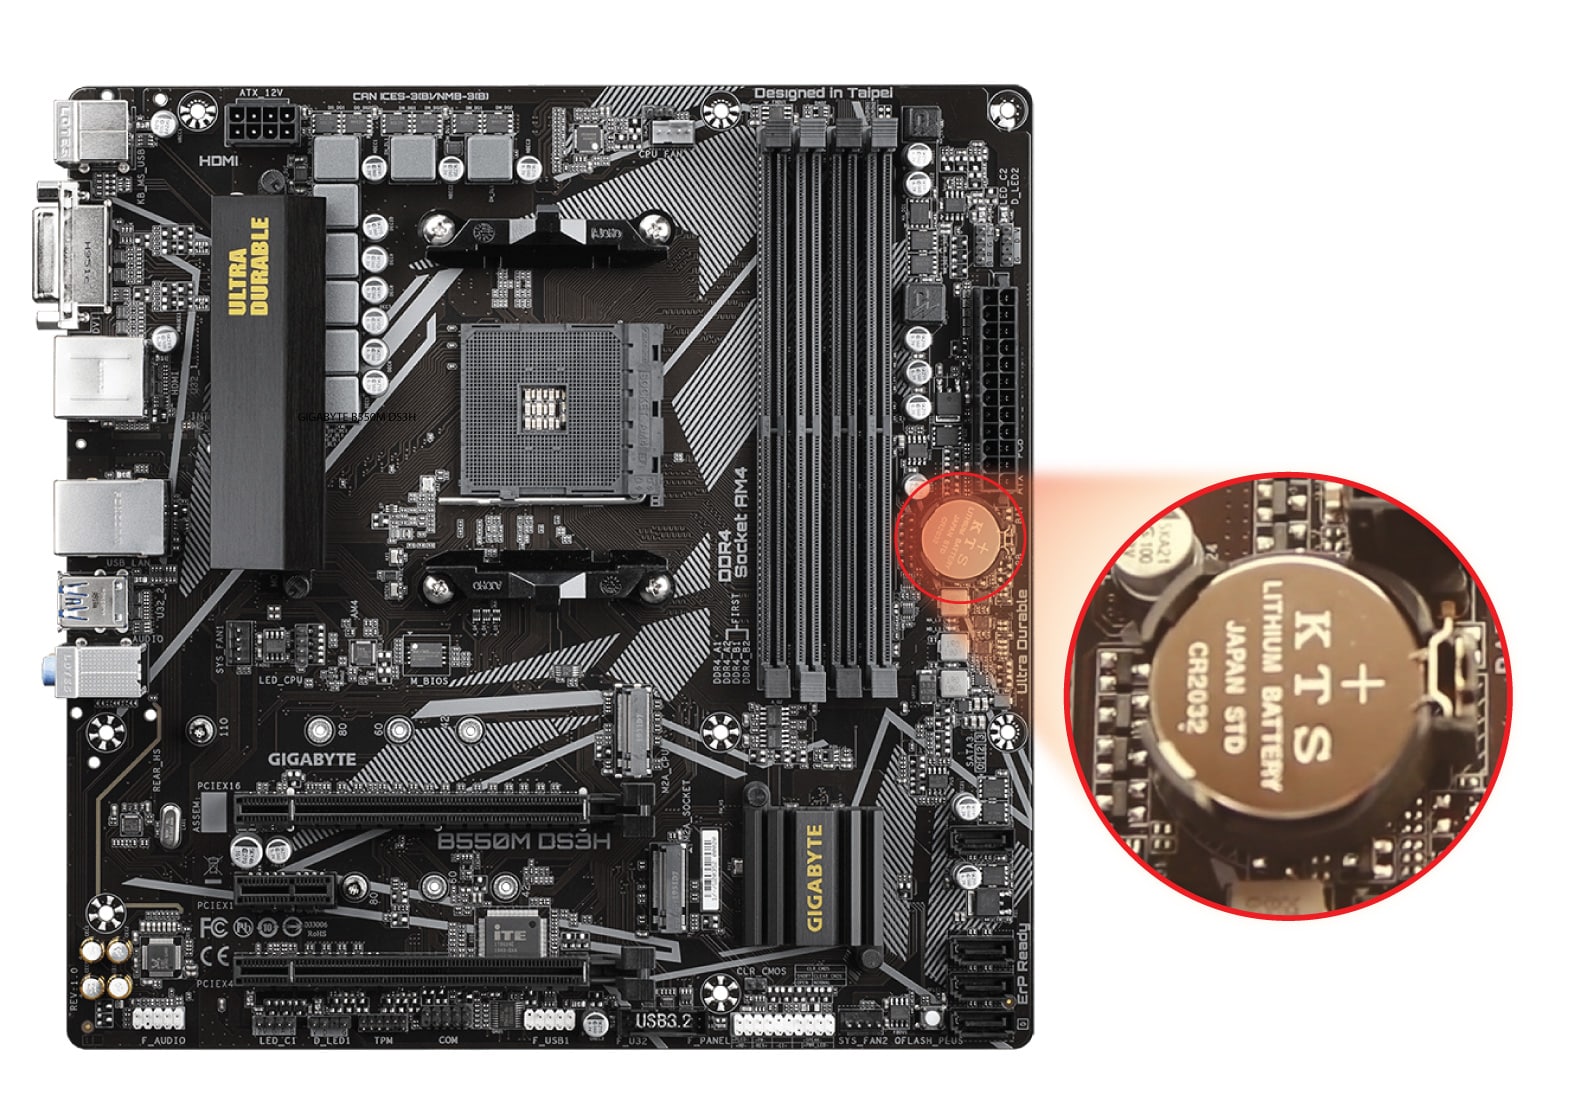
1. Reset Your CMOS by Re-seating the CMOS Battery
A battery is used to maintain settings in the motherboard. One way to clear CMOS on the GIGABYTE B550M DS3H (and AC) motherboard is to remove and reseat the battery. Here’s how to do it:
- Turn off your computer and unplug the power cord.
- Press the power button multiple times to clear any charge in the PSU capacitors.
- Locate the 3V CR2032 battery, gently remove it from the holder, and wait a few minutes to ensure the CMOS is clear.
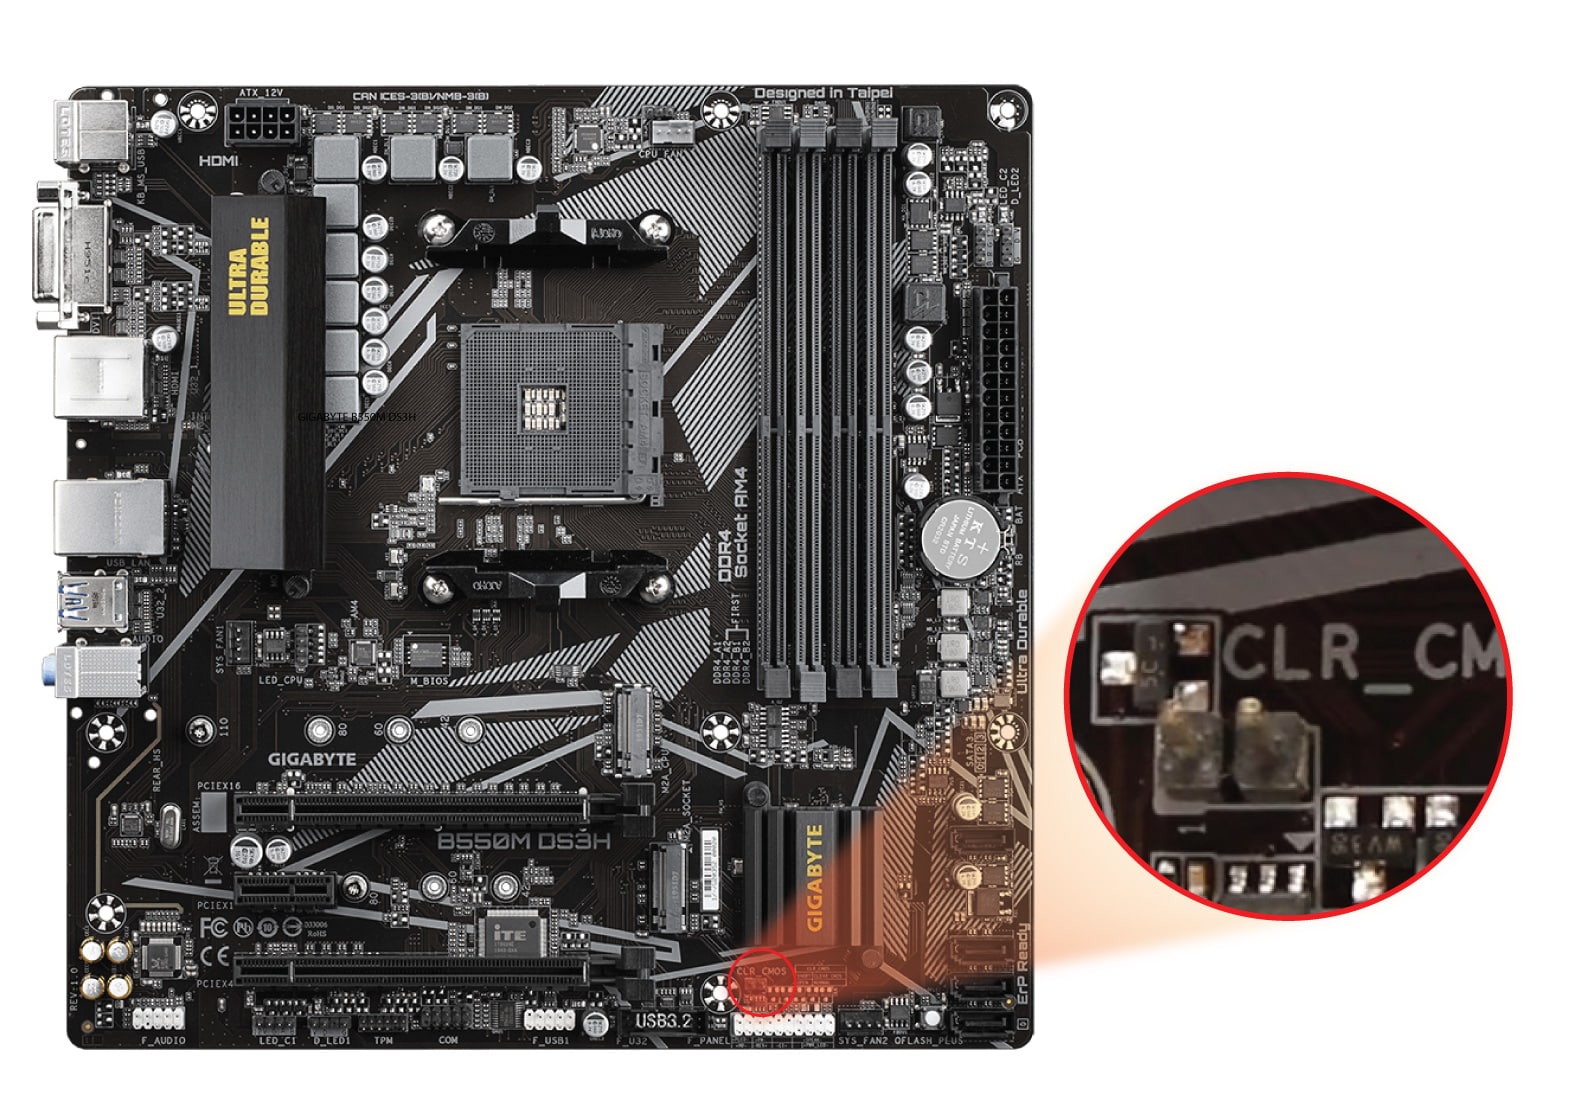
2. Reset Your CMOS with the Motherboard Jumper
The other way to clear CMOS on the GIGABYTE B550M DS3H (and AC) motherboard is to use the jumper. Here’s how to do it:
- Turn off your computer and unplug the power cord.
- Press the power button multiple times to clear any charge in the PSU capacitors.
- Locate the jumper with the label CLR_CMOS next to it.
I hope you find this guide helpful.
Dominique D’Ozen
Co-Founder / Editor
Hardcore gamer, IT engineer, musician, scrapyard lover. Yes, scrapyard! Highly proficient in everything RPG.
How to clear CMOS on GIGABYTE B450M DS3H (and V2/WiFi) Motherboard: 2 Methods
Summary: This article explains how to perform a BIOS, or CMOS reset and clear the NVRAM on your GIGABYTE B450M DS3H (or V2 or WiFi) motherboard.
There are several possible causes for BIOS data corruption. Power outages, incorrect BIOS settings, hardware incompatibilities resulting from specific configurations, etc. Clearing CMOS to its original settings is a common solution in such circumstances to reset BIOS to factory defaults.
Somtimes it’s also recommend to clear CMOS and resetting BIOS before installing a new CPU on the GIGABYTE B450M DS3H (or V2/WiFi) motherboard.
There are 2 methods to clear CMOS and reset BIOS on the GIGABYTE B450M DS3H (V2/WiFi) motherboard:

Sale
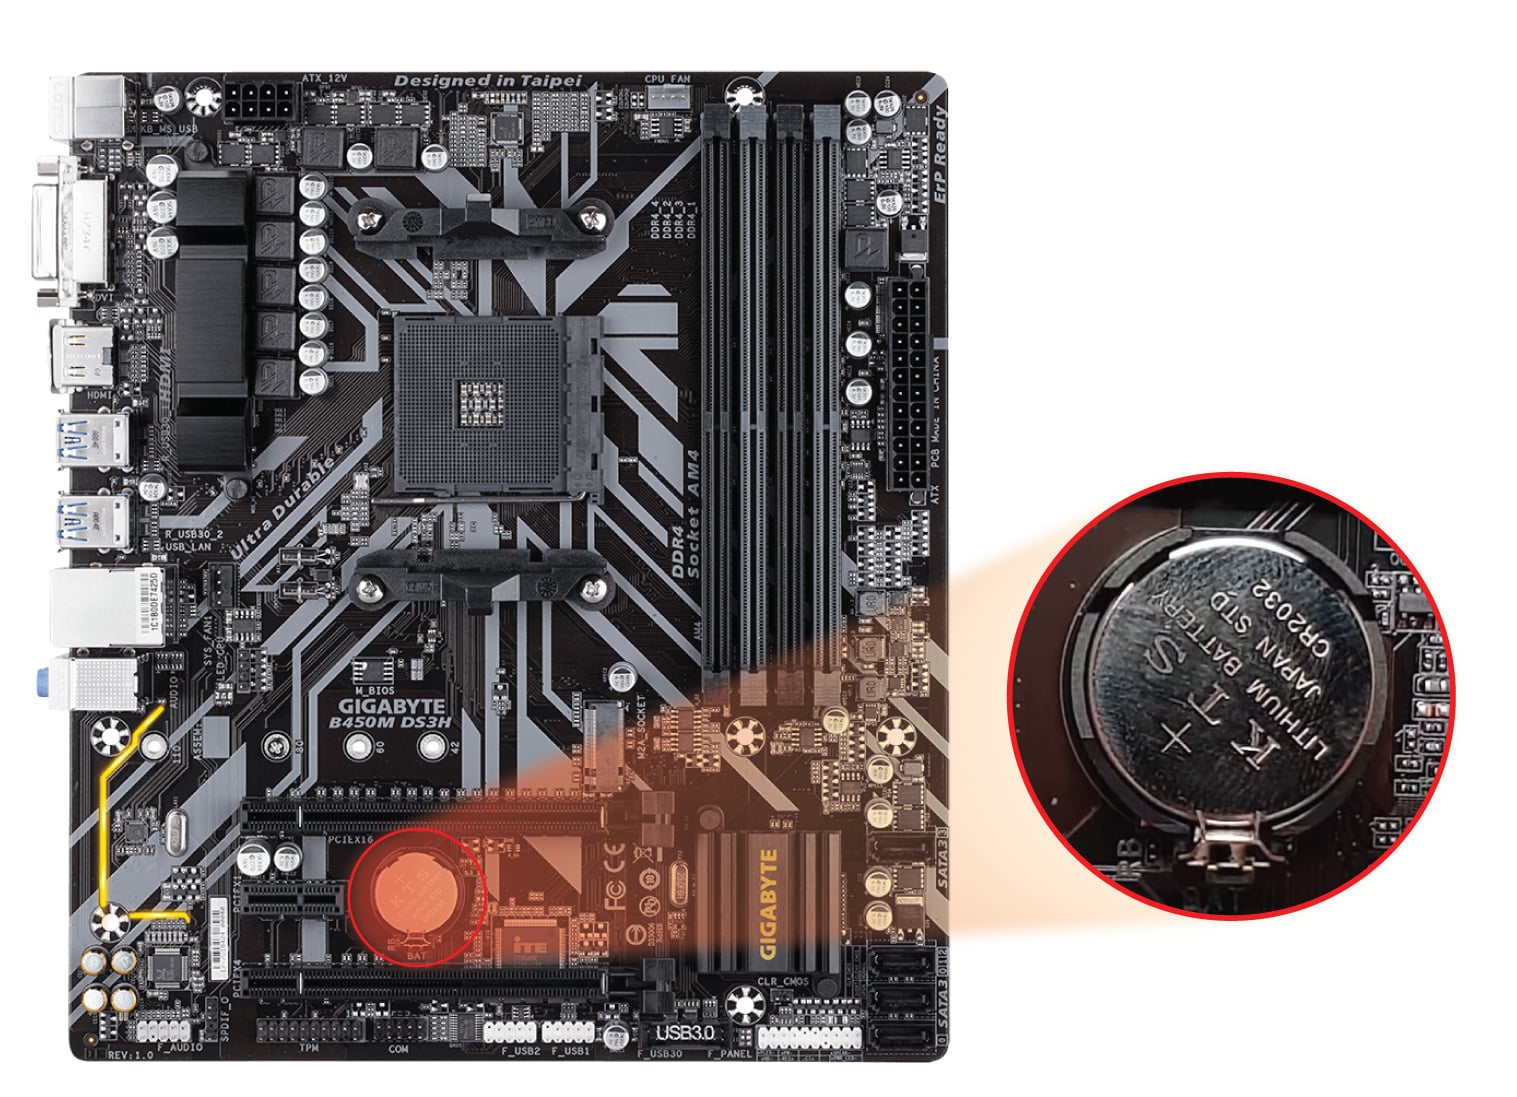
1. Reset Your CMOS by Re-seating the CMOS Battery
A battery is used to maintain settings in the motherboard. One way to clear CMOS on the GIGABYTE B450M DS3H (V2/WiFi) motherboard is to remove and reseat the battery. Here’s how to do it:
- Turn off your computer and unplug the power cord.
- Press the power button multiple times to clear any charge in the PSU capacitors.
- Locate the 3V CR2032 battery, gently remove it from the holder, and wait a few minutes to ensure the CMOS is clear.
2. Reset Your CMOS with the Motherboard Jumper
The other way to clear CMOS on the GIGABYTE B450M DS3H (V2/WiFi) motherboard is to use the jumper. Here’s how to do it:
- Turn off your computer and unplug the power cord.
- Press the power button multiple times to clear any charge in the PSU capacitors.
- Locate the jumper with the label CLR_CMOS next to it.
I hope you find this guide helpful.
Dominique D’Ozen
Co-Founder / Editor
Hardcore gamer, IT engineer, musician, scrapyard lover. Yes, scrapyard! Highly proficient in everything RPG.
How to Reset Gigabyte BIOS
If you’re experiencing system instabilities due to corrupted or incorrect BIOS settings, resetting it can be an effective solution. This can even help erase the custom/administrator password if you have forgotten or are unaware of it.
You can restore your BIOS settings using both firmware and hardware methods. The former involves loading optimized defaults from the BIOS Setup screen. On the other hand, the hardware method involves removing the onboard battery or using a jumper to clear the CMOS values.
Whether you rock an AORUS, AERO, GAMING, or ULTRA DURABLE motherboard, this article will guide you through the different ways of resetting the Gigabyte BIOS.
Table of Contents
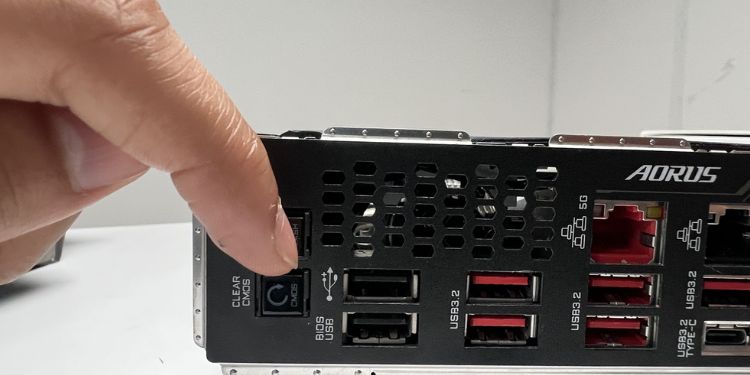
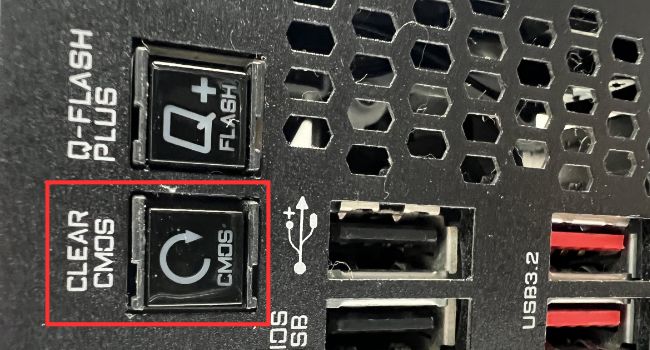
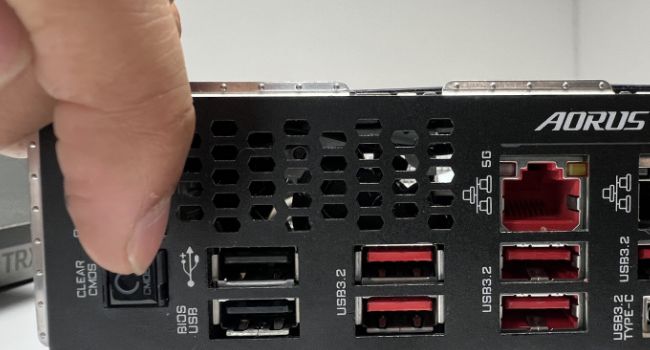
Use Clear CMOS Button
If you’re using a newer high-end motherboard, you’re probably going to find a Clear CMOS button. It can be located either in the rear I/O panel or within the system board itself (along with the other headers).
Without a doubt, this is the most convenient and quickest way to perform a BIOS reset on any mobo. All you have to do is press the dedicated button and it will restore the CMOS values (system clock and other hardware parameters) to factory defaults.
Even though the BIOS configuration is stored within the Southbridge or Super I/O chips these days, it’s still the CMOS that powers them. Hence, clearing your CMOS will erase the data stored in the RAM and revert the motherboard settings.
Caution: Never use the CMOS button when the system is turned on. You may lose your valuable data or in the worst case, it could even damage the motherboard.
Follow the provided instructions below to learn the proper way of resetting a Gigabyte motherboard BIOS.
-
Start by locating the button first:
If yours is available in the rear I/O panel, you’ll likely find a reset icon with the label CLEAR CMOS.

However, Gigabyte has embedded the button within the system board in some models. In that case, you may first refer to the user manual for quick navigation. Look for CMOS_SWor similar indications.
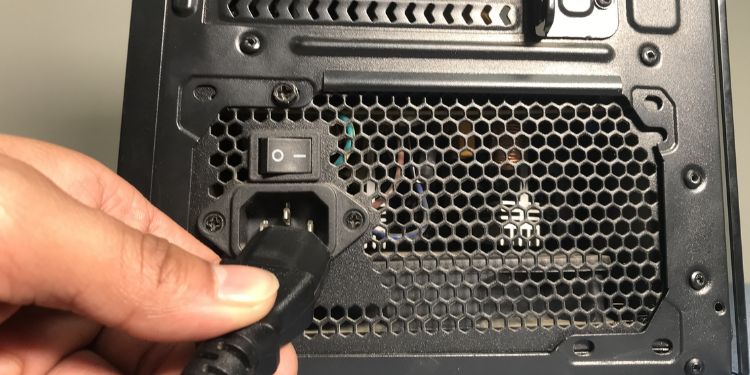
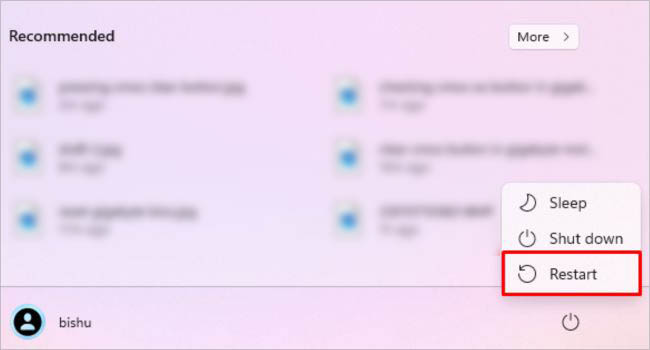
- Then, properly shut down your PC. If you’re facing problems when booting the PC, hold on to the power button for at least 10 seconds and this should force shut it down.
- Also, unplug the power cord from the power supply.
Now, just press the dedicated button.
Load Optimized Defaults From BIOS
While using the CMOS button is the most effective and quickest method for BIOS reset, it’s not present on every motherboard. Instead, you can perform this from your UEFI/Legacy Utility, which is accessible on any system.
Note that this can only be useful if you’re not experiencing any boot/system failures and your PC successfully passes the Power-On-Self-Test (POST). Apart from that, you require to manually load the factory defaults even after clearing the CMOS.
Considering the fact that most users utilize the UEFI mode these days, here are the general guidelines on how to load the optimized defaults:
- First, look into the user manual or check for the BIOS Menu key for your model online.
- Now, close all the running programs and restart your computer.
- As soon as you see the Gigabyte logo on the startup screen, press the BIOS key to access the related settings.
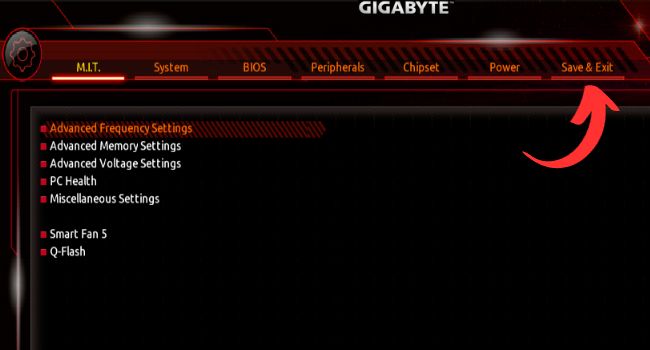
- Click on the Save & Exit tab. You may even use the arrow keys to navigate here.
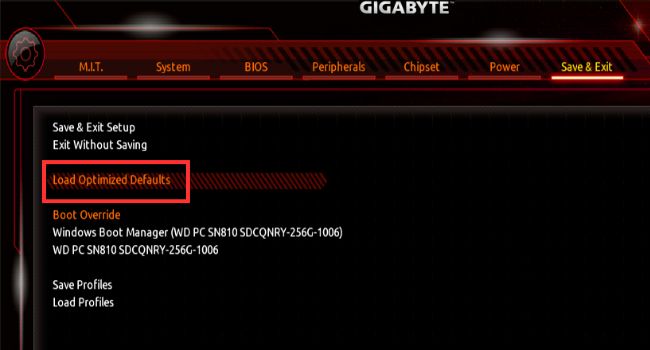
You should see Load Optimized Defaults, Load fail-Safe Defaults, or similar indications. Select this option.
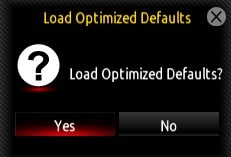
Once the confirmation dialogue box pops up, press Yes.
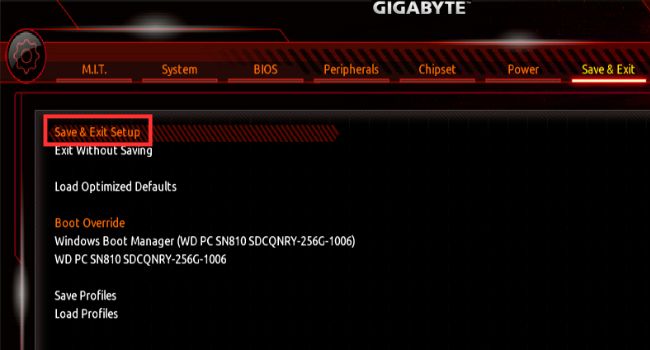
You’re not done yet. Now, choose the Save & Exit Setup option.
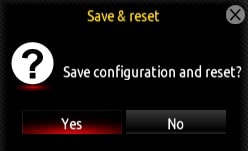
Again, hit Yes and this should reboot your computer. The next time you start your computer, all the BIOS configurations will be set to default values.
The general idea for resetting Gigabyte BIOS on legacy mode is almost similar. Without further delay, let’s get into the necessary steps:
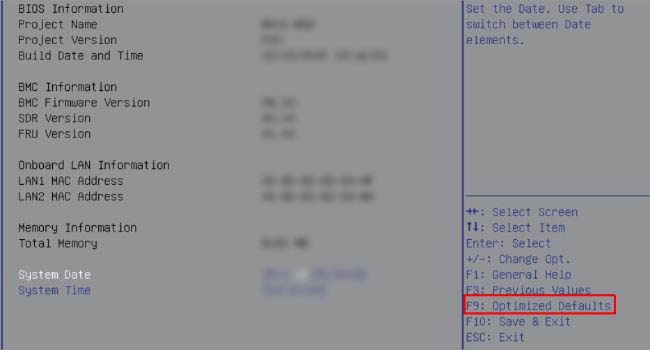
- As demonstrated earlier, restart your computer, and use the BIOS Menu key to enter the interface.
- Check the right pane and find the key used for optimizing defaults. In most models, it’s F9 as shown below.
- Hit the key and a confirmation box should pop up. Here, select Yes or simply press Y .
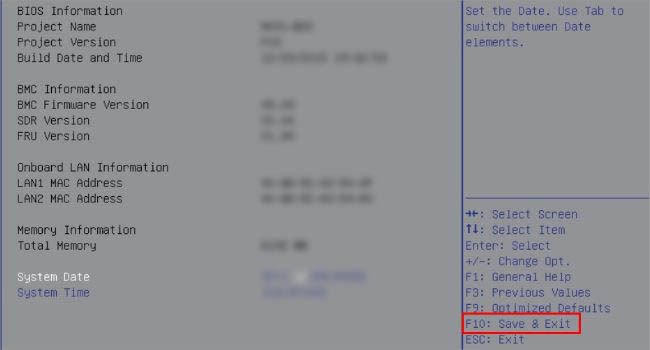
- Next, find the key to save and exit from the Gigabyte Legacy BIOS settings. As you can see below, it’s usually F10.
Remove CMOS Battery
Every motherboard has a small coin-shaped battery that retains power even after your computer turns off. It keeps supplying an adequate amount of power to the RTC RAM, which holds all the BIOS configurations.
When removing the CMOS battery, we are basically cutting off power. Now, the CMOS chip can’t retain the stored settings and everything gets restored to the default state once you put it back.
The exact location of the onboard battery varies based on models. This could be between the PCIe slots or above the front panel headers. It’s always a good idea to refer to the motherboard’s user manual to identify the correct position.
While clearing CMOS using this method sounds a bit technical, it’s actually quite easy if you follow my instructions the right way. This can help solve any issues that could have arouse due to power outages, hardware incompatibilities, failed/corrupted BIOS updates, and more.
Caution: Ground yourself or the PC to get rid of the possible static buildup that may damage the internal components when you’re operating them. Refer to our other guide that discusses in detail on this subject.

- Start by turning off your computer.
- Along with that, remove the PSU’s power supply and also unplug all the external devices.
- Press and hold the power button for up to 10 seconds. This will discharge all the remaining static electricity.
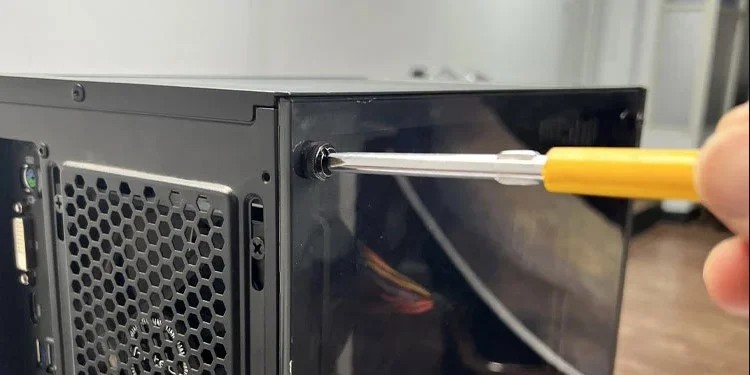
Next, untighten all the screws and carefully remove the PC casing. The exact steps vary for older and newer cases. Here’s a detailed guide that should help you open any PC case.
- Now, lay your PC on its side in such a way that you can have a clear view of the system board.
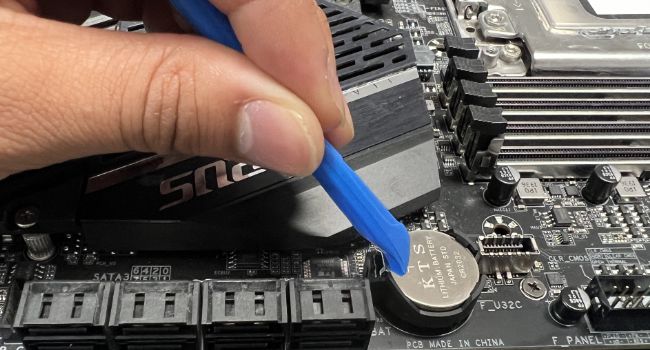
- Navigate to the CMOS battery section and push the latch in the opposite direction. You may use a plastic spudger as I’ve done below.
The cell should be removed automatically. Otherwise, you need to manually pull it out of its compartment.
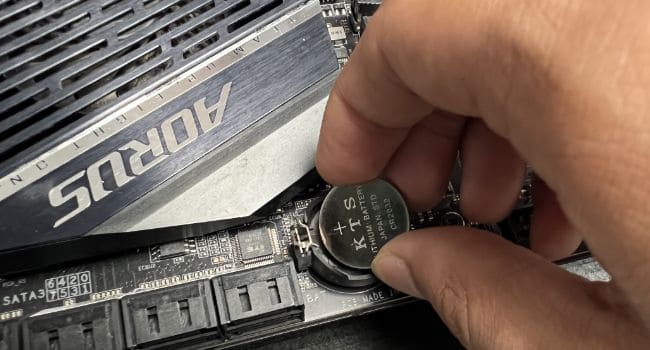
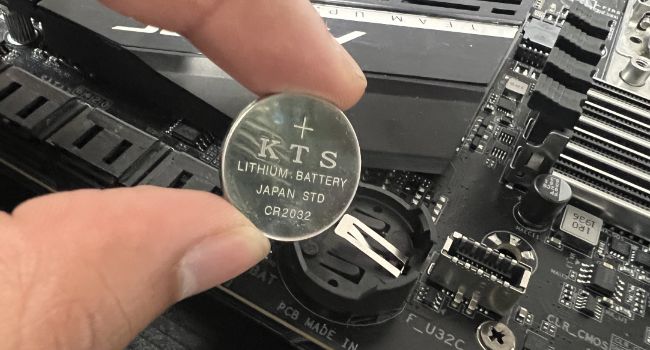
After waiting for about 5 to 10 minutes, insert the cell back into its holder. While you’re at it, make sure you align the positive and negative sides. Make sure the positive side (indicated with a ‘+’ sign) faces upwards.
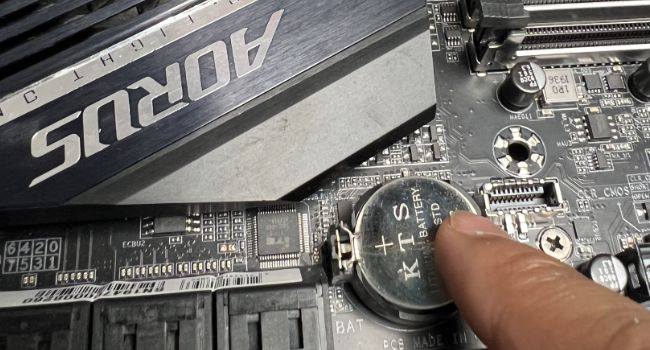
Gently press the CMOS battery downwards and it should lock into place.
Clear CMOS Using Jumper
Another possible way to clear CMOS values and reset the Gigabyte BIOS is to make the jumper pins short-circuit using a metal conductor. You may use a screwdriver or a jumper cap.
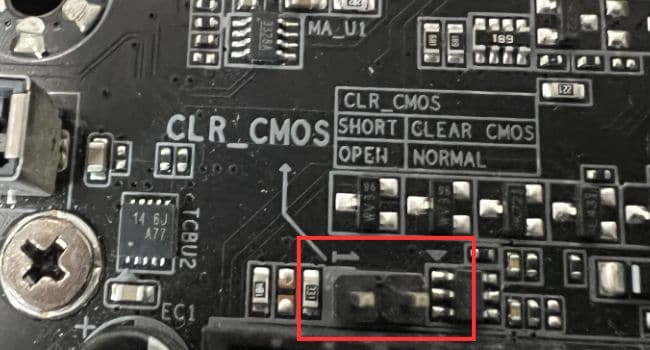
In most Gigabyte motherboards, the jumper is located somewhere near the CMOS battery (labeled CLR_CMOS). Since it’s comparatively difficult to find, I highly advise referring to the user manual to quickly locate it.
Most Gigabyte models embed a 2-pin CMOS jumper. Even my TRX40 AORUS MASTER motherboard includes this. Here’s a quick demonstration of how I cleared CMOS using the jumper method that should help you get a general concept:
- Shut down your PC, remove the power plug, and discharge capacitors by holding down the power button for 10 seconds. Don’t forget to ground yourself to prevent the components from ESD (Electronic Discharge).
- Next, open the case of your PC to access the system board.
- Locate the CLR_CMOS jumper and identify the number of pins.
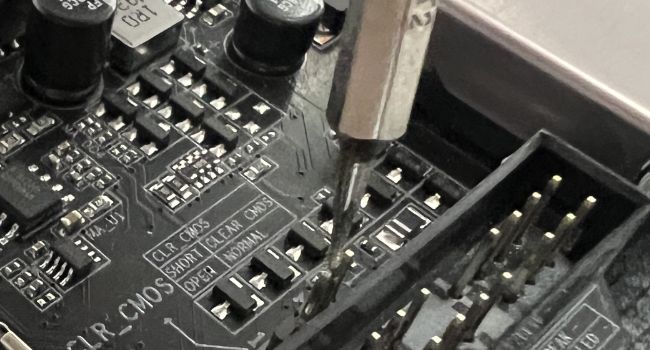
If there are two, follow the below process:
-
Take a screwdriver or any other metal conductor and touch the two pins.
- Hold it for about 30 seconds before removing the metal object.
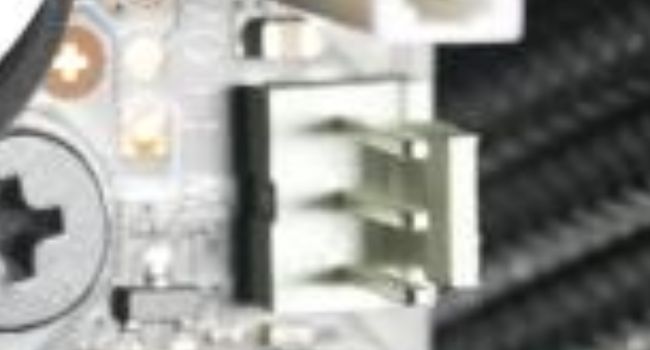
- If your Gigabyte motherboard has a 3-pin CMOS jumper, you’ll also get a jumper cap. The process is going to be a little different:
- Pull out the jumper cap from the default position (1-2).
- Then, shift it to the ‘Clear’ position (2-3).
- Now, revert to the original position (1-2) after a minute. This should clear the CMOS values.
- Finally, close the casing, replug the power adapter, and start your Gigabyte computer.
- Get to the BIOS screen using Del or the correct key.
- Here, load the optimized defaults, save the settings, and exit to complete the BIOS reset.
Bhishu Acharya is a technical content writer at TechNewsToday. He specializes in monitors, laptops, storage devices, and other peripherals. Apart from computer hardware, you can also find his how-to and troubleshooting articles on Windows, internet, security, and networking. Ever since getting his hands on a personal computer, Bhishu started exploring its internal components at just 10. His growing curiosity led him to undertake the Computer Science & Information Technology degree and is just a year away from graduation. While balancing his study and work life for over four years, he has harnessed different sets of technical skills. With his expertise, he is now dedicated to helping netizens looking for hardware and software-related fixes. Today, Bhishu’s proficiency extends beyond computer hardware. In his spare time, he enjoys coding and learning new programming languages. You can contact him at bhishu@technewstoday.com
Как сбросить настройки BIOS

Добрый день, брат пытался что то сделать в BIOS. Теперь после перезагрузки RST_SW моргает слева и справа, оперативка гаснет загорается и больше ничего не происходит. Так по кругу уже около часа. Питание выключал нажимал на RST_SW и держал кнопку вынесенную для удобства на мат плату сзади, где все входы и и выходы. Помогите (
Комментарии 12

1 месяц назад
. и держал кнопку вынесенную для удобства на мат плату сзади, где все входы и и выходы. Помогите (
То есть нифига не шаря, зачем нужна эта кнопка, вместо того чтобы найти в мануале местоположение перемычек CLR_CMOS, ты просто тыкаешь её целый час в ожидании чуда?
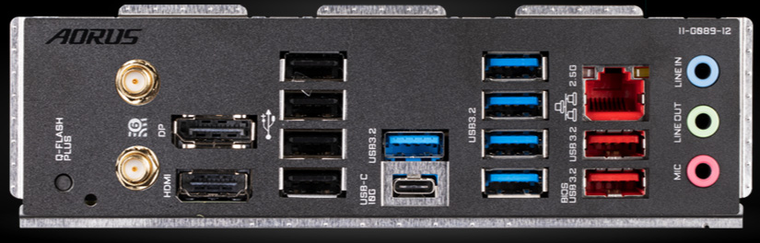
Вот тебе фото I/0 панели твоей платы. Ну теперь может быть у тебя возникают какие-нибудь ассоциации о предназначении этой кнопки?
Свернуть ответы 3

1 месяц назад
Мать наверное раз 10 бы уже обновила биос, если бы флешка была вставлена
Свернуть ответы 1
1 месяц назад
Раз 10 — это пожалуй минимум))

Bullet1993
1 месяц назадДа бог с ним, я от незнания все перепробовал. Как итог все вот так: монитор не срабатывает, клавиатуры нет.
Оперативку ставил в a2-b2, снимал, ставил прсото b2. Ничего не происходит. Отверткой после полного а выключения замыкал контакты где reset bios — бестолку. Если вы думаете с Гуглом не дружу — да я уже все перепробовал. Даже разобрал, собрал и всё контакты прочистил.