How To Add Polygon (MATIC) To Your Metamask Wallet
The Polygon network (formerly known as the MATIC network) is one of the leading layer-2 decentralized scaling solutions for the Ethereum blockchain.
Polygon (MATIC) enables developers to build scalable user-friendly dApps with low transaction fees without sacrificing speed or security since the network inherits security from the Ethereum chain itself.
The Metamask wallet in contrast is the most popular open-sourced non-custodial wallet in the crypto space. It is used by millions of crypto investors across multiple operating systems to purchase, store, and trade cryptocurrencies and other digital assets with ease.
Since the Polygon Network is a sidechain for the Ethereum mainnet, it is compatible with the Ethereum Virtual Machine (EVM) i.e smart contracts are deployed directly on the Polygon chain. Being an EVM-compatible chain also means that it can be added to Metamask via RPC.
If you’re looking to add the Polygon network to your Metamask wallet, then you’re on the right article. In this guide, we will show you how to add the Polygon mainnet to Metamask easily in a few steps.
Article Contents show
How To Add Polygon To Metamask (Quick Guide)
- Launch the Metamask extension/mobile app and unlock your account.
- Click on the network dropdown box.
- Select [Add Network].
- Enter the correct RPC details for the Polygon Network and click [Save].
- Transfer Polygon (MATIC) tokens to your Metamask wallet.
How To Add Polygon (MATIC) Network To Your Metamask Wallet (Guide With Pictures)
To add the Polygon network to your Metamask wallet, you first need to get the correct RPC endpoint details for the Polygon Mainnet (which will be included later in this article).
Once you have the custom RPC endpoint for the Polygon Mainnet, all you have to do is input each of them in the appropriate fields on the Metamask extension/mobile app then click on [Save] to add the network to your wallet.
Below is a step-by-step guide on how you can add the Polygon MATIC network to Metamask easily.
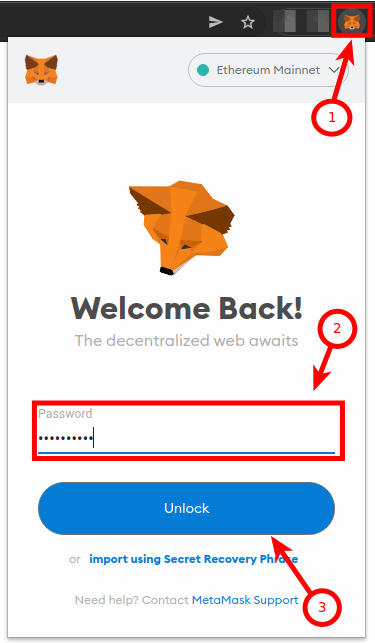
Step 1: Launch Metamask and input your account password to unlock the wallet.
If you haven’t installed the Metamask extension on your browser, you can get the correct version for your browser on the Metamask download page. If you have already installed the extension, you can skip this step since installing again will not be needed.
Once you have the extension installed and correctly set up, click on the Metamask icon in the extensions area of your web browser to launch the Metamask main window.
Enter your account password and click on [Unlock] to unlock your wallet.
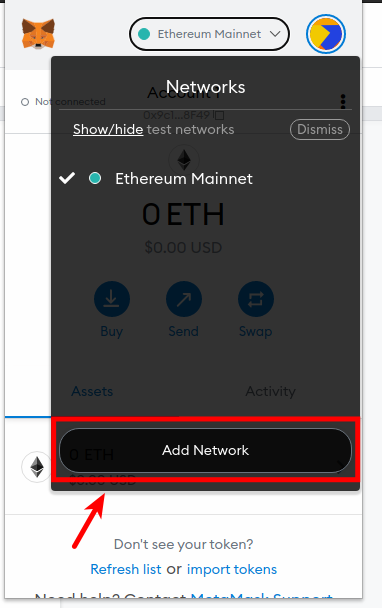
Step 2: Click on the network dropdown box.
On the Metamask main window, click on Network Dropdown Box to reveal a dialog with all available (configured) networks on your Metamask wallet.

Step 3: Now, click [Add Network] on the dialog.
Now, click [Add Network] on the dialog to add a new network (Polygon) to your Metamask wallet.
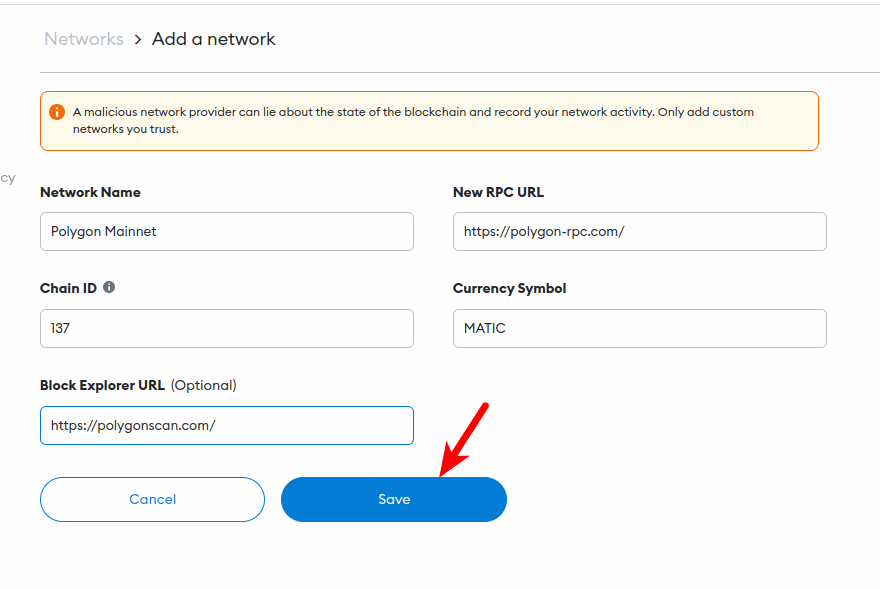
Step 4: Enter the Polygon Mainnet custom RPC endpoint and click [Save].
On the next page, input the custom RPC endpoint for the Polygon Main Network outlined below in the appropriate fields as seen in the next screenshot.
- Network Name: Polygon Mainnet
- New RPC URL: https://polygon-rpc.com/
- Chain ID: 137
- Currency Symbol: MATIC
- Block Explorer URL: https://polygonscan.com/
Once you have filled all the fields correctly with the appropriate details, click on [Save] to add the MATIC network to your Metamask wallet.
After this, the Polygon network should be added and selected automatically as the default network on your Metamask wallet.
If it is not selected, go back to the Metamask main window and click on the network drop-down button then select “Polygon Mainnet” from the list of available networks on the dialog.
![]()
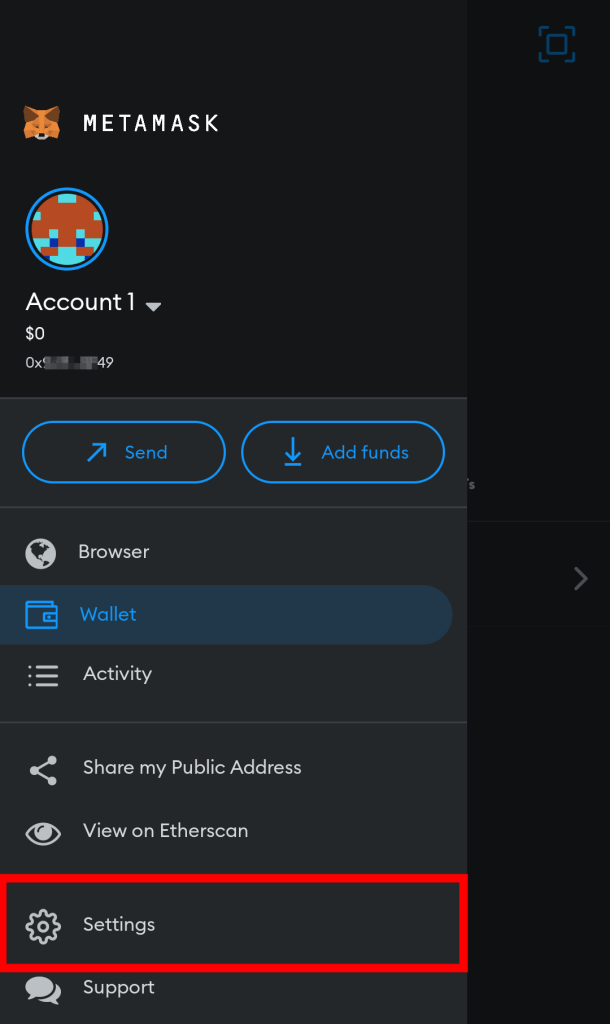
Step 3: Select [Settings] from the menu items.
Next, select [Settings] from the menu items.
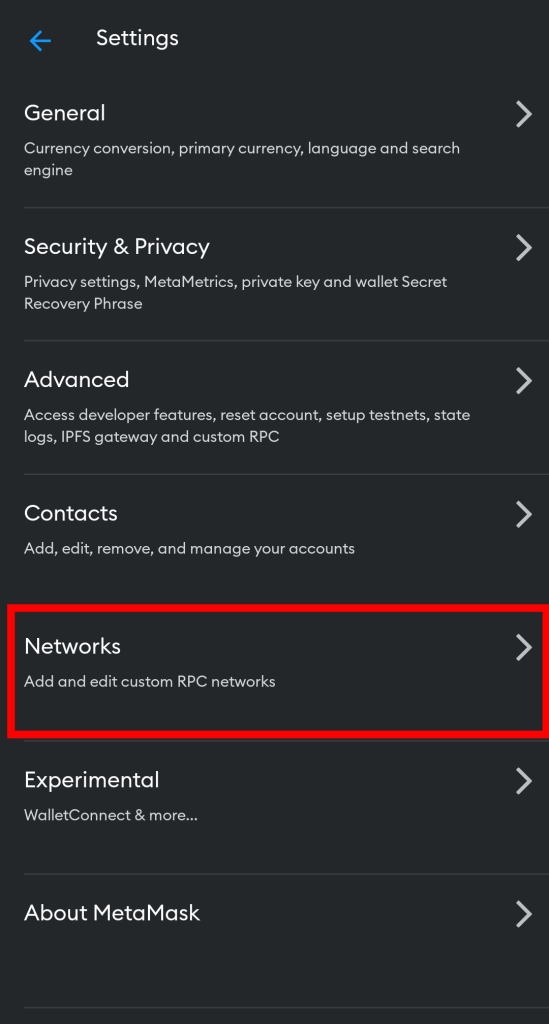
Step 4: Select [Networks] on the Settings page.
On the Metamask app Settings page, select [Networks] to view all available networks on your wallet.
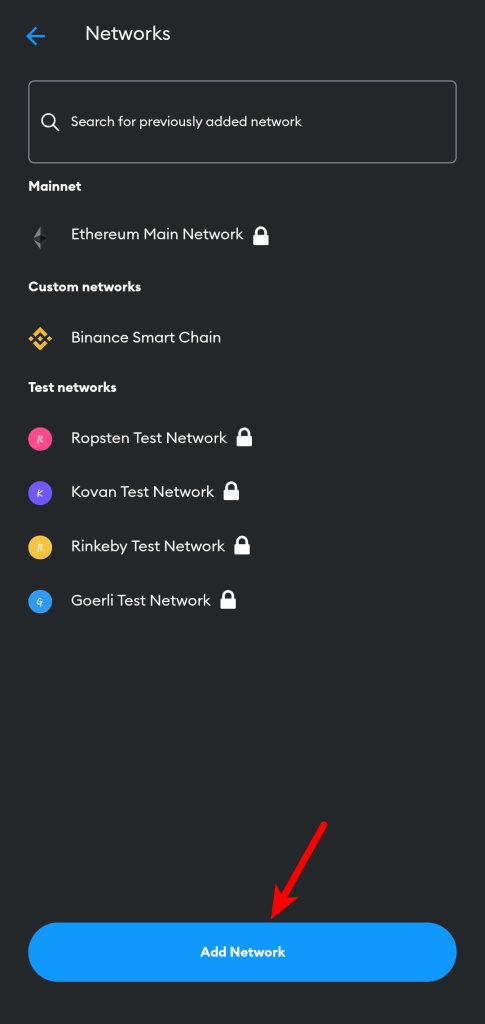
Step 5: Now, tap [Add Network].
Now, tap on [Add Network] to add a new network to your wallet.
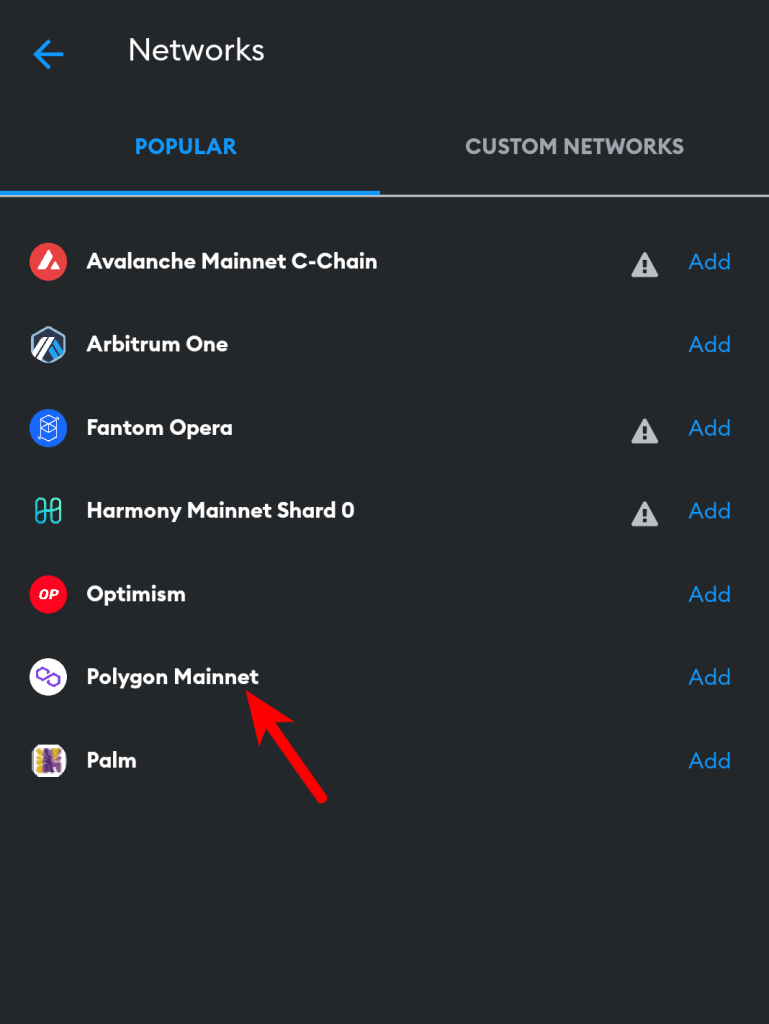
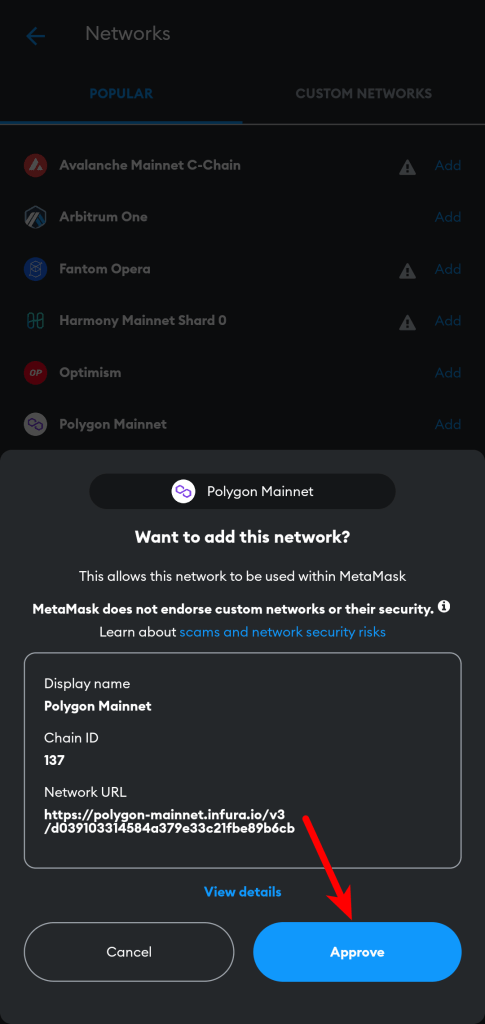
Step 6: Select [Polygon Mainnet] from the list on the “Popular” tab.
On the “Popular” tab, tap on [Polygon Mainnet] to add the MATIC Mainnet to your wallet.
Step 7: Tap on [Approve] to add the network.
Finally, tap on [Approve] to add the network to your Metamask wallet.
After this, the Polygon network should be added to your wallet and selected as the default network on the Metamask app on your device.
How Transfer Polygon To Your Metamask Wallet Easily
To fully utilize your Metamask wallet on the Polygon network, you need to transfer some MATIC tokens (the native token of the Polygon network) from an external wallet or crypto exchange account (that holds some value in MATIC) to your Metamask wallet.
If you don’t currently hold any MATIC tokens, we recommend using Binance to purchase some MATIC since the cryptocurrency is supported by the exchange, and most importantly, it can be transferred out to external wallets like Metamask.
You can sign up for a free Binance account using this link.
Once you have created an account on Binance, purchase some MATIC using your credit/debit card, direct bank deposit, third-party payment providers, or via P2P before moving on with the guide below. Binance provides an excellent tutorial on how to do that in this article.
To send MATIC from Binance to your Metamask Wallet, you need to copy your default Metamask wallet address since Metamask only provides one wallet address which is used across multiple (configured) blockchains/networks on your wallet and this includes the Polygon network.
Now that you have your Metamask wallet address which is also your MATIC wallet address, head over to the Binance mobile app or web dashboard, then tap on [Wallets], and select [Funding] to navigate to your funding wallet.
Next, tap on [Withdraw], search for “MATIC” and select “MATIC Polygon” from the results. Now, select [Send via Crypto Network] from the bottom dialog.
On the next page, enter your Metamask MATIC wallet address in the wallet address section then select “Polygon” as the network to be used for the transaction.
Enter the amount of Polygon (MATIC) tokens to be transferred to your Metamask wallet from Binance and tap on [Withdrawal].
Now, tap on [Submit] and complete the 2-step verification by providing the code sent to your phone number, email, and/or authenticator app (Google or Binance authenticator).
Finally, head back to your Metamask wallet and refresh your MATIC balance to view the updated balance.
The transaction can take anywhere from 5 – 20 mins to complete so you have to be a bit patient just in case the tokens aren’t available in your wallet yet.
How To Add ETH To Polygon Network On Metamask
To add ETH to the Polygon on Metamask, you first need to add the Polygon Mainnet to your Metamask wallet as explained in the guide above.
Since there is no Native Ethereum deployed on the Polygon chain, you will need to add the Wrapped version of Ethereum (WETH) to the Polygon network on your Metamask wallet if you want to trade with ETH on the Polygon network.
While Wrapped Ether (WETH) is not the native Ether (ETH) token we all know, it is the ERC-20 compatible version of Ether and it has the same value as the ETH token since WETH is created by sending ETH to a smart contract where the ETH is placed on hold until it ready to be redeemed.
Now that you have a basic understanding of what WETH is, let’s learn how to add it to your Metamask wallet on the Polygon network.
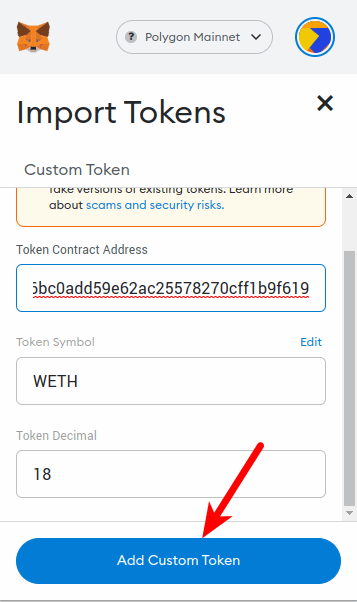
First, you will need to get the Contract Address for WETH on Polygon. The correct contract address for WETH on the Polygon network is “0x7ceb23fd6bc0add59e62ac25578270cff1b9f619” and you can find the contract on the Polygonscan explorer.
Now that you have the contract address of WETH on Polygon, you can go ahead and add WETH to your Metamask wallet on the Polygon network using this contract address.
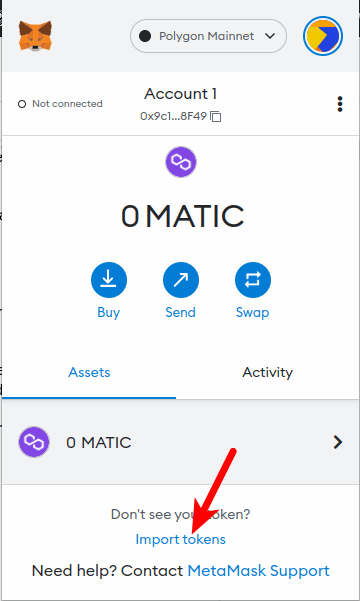
To do this, launch the Metamask extension and ensure that the Polygon Mainnet is added and selected as the default network on your wallet (refer to the guide above if you haven’t done this).
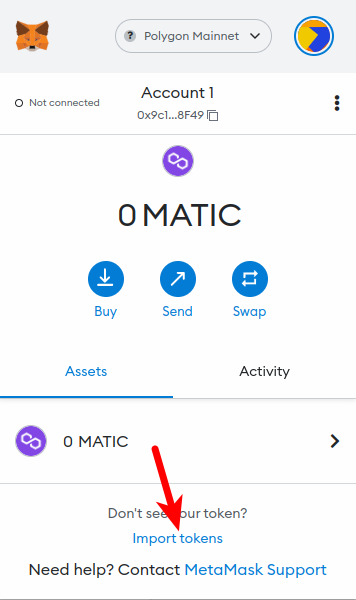
Now, on the Metamask main window, click on [Import tokens].
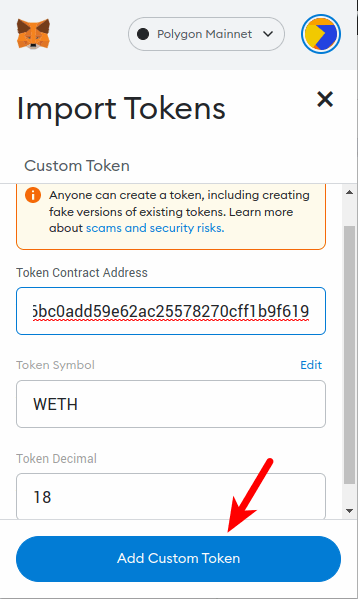
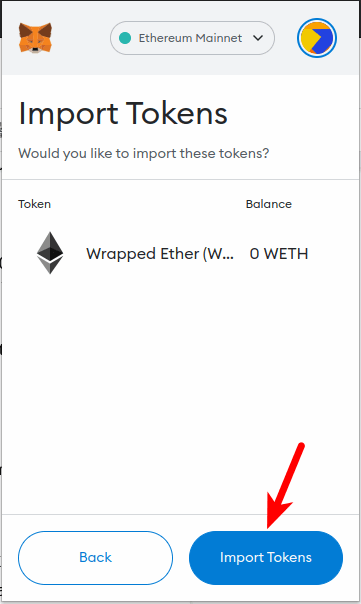
On the new window, paste in the contract address for Polygon WETH (0x7ceb23fd6bc0add59e62ac25578270cff1b9f619) in the “Token Contract Address” section and wait for some seconds for Metamask to automatically input the Token Symbol and Decimal.
Click on [Add Custom Token].
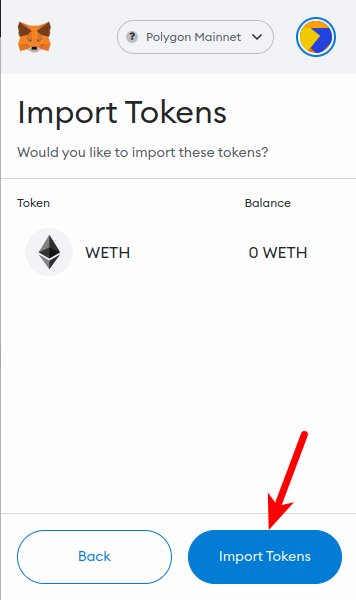
Finally, click on [Import Tokens] to add Polygon ETH to your Metamask wallet.
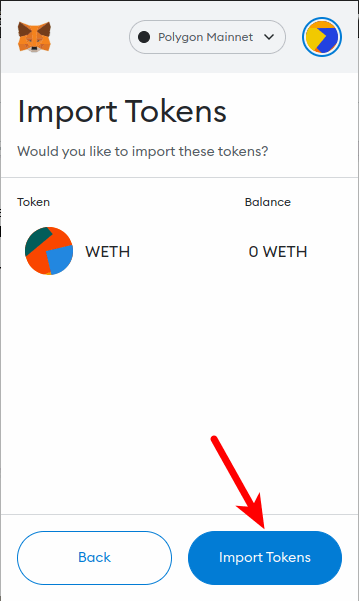
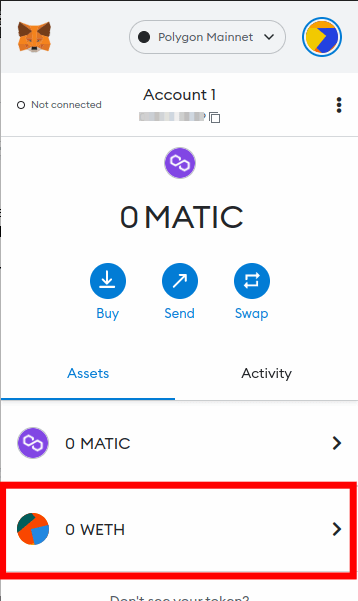
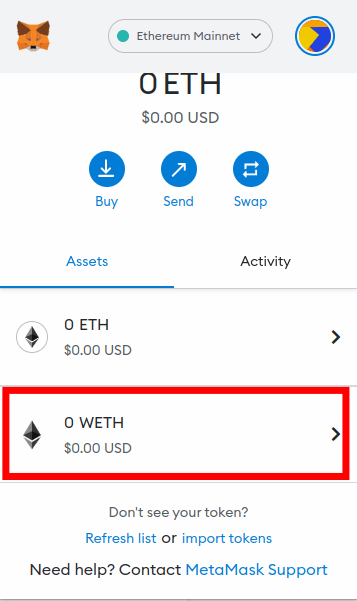
After this, you should see your Polygon WETH balance Metmask and you can transfer WETH to your Metamask wallet address using the Polygon network.
Wrapping Up
Well, that’s it. You have successfully added the Polygon network to your Metamask wallet if you followed this guide to the end.
Since the Polygon network is a side chain of Ethereum and an EVM-compatible network, it can be added to Metamask just like other blockchains which are compatible with the Ethereum Virtual Machine (EVM).
To add Polygon to your Metamask wallet, you first need to get the correct custom RPC endpoint for the Polygon Mainnet.
Once you have the RPC details (which were included earlier in the article), you can then head over to the Metamask extension and add the network to your wallet using these RPC details including the Network name, RPC URL, Chain ID, Symbol and Block Explorer URL.
On the Metamask mobile app, things are less technical when adding some of the popular networks to your wallet since these networks come pre-configured on the app.
To add MATIC to your wallet on the Metamask mobile app, you just need to select it from the list of preconfigured networks and tap on [Approve].
Related Guides:
- How To Transfer Crypto From Coinbase To Metamask
- How To Add Cardano (ADA) To Metamask (2 Methods)
- How To Transfer USDC From Metamask To Binance
- How To Connect Metamask To Etherscan
Share this post on social!
Jay Wilkins
Jay is a former freelance crypto writer who now heads up guides for IsItCrypto.com. He is also a contributor to some top publications in the crypto space. When he’s not cranking up some crypto-related guides for our readers, he’s probably trying to find the next moonshot tokens and NFTs.View Author posts
How To Add Wrapped Ether (WETH) To Metamask
Wrapped Ether or WETH is simply the Wrapped version of the Ether (ETH) token. WETH is pegged to the native Ether token on a 1:1 ratio and you can convert ETH to WETH through a process known as Wrapping.
While Ether (ETH) is the native token for the Ethereum network, it has limited capabilities and can only be used to cover gas fees in most cases. Since ETH doesn’t follow the ERC-20 standard, WETH is used in place of ETH on many platforms and DApps for trading directly with ALT tokens, NFT trading, providing liquidity, and crypto lending amongst others.
Metamask on the other hand is unarguably the most popular non-custodial cryptocurrency wallet right now. The wallet is available on a wide range of devices and can be used to store, trade, send, and receive various cryptocurrencies and crypto assets across multiple (compatible) blockchains.
The WETH token is available on the Ethereum blockchain and a handful of other networks including Polygon, Fantom, BSC, and more for use in their various ecosystems.
If you’re a Metamask user who’s currently searching for how to add WETH to your Metamask wallet, you’re on the right page. In this article, you will learn how to add WETH to Metamask easily on Ethereum and other EVM-compatible networks.
Article Contents show
How To Add WETH To Metamask (Quick Guide)
- Launch the Metamask extension or mobile app and unlock your account.
- Scroll down to the bottom of the page and click on [import tokens].
- Search for WETH and select the correct option from the search results.
- Click on [Next].
- Finally, click on [Import token] to add WETH to your Metamask wallet.
How To Add WETH To Your Metamask Wallet (Step By Step Guide)
The Ethereum DeFi ecosystem is the largest in the crypto space and WETH on the Ethereum network is the most popular version of the WETH token.
We generally recommend you add Wrapped Ether (WETH) to your Metamask wallet on the Ethereum network unless you intend to use WETH on Metamask via other networks due to specific reasons.
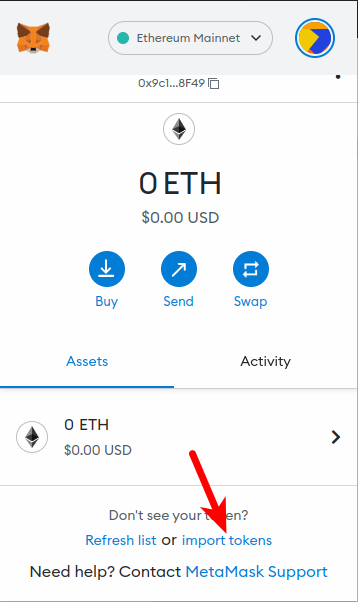
To add the WETH token to your Metamask wallet on Ethereum, you first need to ensure that the Ethereum Mainnet is selected as the default network on your wallet.
Once your wallet is connected to the Ethereum mainnet, you can then import the Wrapped Ether token to your wallet directly on the Metamask interface.
Below is a step-by-step guide on how to add WETH to your Metamask wallet easily.
Step 1: Launch Metamask and unlock your wallet.
First, launch the Metamask extension on your web browser by clicking on the Metamask icon, then enter the account password to unlock your wallet.
If you’re on mobile, launch the Metamask mobile app by tapping on the Metamask app icon, then enter your account password or biometrics information to unlock your wallet.
Step 2: Ensure Ethereum is the selected network.
Since we’re adding the WETH token to Metamask on the Ethereum Network (ERC-20), you want to make sure that the Ethereum Mainnet is selected as the default network on your wallet.
By default, the Ethereum mainnet should be the selected network on your wallet, but if you have switched networks in the past, then click on the network dropdown box and select “Ethereum Mainnet” from the list of available networks.

Step 3: Click on [Import tokens].
Now that your wallet is connected to the Ethereum Mainnet, scroll down to the bottom of the Metamask main window and click on [Import tokens].
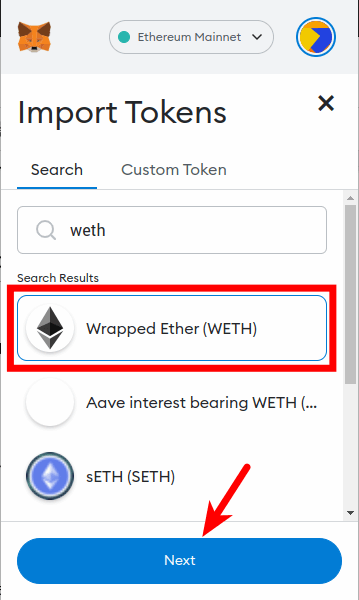
Step 4: Search for “WETH” and select it from the list, then click [Next].
On the token import page, search for the WETH token by typing in “WETH” in the search field and then selecting [Wrapped Ether (WETH)] from the search results. The correct WETH token is usually the first one on the search results list.
After that, click on [Next].
Step 5: Click on [Import tokens] to add WETH to your Metamask wallet.
Finally, click on [Import tokens] to add the Wrapped Ether (WETH) token to your wallet on the Metamask browser extension.
Once the token has been added, you can go back to the Metamask home window to view your WETH balance.
With this, you have successfully added the WETH token to your Metamask wallet on the Ethereum network (ERC-20).
How To Add WETH To Metamask On Other Networks.
There are many versions of the Wrapped Ether token (WETH) available for use across different blockchains not just on Ethereum.
Some of these blockchains are compatible with the Ethereum virtual machine meaning that WETH can be added to your Metamask wallet via a handful of these blockchains where the token is available on.
Below, you will find out how to add WETH to Metamask on EVM-compatible blockchains including Polygon (formerly, MATIC), and the Binance Smart Chain (BSC).
How To Add WETH To Metamask On The Polygon Network
The Wrapped Ether token (WETH) is available on the Polygon (MATIC) network.
To add WETH to Metamask on Polygon, simply copy the contract address of Polygon WETH then input the address in the token import window and click on [Import tokens] to import the token to your wallet.
Below is how you can add WETH To Metamask on the Polygon Network.
1. Copy the WETH token contract address for the Polygon network.
To add the WETH token to your Metamask wallet on Polygon, you first need to get the contract address for the Wrapped Ether token on Polygon.
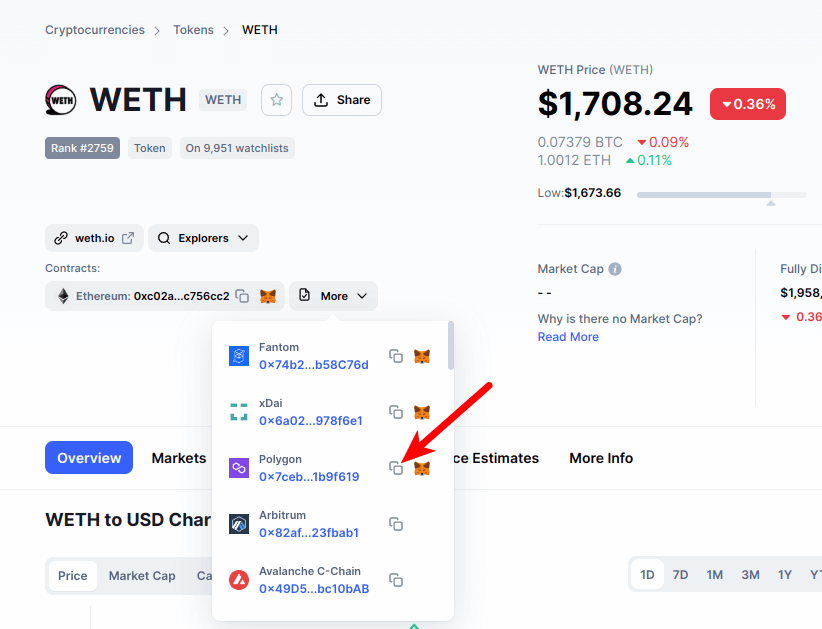
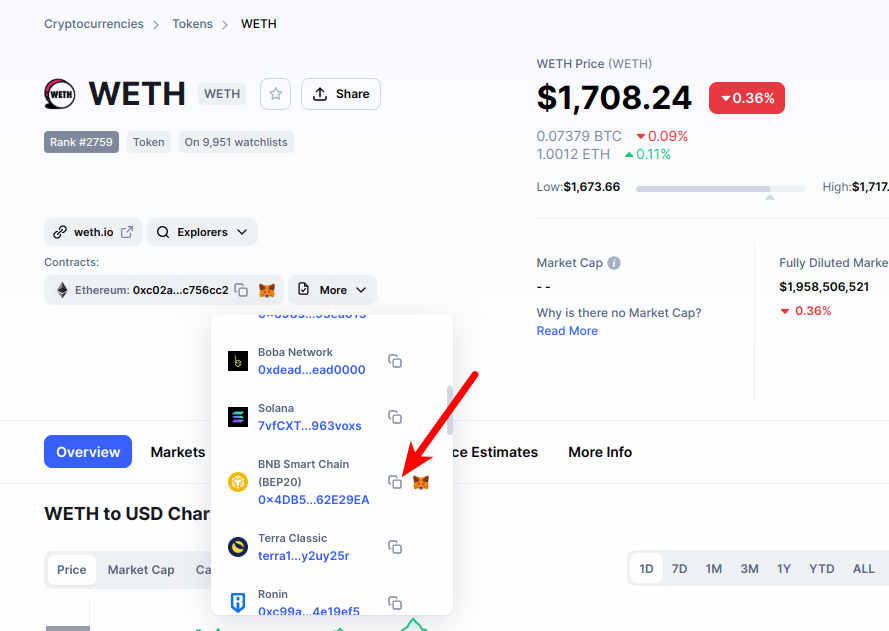
To do this, go to the WETH token page on CoinMarketCap. On the page, click on [More], then scroll down on the dialog box until you find the contract address for WETH on the Polygon network.
Now, click on the Copy icon next to the WETH Polygon contract address to copy it to your device clipboard.
2. Launch Metamask, unlock your wallet, and ensure Polygon is the selected network.
Launch the Metamask extension by clicking on the Metamask icon in the extensions area of your browser. Enter your account password and click on [Unlock] to unlock your wallet.
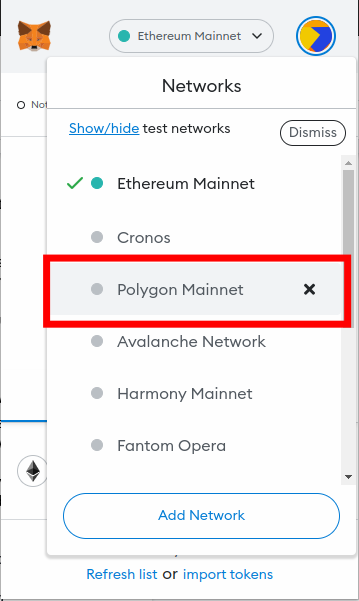
Since we will be adding the Wrapped Ether token (WETH) to Metamask on the Polygon network, you will want to ensure that the Polygon network has been added to your Metamask wallet and selected as the default network
If you haven’t added the Polygon Mainnet to your Metamask wallet, we have a good tutorial on how to add the Polygon network to Metamask on both the extension and mobile app. You will need to follow the steps in that guide to add the Polygon (MATIC) network to your Metamask wallet before moving ahead with this guide.
Once you have added the Polygon network to your wallet, select it as the default network as illustrated in the screenshot below.
3. Scroll down and click on [Import tokens].
Now that you have added (and selected) the Polygon network as the default network on your Metamask wallet, go back to the Metamask main window and scroll down.
At the bottom of the page, click on [Import tokens].
4. Paste the Contract Address and click [Add Custom Token].
On the token import window, paste the WETH contract address that you copied earlier from the CoinMarketCap website in the contract address field and wait a few seconds for Metamask to fetch the Token Symbol and Decimal automatically.
Once that’s done, click on [Add Custom Token].
5. Click on [Import tokens] to add WETH to Metamask on Polygon.
Finally, click on [Import tokens] to add WETH to your Metamask wallet on the Polygon network.
With this, you have successfully added WETH to Metamask on Polygon.
How To Add WETH To Metamask On The Binance Smart Chain (BSC)
WETH is available on the Binance Smart Chain and since the BSC is an EVM-compatible network, you can add easily add WETH to your Metamask wallet on the Smart Chain once you have the network configured on your wallet.
Below is how you can add the WETH token to Metamask on the BSC network.
1. Copy the WETH contract address for the Binance Smart Chain (BEP-20 WETH).
To add the WETH token to your Metamask wallet on the Binance Smart Chain, you first need to get the contract address for the WETH token on BSC.
To do this, go to the Wrapped Ether (WETH) token page on CoinMarketCap. On the page, click on [More], then scroll down on the dialog box until you find the WETH contract address for the BNB Smart Chain (BEP20) network.
Now, click on the Copy icon next to the WETH BEP-20 contract address to copy the address to your device clipboard.
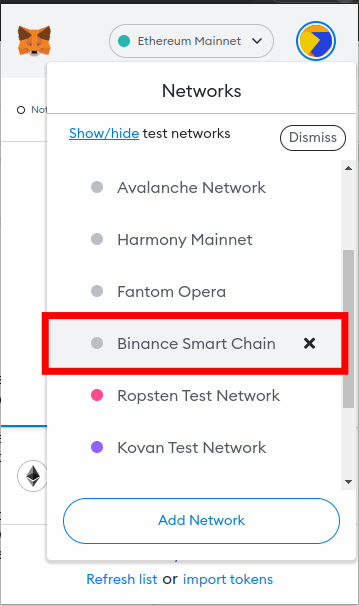
2. Launch Metamask, unlock your wallet, and ensure the Binance Smart Chain is the selected network.
Launch the Metamask extension by clicking on the Metamask icon in the extensions area of your browser. Enter your account password and click on [Unlock] to unlock your wallet.
Since we will be adding Wrapped Ether (WETH) to Metamask on the Binance Smart Chain, you will want to ensure that the BSC Network has been added and selected as the default network on your Metamask wallet.
If you haven’t added the Binance Smart Chain to your Metamask wallet, we have a comprehensive tutorial on how to add the BSC network to Metamask on both the extension and mobile app. You will need to follow the steps in that article to add the BSC network to your Metamask wallet before moving forward with this guide.
Once you have added the Binance Smart Chain to your wallet, select it as the default network as illustrated below.
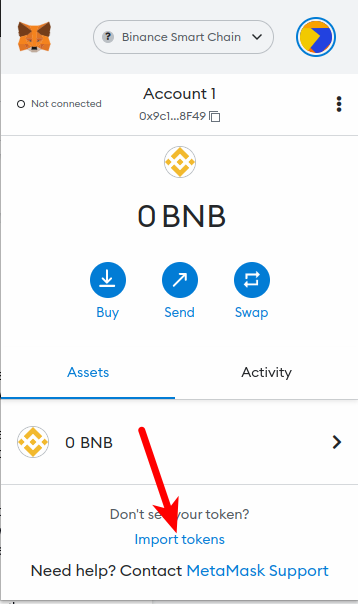
3. Scroll down and click on [Import tokens].
Now that you have added and selected the Binance Smart Chain network as the default network on your Metamask wallet, go back to the Metamask main window and scroll down to the bottom.
At the bottom of the page, click on [Import tokens].
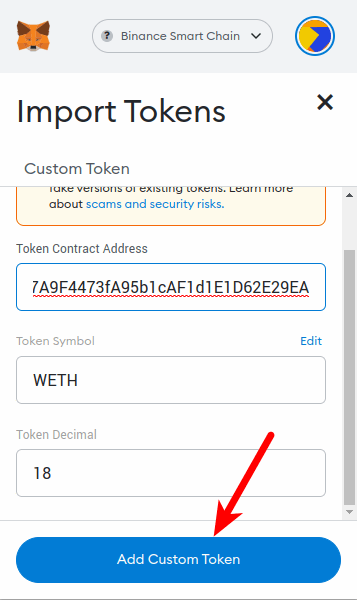
4. Paste the Contract Address and click [Add Custom Token].
On the token import window, paste the WETH contract address you copied earlier from CoinMarketCap and wait a few seconds for Metamask to fill in the Token Symbol and Decimal automatically.
Once that’s done, click on [Add Custom Token].
5. Click on [Import tokens] to add WETH to Metamask on the BSC Network.
Finally, click on [Import tokens] to add WETH to your Metamask wallet on the Binance Smart Chain network.
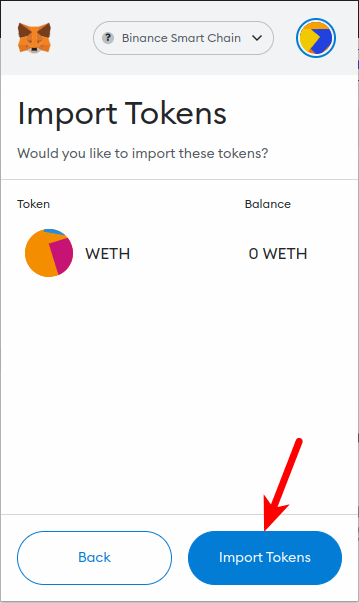
With this, you have successfully added WETH to Metamask on the Binance Smart Chain.
How Does One Convert From ETH to WETH on MetaMask?
Converting ETH to WETH is a process known as “wrapping” and it can be done directly on your Metamask wallet.
Wrapping simply means locking some ETH tokens in a smart contract and then getting Wrapped ETH back. Both ETH and WETH have the same value and you can convert from one to another on Metamask easily.
To convert ETH to WETH on Metamask, you must first ensure that you have added WETH to your wallet using the guide above. You also need to have some ETH on your wallet which will be converted to WETH i.e “wrapped”.
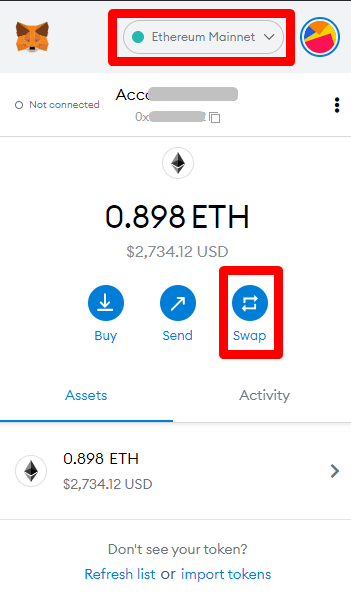
Once WETH is added to your wallet and you also have some ETH available, launch Metamask and select the “Ethereum Mainnet” as the default network on your wallet.
Now, click on [Swap].
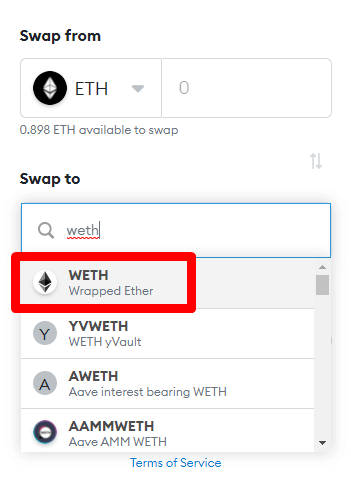
Next, search for “weth” in the “Swap To” section and select the correct Wrapped Ether (WETH) token from the search results.
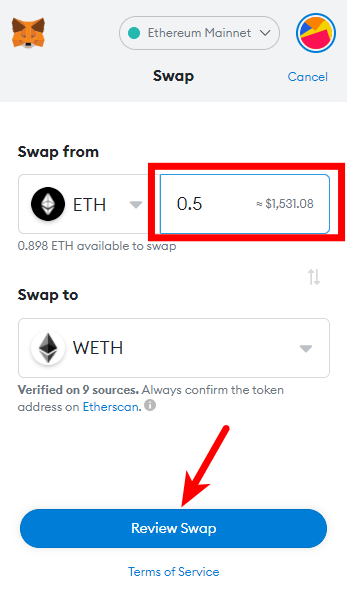
Input the amount of ETH you intend to convert to WETH and click on [Review Swap] to review the transaction.
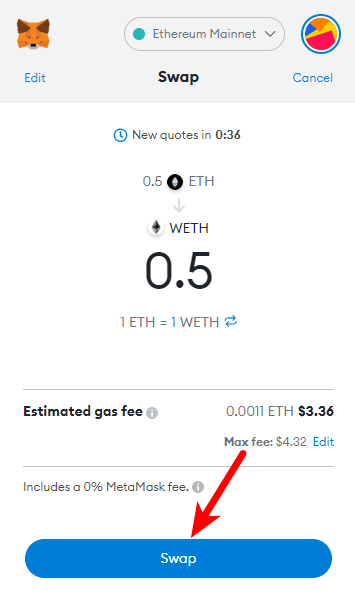
Finally, review the quotes and estimated gas fees then click on [Swap] to complete your transaction.
Once the transaction completes, go back to the Metamask main window and refresh your balances to view your newly converted WETH balance.
Can You Send WETH to Your Metamask ETH Address?
On Metamask, your ETH address and WETH address are the same so yes, you can send WETH to your Metamask ETH address.
Metamask provides only one default wallet address to be used across all the different blockchains you add to your wallet. For instance, your Metamask BEP-20 wallet address is the same as your ERC-20 wallet address, MATIC wallet address, and so on.
Wrapping Up
Wrapped Ether, also known as WETH is the wrapped version of the native Ether token. It holds the same value as ETH and as an ERC-20 token, WETH allows you to trade ETH for other ERC-20 tokens, purchase NFTs on platforms like Opensea, provide liquidity on various liquidity pools, and more.
There are a few ways to add the WETH token to your Metamask wallet and this depends on the network you intend to use WETH on. The token is currently available on several blockchains and some of these chains are compatible with Metamask.
You can add WETH to your Metamask wallet on the Ethereum network by simply selecting the Ethereum Mainnet as the default network on your wallet. After that, click on [import tokens] at the bottom of the page, search for WETH then add the token to your wallet.
On other networks like Polygon, and the Binance Smart Chain, you first need to copy the correct contract for WETH on the network you intend to add the token to.
Once you have the correct contract address, head over to your Metamask wallet and select your network of choice then add WETH to your wallet that network using the contract address you copied.
And that’s about it. If you were searching for a tutorial on how to add WETH to your Metamask wallet, we hope you found this guide helpful.
Related Guides:
- How To Transfer Crypto From Coinbase To Metamask
- How To Add Rinkeby Network To Metamask Easily
- How To Transfer USDC From Metamask To Binance
- How To Connect Metamask To Etherscan
Share this post on social!
Jay Wilkins
Jay is a former freelance crypto writer who now heads up guides for IsItCrypto.com. He is also a contributor to some top publications in the crypto space. When he’s not cranking up some crypto-related guides for our readers, he’s probably trying to find the next moonshot tokens and NFTs.View Author posts
Add weth to metamask polygon

To see your Polygon ETH balance, simply click on the «Token» field. To see your transaction history, click on the «ERC-20 Token Txns» tab.
How do I add a Polygon layer to my MetaMask?
The trick here is when you click on the Ethereum symbol you can switch to different network options. Select Polygon Matic: Then the MetaMask will open up, click Approve and then select Switch network: So automatically we switched from the Ethereum network to the Polygon network!
Is ETH on Polygon WETH?
They confirmed that ETH exists as wETH on Polygon and MetaMask browser extension does not support bridging currently.
How do you get Matic on WETH?
First, you need to connect your Metamask with the Matic mainnet where you have to wrap eth (WETH) on a polygon network. Now you go to sushi.com and then select the token option because you want to convert it into Matic. Now select WETH token.
Can MetaMask hold Polygon?
Adding Polygon to your Metamask
To use Polygon, you first need to add it to your Metamask wallet. 1). Open the extension and click the “Ethereum Mainnet” button on the top.
How do I add a Polygon Matic network to MetaMask?
This is how you can add the Polygon network to the MetaMask wallet. In MetaMask mobile application, Go to Settings -> Networks -> Add Network. Then, copy-paste the Polygon network details. Now, you can send and receive MATIC on your MetaMask wallet and access dApps.
Does MetaMask support Polygon network?
Once you’ve added the information click on Save. You will be directly switched to Polygon’s Mainnet now in the network dropdown list. You can now close the dialog. You have successfully added Polygon Network to your Metamask!
Does MetaMask accept WETH?
To add WETH, click on the MetaMask extension and click the Add Token button at the bottom of the window. Type WETH into the Add Tokens search box. You should see Wrapped Ether (WETH) show up as an option. After confirming, you should see WETH appear in your item list on the MetaMask extension.
Can you transfer WETH?
You can easily convert ETH into WETH through a process known as wrapping. You can also convert WETH back into ETH at any time. Both wrapping and unwrapping follow a 1:1 ratio, meaning there are no extra costs apart from transaction fees.
Why is Aave going down?
The AAVE price decline has coincided with the overall fading demand of its network. A good way to look at this is to consider the total value locked (TVL) performance in the platform. According to DeFi Llama, the TVL in Aave has collapsed to about $11.71 billion.
Is Aave an erc20?
The AAVE token is an ERC-20 compatible token with the addition of a snapshot feature (used in governance balance tracking) and integrates EIP 2612 permit function, allowing gas-less transactions and one transaction approval/transfer.

Thumbnail
Uploaded videosSign in to YouTube Studio.From the left menu, select Content.Select a video by clicking its thumbnail.Under “Thumbnail”, select Upload .

Graphql
How do you define mutation in GraphQL?Is GraphQL faster than REST?What should GraphQL mutation return?How do you pass variables in GraphiQL?How do yo.

File
To locate the File ID, right-click on the name of the file, choose the Get Shareable Link option, and turn on Link Sharing if needed. You will see the.
Как добавить weth в metamask polygon
Чтобы добавить токен WETH (Wrapped Ether) в Metamask, вам потребуется адрес контракта токена. Адрес контракта можно найти на сайте Etherscan.io. Обратите внимание, что перед добавлением нового токена нужно тщательно проверить адрес контракта, чтобы избежать потери средств из-за ошибки или мошенничества.
Вот как добавить токен WETH в Metamask:
- Откройте приложение Metamask и войдите в свой аккаунт.
- Нажмите на кнопку «Add Token» (Добавить токен) внизу списка ваших токенов.
- В открывшемся окне выберите вкладку «Custom Token» (Пользовательский токен).
- В поле «Token Contract Address» (Адрес контракта токена) вставьте адрес контракта токена WETH, который вы можете найти на Etherscan.io.
- После вставки адреса контракта, остальные поля («Token Symbol» и «Decimals of Precision») должны заполниться автоматически.
- Нажмите на кнопку «Next» (Далее), затем проверьте информацию о токене и нажмите «Add Tokens» (Добавить токены).
Теперь WETH должен быть виден в списке ваших токенов в Metamask. Если вы отправите WETH на свой адрес в Metamask, они будут отображаться здесь.
Как обменять токен WETH на ETH в Metamask
Обменять токен WETH (Wrapped Ether) на ETH (Ethereum) можно с помощью функции «Swap» в Metamask. Это делается следующим образом:
- Откройте Metamask и выберите нужный вам кошелек.
- Нажмите на кнопку «Swap» в главном окне кошелька Metamask.
- В открывшемся окне выберите WETH в поле «From» (Откуда) и ETH в поле «To» (Куда). Введите сумму, которую вы хотите обменять.
- Нажмите на кнопку «Get Quotes» (Получить котировки). Metamask теперь будет искать лучшие цены для вашего обмена через различные децентрализованные биржи (такие как Uniswap, SushiSwap, и др.).
- Когда цены будут найдены, выберите лучший вариант и нажмите «Swap».
- Подтвердите транзакцию. Вам потребуется заплатить комиссию за газ для выполнения транзакции.
После подтверждения транзакции и ее майнинга в сети Ethereum, вы получите ваши ETH.
Обратите внимание, что комиссии за газ могут быть высокими в зависимости от текущей загруженности сети Ethereum. Используйте функцию «Swap» с умом и учтите все возможные комиссии.
Адрес контракта токена WETH в Metamask
Адрес контракта для Wrapped Ether (WETH) может быть различным в зависимости от сети, в которой вы работаете. Однако, если вы работаете в основной сети Ethereum (Ethereum Mainnet), общепринятым адресом контракта для WETH является:
0xC02aaA39b223FE8D0A0e5C4F27eAD9083C756Cc2 Этот адрес вы можете использовать для добавления WETH в свой кошелек Metamask. Не забудьте всегда дважды проверять адрес контракта на официальных ресурсах или на Etherscan перед тем, как производить какие-либо транзакции.
И помните, что вмешательство в транзакции с криптовалютами требует осторожности и понимания рисков.