Как узнать какие чипы памяти стоят в оперативной памяти?
в аиде и cpu z в разделе производитель DRAM указано Kingston, но они не делают своих чипов, так как узнать производителя?
Лучший ответ
Через Thaiphoon burner
—Профи (543) 2 месяца назад
тоже самое, указывает чипы Kingston
Blabla Bla Просветленный (22019) -, тогда нужно попробовать зайти на сайт кингстон и скачать пдф-документацию своей ОЗУ, сравнить серийный номер, узнать производителя чипов, если, конечно, сам кингстон делится такой информацией
Остальные ответы
Посмотреть глазами.
—Профи (543) 2 месяца назад
посоветовал бы вам того же, мелкий шрифт прочитайте
Сергей Шелякин Искусственный Интеллект (209667) -, очки или лупа для этого есть.
Похожие вопросы
Ваш браузер устарел
Мы постоянно добавляем новый функционал в основной интерфейс проекта. К сожалению, старые браузеры не в состоянии качественно работать с современными программными продуктами. Для корректной работы используйте последние версии браузеров Chrome, Mozilla Firefox, Opera, Microsoft Edge или установите браузер Atom.
Как узнать производителя оперативной памяти на компьютере

Добрый день, уважаемые пользователи ПК.
Сегодня поговорим о том, как узнать производителя оперативной памяти на компьютере.
В некоторых случаях пользователям требуется установить наименование модели ОЗУ, подключенной к их компьютеру.
Разберем способы, как узнать, какая оперативная память стоит на компьютере или ноутбуке под управлением системы Windows. Узнаем полные характеристики ОЗУ и какой объем, частота, тип DDR3 или DDR4, имеет RAM.
Программы для определения модели ОЗУ
Наименование производителя ОЗУ и другие данные об установленном на компьютере модуле оперативной памяти, конечно, можно узнать, открыв крышку системного блока ПК и посмотрев информацию на самой планке оперативки. Но данный вариант подойдет не всем пользователям. Существует ли возможность узнать нужные данные, не вскрывая крышку?
К сожалению, встроенными инструментами Windows 7 это сделать никак не получится. Но, к счастью, существуют программы сторонних производителей, которые способны предоставить интересующую нас информацию. Давайте рассмотрим алгоритм определения марки ОЗУ при помощи различных приложений.
Через диспетчер задач
- Нажмите сочетание кнопок на клавиатуре Ctrl+Shift+Esc, чтобы запустить диспетчер задач.
- Перейдите во вкладку «Производительность» и в левом столбце нажмите на «Память«. С правой стороны вы увидите информацию об установленной оперативной памяти на компьютере или ноутбуке, такую как объем, скорость и тип. В моем случае, установлено 16 ГБ объема, тип DDR4 и скорость 2133 МГц.
Примечание: Обратите внимание, если установлена ОЗУ тип DDR3 (рис. ниже), то само слово будет написано в диспетчере устройств, а если тип DDR4, то будет без слово, как на рисунке ниже.
Способ через AIDA64
Одной из самых популярных программ для диагностики системы является AIDA64 (ранее известная как Everest). С её помощью можно узнать не только интересующую нас информацию, но и произвести комплексный анализ компонентов всего компьютера в целом.
- Запустив AIDA64, щелкните во вкладке «Меню» левой области окна по пункту «Системная плата».
- В правой части окна, которая является основной областью интерфейса программы, появляется набор элементов в виде иконок. Щелкайте по значку «SPD».
- В блоке «Описание устройства» отобразятся планки ОЗУ, подключенные к компьютеру. После выделения наименования конкретного элемента в нижней части окна появится подробная информация о нем. В частности, в блоке «Свойства модуля памяти» напротив параметра «Имя модуля» будут отображены данные о производителе и модели устройства.
Детальная информация о RAM
Подробную информацию как производитель, объем, скорость, номер детали, серийный номер, объем каждого модуля, тип, форм-фактор и все это через командную строку без сторонних программ.
Производитель ОЗУ
Запустите командную строку от имени администратора и введите ниже команду:
- wmic memorychip get devicelocator, manufacturer
- Смотрите столбец «Manufacturer«. В моем случае G-Skill производитель.
Номер детали
Запустите командную строку от имени администратора и введите команду:
- wmic memorychip get devicelocator, partnumber
- Столбец «PartNumber» покажет номер запчасти.
Серийный номер
Запустите CMD от имени админа и введите:
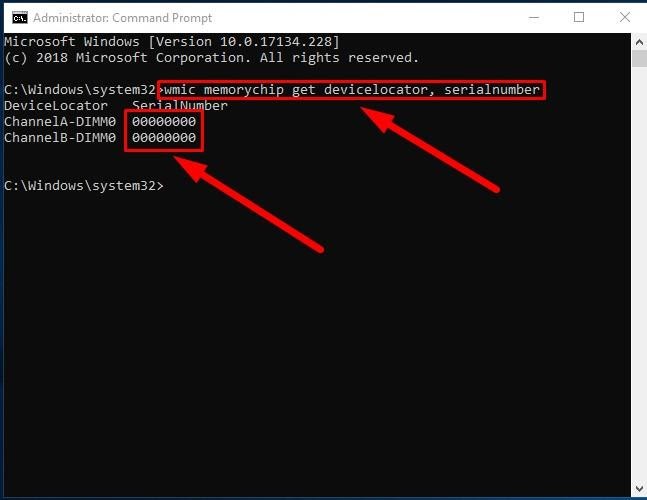
- wmic memorychip get devicelocator, serialnumber
- Графа «SerialNumber» покажет серийный номер.
Объем на планку
Запустите командную строку от имени админа и введите команду:
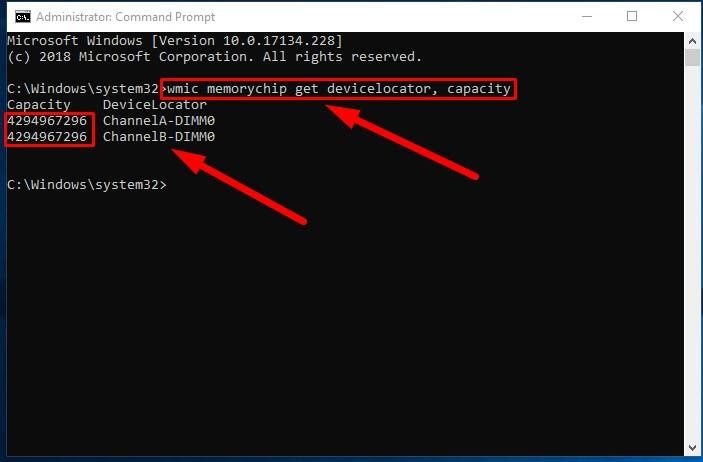
- wmic memorychip get devicelocator, capacity
- Столбец «Capacity» покажет емкость напланку.
Примечание: Цифры указаны в байтах, переводим их в ГБ для удобства. У меня стоит две планки по 8 Гб.
Общий объем
Откройте командную строку от имени админа и введите:
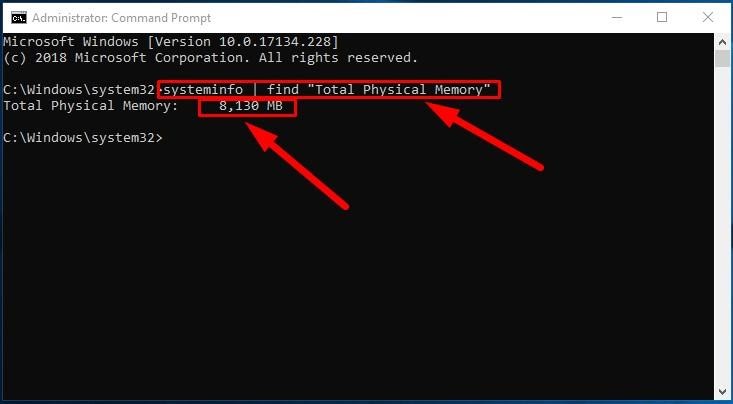
- systeminfo | findstr /C:»Total Physical Memory» (не всегда срабатывает из-за чипа).
- wmic ComputerSystem get TotalPhysicalMemory (если выше не работает).
Скорость
Откройте CMD от имени админа и введите:
- wmic memorychip get devicelocator, speed
- Столбик «Speed» отобразит скорость в МГц каждой планки.
Тип памяти
Отройте командную строку от имени администратора и введите ниже команду:
- wmic memorychip get devicelocator, memorytype
- В моем случае 0 неопределенно. Если будет 24, то тип памяти будет DDR3.
Значения для типов памяти
Способ через Speccy
Ещё одно приложение для диагностики системы, умеющее определять название модели ОЗУ, называется Speccy.
- Активируйте Speccy. Подождите пока программа выполнит сканирование и анализ операционной системы, а также подключенных к компьютеру устройств.
- После завершения анализа щелкайте по наименованию «Оперативная память».
- Откроется общая информация об ОЗУ. Чтобы посмотреть информацию о конкретном модуле, в блоке «SPD» щелкайте по номеру разъема, к которому подключена нужная планка.
- Появится информация о модуле. Напротив параметра «Изготовитель» будет указано наименование производителя, а напротив параметра «Номер компонента» — модель планки ОЗУ.
Мы выяснили, как при помощи различных программ можно узнать название производителя и модели модуля оперативной памяти компьютера в Windows. Выбор конкретного приложения не имеет принципиального значения и зависит только от личного предпочтения юзера.
How to Get Full RAM Specifications in Windows 10
Read this article to find out how to find specifications for the system memory installed on your computer, including information about its manufacturer, part number, serial number, effective speed, capacity, form factor, type etc.
Introduction
There are many scenarios when the ability of Windows 10 to supply specifications data on installed computer hardware may come in handy. Getting to know the detailed information on system memory (also known as random-access memory, or RAM) can sometimes be very useful in helping you to take the correct decision if any problems arise. For example, if a computer works slowly because it has to run memory-intensive applications or games, then adding more system memory may give it a considerable boost. Knowing certain peculiarities and required standards of the system memory can help you decide on the correct capacity, speed and brand of RAM to buy a piece of compatible hardware for an upgrade.
If you are having issues with system memory, knowing the information on its manufacturer, part number and serial number will help you to contact the tech support and solve the problem. At least, you will be able to find a memory module of the same type which, as you already know, is fully compatible with your PC. Besides, when you are configuring memory settings in the basic input / output system (BIOS) or in the unified extensible firmware interface (UEFI), a chance to have a look at memory information can help you to understand if a particular configuration was applied correctly.
Whatever might be your reasons, Windows 10 can provide you with all the information you may need; what is more, it saves you the trouble of having to open the computer case or install third-party tools, which may trigger a conflict of interest or cause compatibility issues.
In this tutorial, we will try to show you how to find specifications for the system memory installed on your computer, including information about its manufacturer, part number, serial number, effective speed, capacity, form factor, type etc.
A brief note: Despite the fact that Windows 10 lets users see detailed information on the system memory in their devices, some data may be unavailable due to peculiarities of specific hardware.
How to get detailed information on system memory with the command prompt console
If you suspect that Task Manager displays inaccurate or wrong information on your RAM specifications, or if you need to learn more detailed data such as serial number, part number, manufacturer etc on every memory module, Windows 10 is here to help you find all that information by using a certain set of system commands.
To start searching and find specific data on memory modules installed on your desktop PC or laptop, you need to use the functions of the command prompt with administrator rights in Windows 10. There are a few ways to open the Command Prompt application, the rich functionality of which we are going to explore today.
Click the Search button, shaped as a magnifying glass and located on the Taskbar next to the Start button, and open the search panel. There, type command prompt or cmd. The Best match section will show you the app you are looking for. Right-click on it and select Run as administrator from the context menu.

Identify the manufacturer
Here is what you do to identify the manufacturer company (brand or trademark) that produced the RAM modules installed on your PC.
Open the Command Prompt with administrator rights using the way you prefer.
To find out the manufacturer’s name, type the following command and press the Enter key (make sure there are no quotation marks):
wmic memorychip get devicelocator, manufacturer
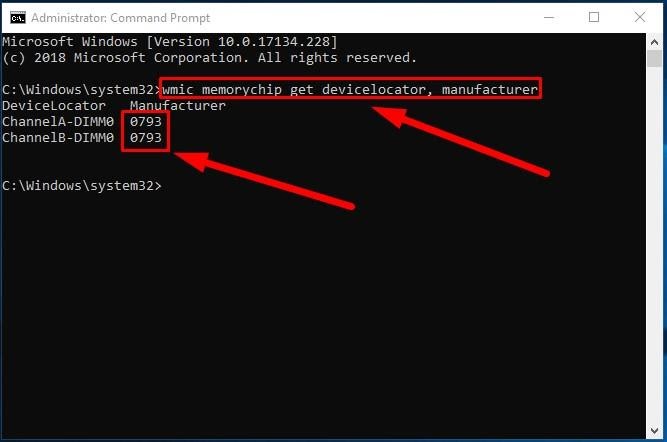
Read the RAM module manufacturer name under the column Manufacturer.
Identify the part number
To find data on the part number that the manufacturer assigned to a specific RAM module, here’s a simple sequence of steps to take.
Use any method you prefer to open the command prompt console with extended rights.
In the window that appear, type the command to run (without quotation marks) and press the Enter key.
wmic memorychip get devicelocator, partnumber

Under the column PartNumber you will see the product identifier you are looking for.
Note: If the speed of data processing and overall performance of your computer is decreasing, upgrading your RAM modules might be one of the best way to solve the issue. Using modern memory sticks, you can add high-quality components to your machine, with a pleasant bonus of higher bandwidth and advanced settings at an affordable price.
Check the serial number of your memory module
Take these steps to find out the serial numbers for every memory stick currently installed in your computer:
Open Command Prompt with administrator rights using any way you prefer.
In the corresponding line, type the command for identification of RAM serial number (make sure there are no quotation marks) and hit the Enter key to begin.
wmic memorychip get devicelocator, serialnumber
Hint: In the command for identification of the serial number, you can replace the part devicelocator by banklabel to see the serial number of the physical label of the bank where the memory is installed on the motherboard.

The result will be displayed in the Command Prompt window under the column SerialNumber.
Identify RAM capacity
In Windows 10 you can use a variable set of commands to find out total capacity for every RAM module, and for the entire system memory.
Discover capacity of each RAM module
To learn capacity of each memory stick in your configuration, take a few steps.
Open Command Prompt with administrator rights, using any method you prefer.
In the program’s window, type the following command for displaying the memory capacity, and then press the Enter key to run it (make sure the command doesn’t contain any quotation marks).
wmic memorychip get devicelocator, capacity
The total capacity of RAM installed on your computer will be shown under the column Capacity.
Note: The memory module capacity is represented in bytes, so to understand the figure properly you need to convert it into gigabytes (divide the value shown in the Command Prompt window by 1073741824, which is how many bytes are there in one gigabyte).
Displaying total amount of RAM
In addition, you can quickly learn the total size of system memory on your computer by taking another sequence of simple steps.
Open Command Prompt with administrator rights.
When the corresponding window opens, type the following command to see the total system memory size installed on your computer with Windows 10, and press the Enter key to run the command (remove any quotation marks).
systeminfo | find “Total Physical Memory”
Note: If the total memory size is not displayed, try a similar command:
systeminfo | findstr /C:”Total Physical Memory”
With every command, make sure there are no quotation marks.
The total size of physical system memory (in megabytes) available on this computer will be shown in the corresponding line.
Check RAM speed
To find out the speed that the memory modules are operating at, here are the steps to use:
Open the Command Prompt console with administrator rights in any way you prefer.
Type the command to determine the RAM speed and press Enter on your keyboard (make sure there are no quotation marks):
wmic memorychip get devicelocator, speed
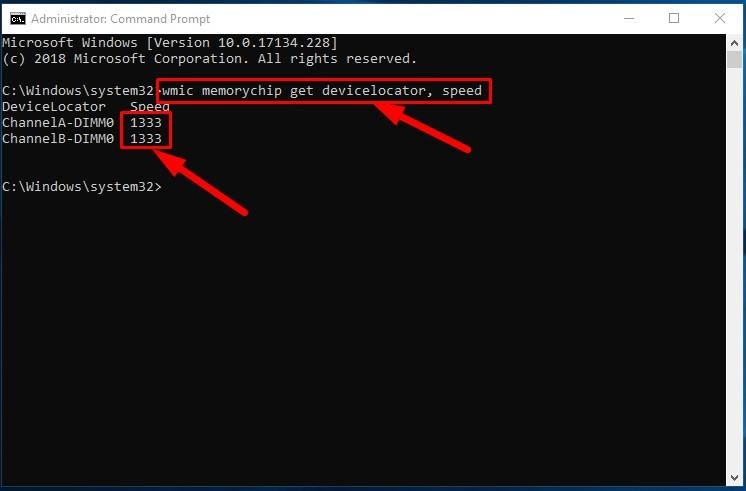
In the corresponding Speed column, the program will display the speed of your memory modules (in MHz).
Check RAM type
To check the system memory type (generation) in Windows 10, take these steps:
Open Command Prompt with administrator rights, using any method you prefer.
In the corresponding line, type the following command to determine the memory type and press Enter on your keyboard (make sure there are no quotation marks):
wmic memorychip get devicelocator, memorytype
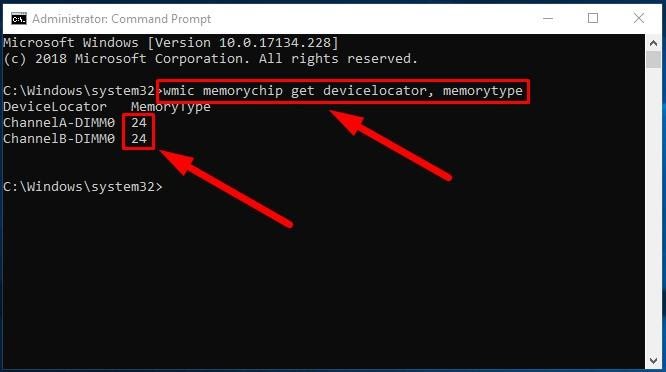
The MemoryType column will contain a digit from zero to twenty-five that denotes a certain memory type. For example, if you see 24 in the column, it means this computer is using DDR3memory modules.
Also, you may see zeroes in the MemoryType column: it means the Windows system tool wmic.exe cannot identify the memory generation properly (it may happen if you’re using DDR4 modules), as such values are not provided in the specifications.
The comprehensive list of supported memory types
- 0: Unknown.
- 1: Other.
- 2: DRAM.
- 3: Synchronous DRAM
- 4: Cache DRAM.
- 5: EDO.
- 6: EDRAM.
- 7: VRAM.
- 8: SRAM.
- 9: RAM.
- 10: ROM.
- 11: Flash.
- 12: EEPROM.
- 13: FEPROM.
- 14: EPROM.
- 15: CDRAM.
- 16: 3DRAM.
- 17: SDRAM.
- 18: SGRAM.
- 19: RDRAM.
- 20: DDR.
- 21: DDR2.
- 22: DDR2 FB-DIMM.
- 24: DDR3.
- 25: FBD2.
Check RAM form factor
The word “form factor” (standard size) suggests certain standard dimensions of a memory module which also includes additional characteristics such as the module shape. By form factor, there are twenty-five types of system memory. However, the two most widespread categories are DIMM and SODIMM.
To find out if your RAM sticks are DIMM or SODIMM, follow these steps:
Use your preferred method to open Command Prompt with administrator rights.
In the window Administrator: Command Prompt, type the following command to identify the memory form factor and press the Enter key (make sure there are no quotation marks):
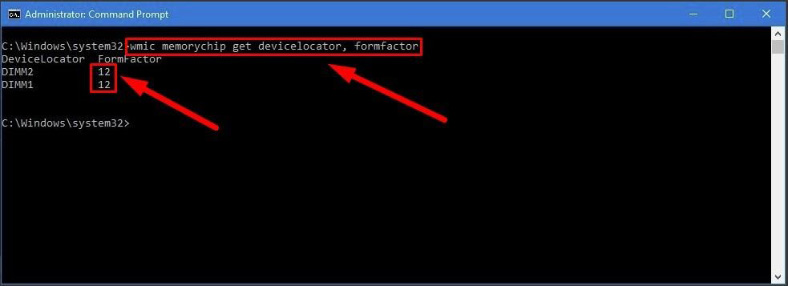
wmic memorychip get devicelocator, formfactor
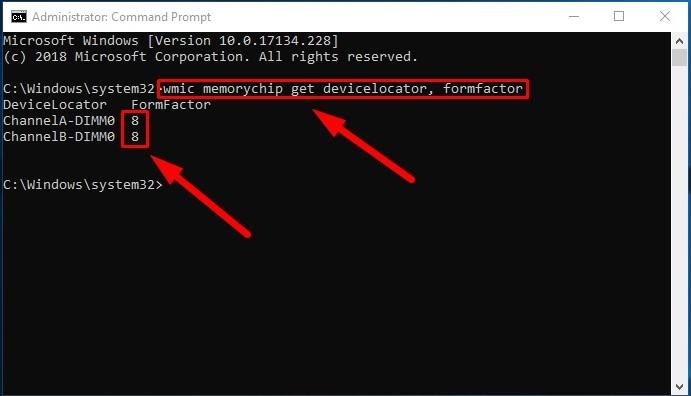
If the result in the FormFactor column is 8, then your computer is using DIMM modules (the default option for desktop computers). Otherwise, if the command displays the number 12, then your computer is using SODIMM modules (the typical choice for laptops).
The comprehensive list of supported memory form factors
Here is the list of form factors that this command can identify:
- 0: Unknown.
- 1: Other.
- 2: SIP.
- 3: DIP.
- 4: ZIP.
- 5: SOJ
- 6: Proprietary.
- 7: SIMM.
- 8: DIMM.
- 9: TSOP.
- 10: PGA.
- 11: RIMM.
- 12: SODIMM.
- 13: SRIMM.
- 14: SMD.
- 15: SSMP.
- 16: QFP.
- 17: TQFP.
- 18: SOIC.
- 19: LCC.
- 20: PLCC.
- 21: BGA.
- 22: FPBGA.
- 23: LGA.
- 24: FB-DIMM.
Displaying all RAM details
The commands described above allow you to identify the most important data about memory modules. However, if you want to find all the information, here’s what you do:
Open Command Prompt with administrator rights in any way you prefer.
In the corresponding line, type the following command to display all memory details and press Enter to run it (don’t forget to remove any quotation marks):
wmic memorychip list full
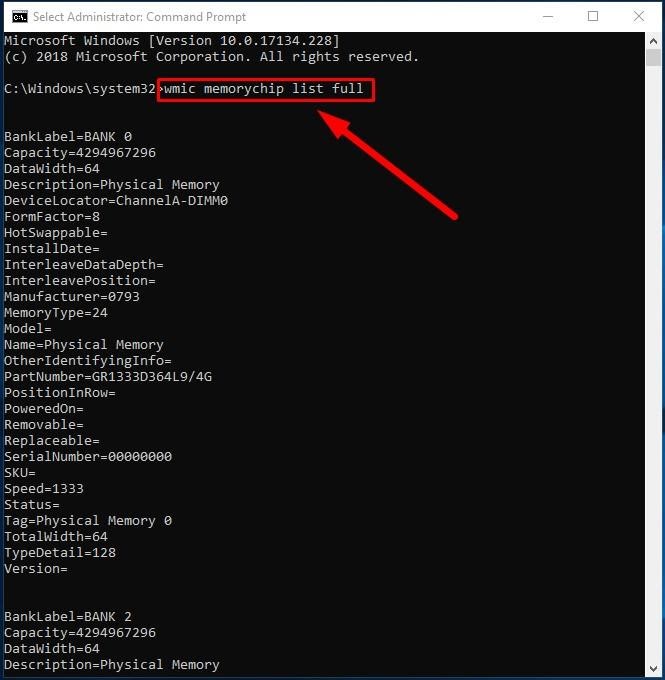
View all the available information for each RAM module installed on your computer.
(Optional) if the list of data is too big and you don’t actually need all that stuff, type the following command to view only the necessary things and press Enter (everything should be typed into one line; remember to remove the quotation marks):
wmic memorychip get devicelocator, manufacturer, partnumber, serialnumber, capacity, speed, memorytype, formfactor

Now you can view the memory information you prefer.
Conclusion
Using the steps described in this article, you’ll get an impressive amount of data on the RAM modules installed on your computer. These hints will come in handy when troubleshooting PC issues, tweaking configuration (e.g. when overclocking), or when you’re planning to upgrade your system memory to improve overall computer performance.
See the full article with all additional video tutorials
Как узнать производителя чипов оперативной памяти с помощью командной строки или сторонних программ


Здравствуйте, друзья. В большинстве современных ноутбуков для установки ОЗУ предусмотрены два слота, один из которых в новых устройствах остаётся пустым. Чтобы увеличить производительность ПК, пользователь может добавить память самостоятельно. При этом она должна быть точно такой же, что и первая, вплоть до фирмы, которая её изготовила (это в идеале). Объём, тип и частоту ОЗУ легко увидеть на ПК, например, в «Диспетчере устройств», во вкладке «Производительность». Сегодня я расскажу на своём сайте itswat.ru , как узнать производителя чипов оперативной памяти, используемой в вашей машине. Способ с разбором ПК, изъятием ОЗУ и просмотром наклейки я описывать не буду. Давайте вместе попробуем добиться желаемого более простым путём.
- Читайте также: Чем отличаются типы оперативной памяти — DDR, DDR2, DDR3 или DDR4 и как узнать, какой из них стоит на ноутбуке >>>
Содержание показать
Командную строку
В системе эти сведения тоже есть, хотя и выудить их не так-то просто. Нам поможет командная строка, которую нужно запустить от имени администратора. Как нельзя лучше подходит команда wmic memorychip get devicelocator, — если написать только её, то никакого результата мы не получим. После запятой нужно будет дописать значение, зависящее от того, что мы хотим узнать:
- Производителя – manufacturer – после нажатия Enter командная строка расскажет, кто изготовил вашу ОЗУ (смотрите пример на фото, там в слоты установлена память разных производителей – это не критично, если остальные параметры идентичны). Ещё один момент, если на ноутбуке ОЗУ встроенная, а не съёмная, то её производитель, скорее всего, не определится.

- Маркировку – partnumber – нужное значение найдётся под соответствующей строкой.

- Серийный номер – serialnumber – такая информация тоже иногда может быть полезной.

Друзья, мы сегодня сделали акцент на изготовителя, но для общей информации добавлю, что если к команде wmic memorychip get devicelocator, прибавить capacity, то командная строка расскажет про объём ОЗУ, speed – про скорость, memorytype – про тип. Ещё можно напечатать команду wmic memorychip list full – результатом станет табличка с подробными сведениями.

Утилиты
Гораздо проще воспользоваться специальной программой, предназначенной для определения чипов оперативной памяти и не только, которых полно в интернете. Расскажу о самых популярных, а в скобках буду оставлять ссылки для безопасного скачивания на официальных ресурсах.
Aida64
Первая утилита в моём списке достойных — Aida64 ( https://www.aida64russia.com/Скачать ). Скачайте, установите и давайте научимся пользоваться:
- Запустите «Аиду», в левой её части найдите каталог «Системная плата» и раскройте его содержимое, нажав на треугольник рядом.
- Вся нужная информация – о производителе, серийном номере и так далее, отыщется в разделе SPD.

У Aida64 есть только один недостаток – она платная, но ссылка, приведённая мной выше, поможет вам скачать бесплатную пробную версию, которой вполне хватит для разового использования.
- Читайте также: Как узнать, какая ОЗУ стоит на компьютере через сведения о системе и программу Аида64 >>>
CPU-Z
CPU-Z – ещё один достойный продукт, о котором хочется вам поведать. Если честно, то мне он нравится дальше больше, чем «Аида». CPU-Z выигрывает тем, что не требует установки – нужно просто скачать архив, распаковать его и запустить файл.exe нужной разрядности ( https://www.cpuid.com/downloads/cpu-z/cpu-z_1.92-en.zip ).

Сразу после запуска покажет всё, что вам нужно:
- Во вкладке Memory – тип, объём и скорость.

- Во вкладке SPD – производителя, модель, серию, партию и другое. Чтобы посмотреть параметры каждой ОЗУ, переключайтесь между слотами, для чего в программе предусмотрен выпадающий список.

HWiNFO
Ещё одна утилита, альтернативная предыдущим двум – это HWiNFO. Она англоязычна, но зато бесплатна ( https://www.hwinfo.com/download/ ), а также имеет портативные версии. Алгоритм использования HWiNFO следующий:
- Скачали, запустили, нажмите на кнопку RUN.

- Чуть-чуть подождали и получили подробный отчёт.

Программы нужно скачивать и устанавливать, они займут некое пространство на ПК, но зато без лишних проблем отобразят всю необходимую информацию об оперативной памяти. Командная строка же всегда под рукой, но чтобы ей пользоваться, нужно знать команды и уметь их набирать. Можно, конечно, скопировать из этой статьи, но горячие клавиши Ctrl+C и Ctrl+v в cmd не работают. Если будете копировать, то вызывайте контекстное меню правым щелчком мыши. Друзья, выбирайте свой способ, а если возникнут сложности – пишите в комментариях, обязательно помогу всем. До свидания.