Installation guide S19, S19j, S19j Pro, S19 Pro, T19
S19, S19j, S19j Pro, S19 Pro, and T19 firmware packages can only be installed on the Series 19 single-deck Xilinx control board. Beagle Bone boards are already supported. Double-decked boards are not supported until further notice. The Amlogic control boards are under development now.
Please let your ASICs run through the entire autotuning process after the firmware installation, which may take up to 2 hours. This will allow any pre-existing errors to be rectified and improve your farm performance.
Prerequisites
An SD card of up to 32 GB is required.
Installation steps:
Download one of the following archives depending on the control board version (19 or 17):
- S19 — S19, 76 chips, 95Th
- S19x88 — S19, 88 chips, 87Th
After the necessary archive is downloaded, do the following steps:
1. Format an SD card to FAT32 with MBR (Master Boot Record) partition scheme.
2. Unzip the downloaded file and copy its content to the MicroSD card. There are files in the root folder. Fill them, and ASIC will connect to Hiveon OS after flashing:
- FARM_HASH — in this file, insert FARM_HASH from the farm settings
- HIVE_HOST_URL — insert the API server, if it is essential to replace it. If the file is empty, the standard server is used (api.hiveos.farm)
3. Turn off your ASIC.
4. Insert the SD into the control board’s slot.
5. Turn on your ASIC.
6. Wait for the autotuning to be done. Allow your ASICs to undergo the autotuning process, which might take up to 2 hours. Refrain from interfering and keep the devices powered on to ensure a successful error-free operation.
For information on how to link your ASIC to the Hiveon OS account, see How to bind ASIC miner to the farm.
Firmware update via ASIC web
If a firmware is already installed on the SD card, and the ASIC is running, you can download the WEB upgrade firmware. Next, select this file on the update tab in ASIC web. Thus, it will not be necessary to overwrite the firmware on the SD card if it was previously installed.
Note: The older versions of Hiveon Firmware of the S19/T19 series might require reselecting the file. The first reboot prepares the Micro SD card file system, and the second reboot upgrades the firmware on the micro SD card.

Control board identification
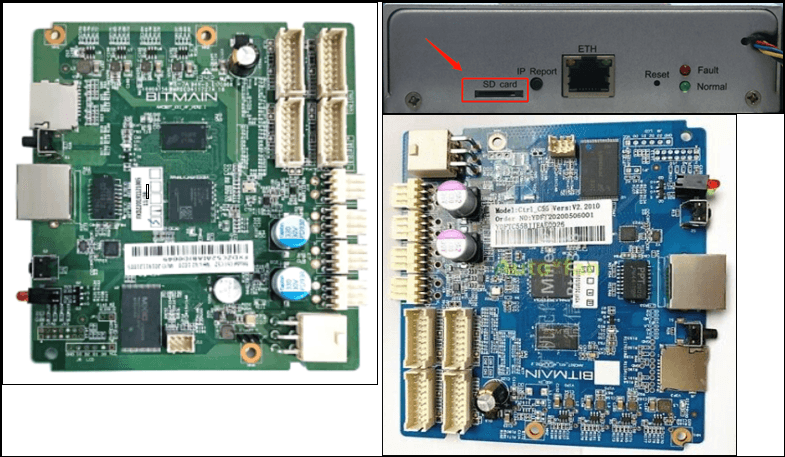
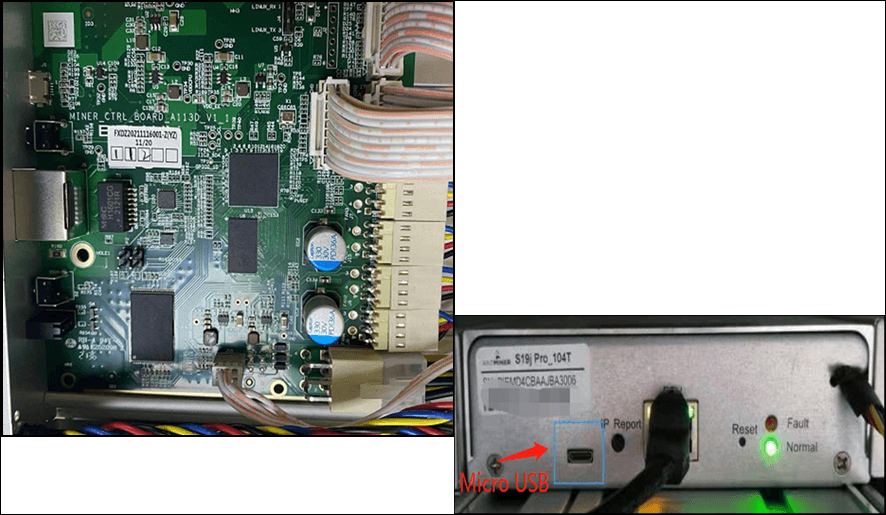
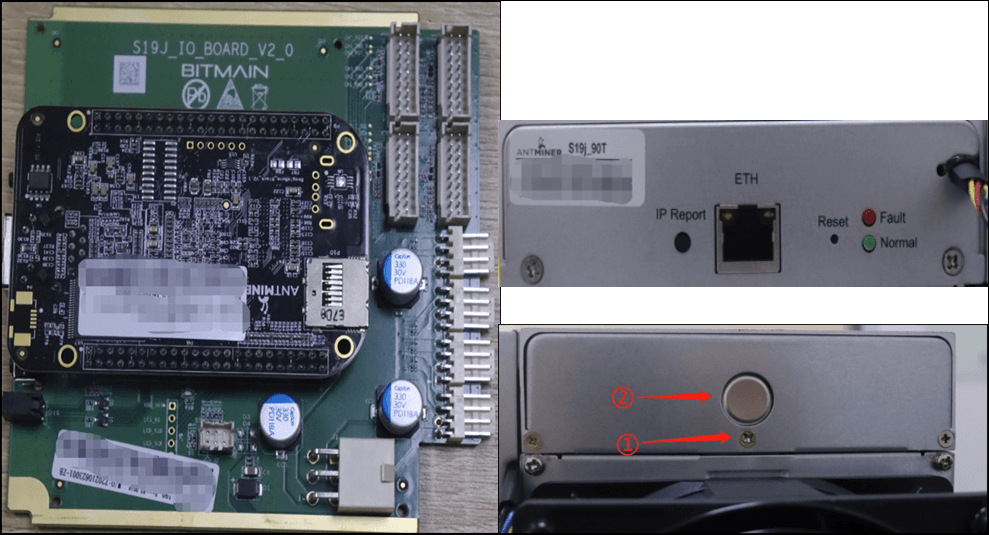
Antminer 19 series (e.g. Antminer S19j, S19j Pro) can be produced on three different control boards: Xilinx 7007, BeagleBone (BB) and Amlogic. For each type of control board, only the firmware created specifically for this board is suitable.
The images below will help you to undersatnd which control board you have.
Xilinx (model 7007 with SD slot)
Amlogic (model A113D with microUSB)
Beagle Bone (+ IO board, SD card)
Updating a firmware version
If you use one of the previous versions of Hiveon OS for your ASIC miners or GPU rigs, you need to first update them to a compatible firmware.

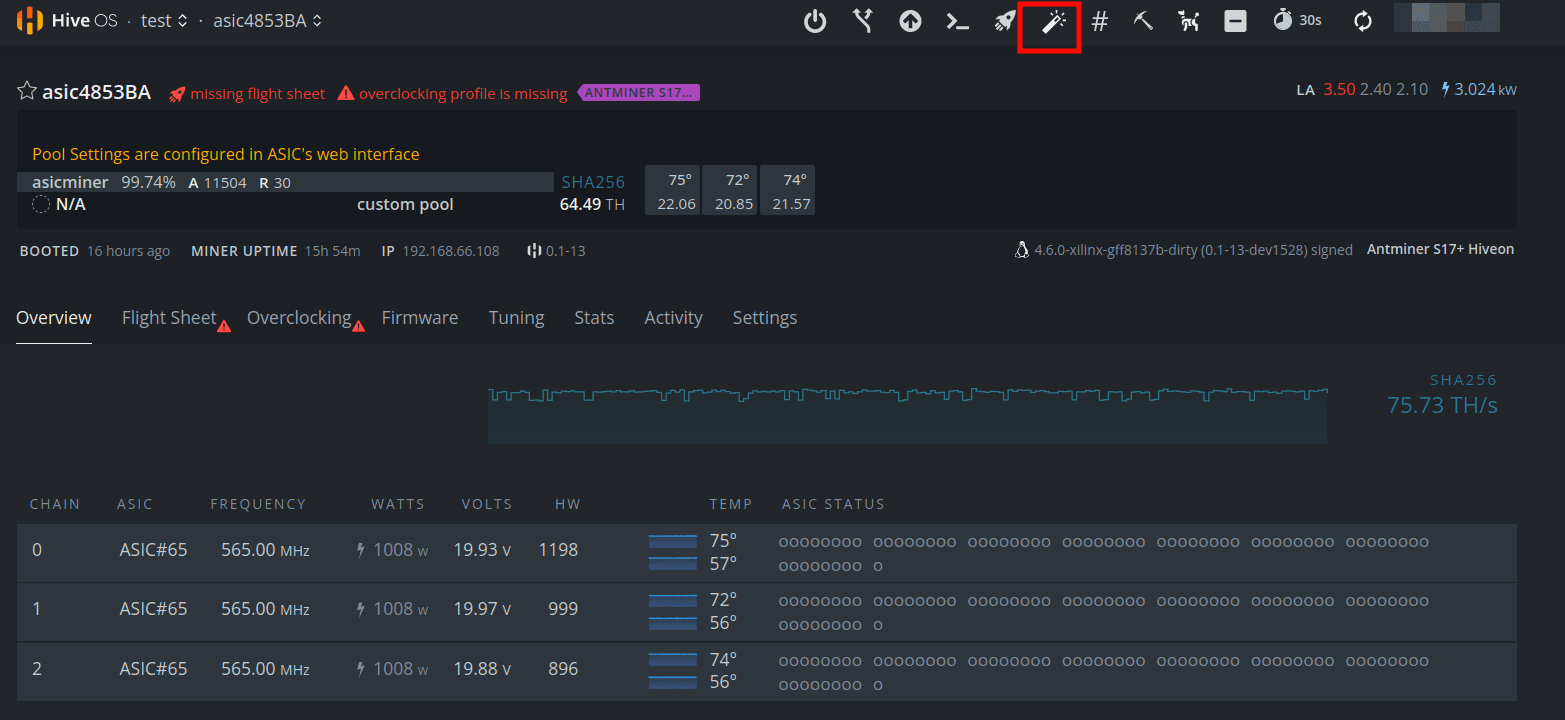
For ASIC miner — click the icon located on the ASIC control panel of the miner.
For GPU rig — click Switch next to the OS version.
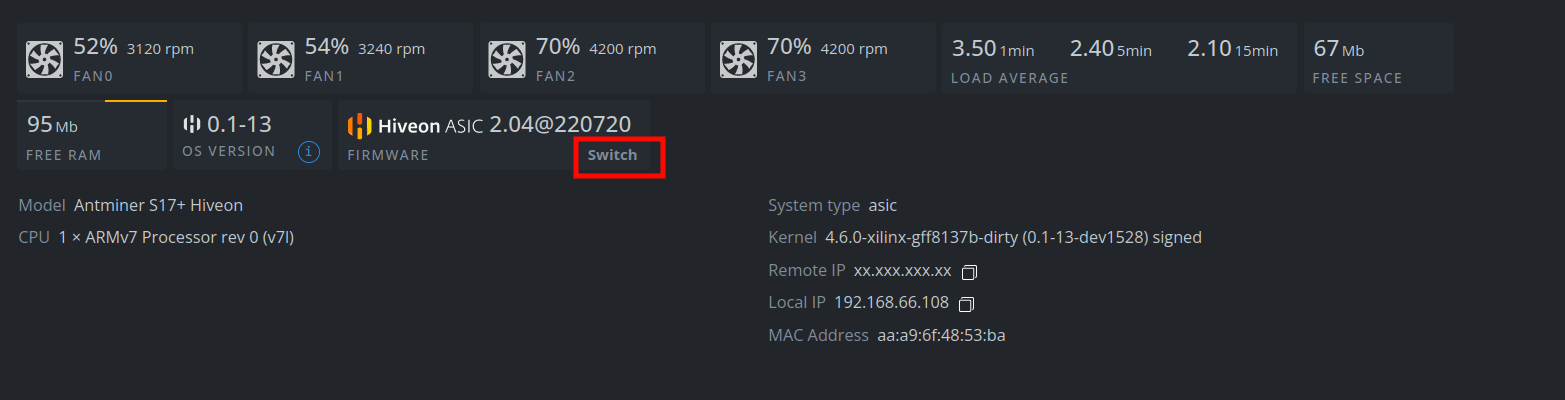
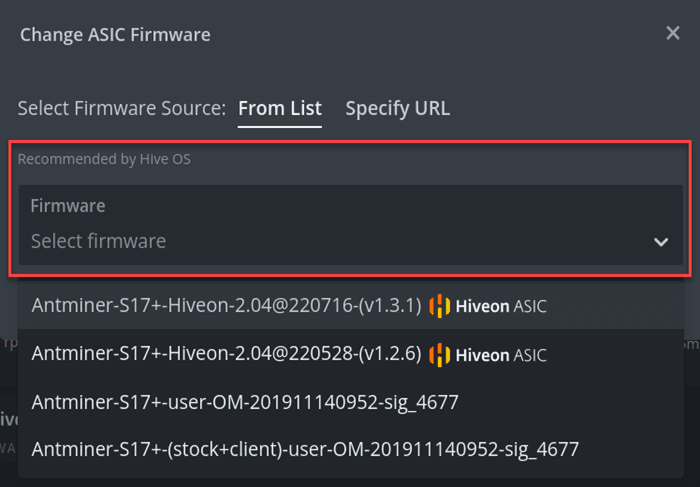
In the displayed window, click on the Select firmware drop-down list and select the desired firmware version. Then, click Apply.
Formatting a microSD card
Firmware for the Antminer series 19 contains a file that is called by the template ForEtcher-Antminer-….img.
To minimize efforts for microSD card formatting, it is available to write the file with the help of the BalenaEtcher application.

1. From http://download.hiveos.farm/asic/, download an archive with the necessary firmware version. An archive is marked with a special icon for better recognition.
2. Run the BalenaEtcher application.
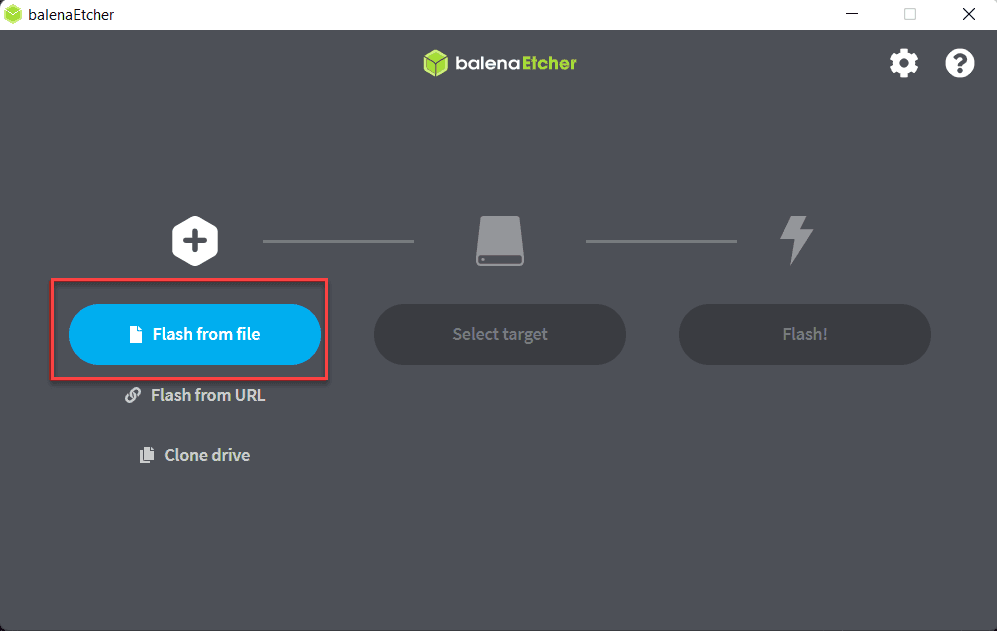
3. In the BalenaEtcher application, click Flash from the file and select the ASIC firmware archive that you have downloaded.
4. Insert a microSD card of less or equal to 32GB into your computer.
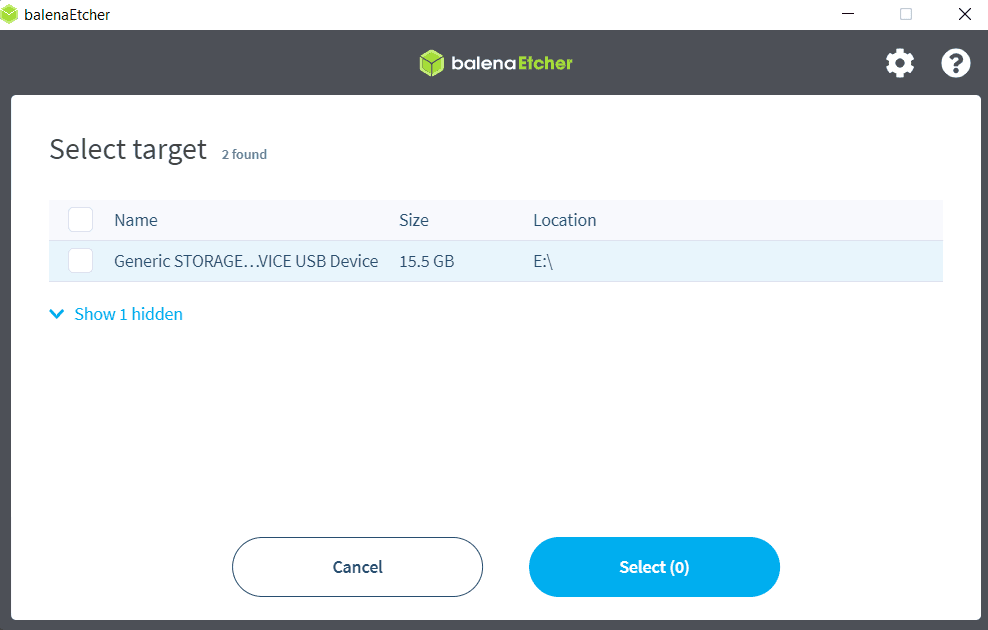
5. In the BalenaEtcher application, click Select target and choose your microSD card.
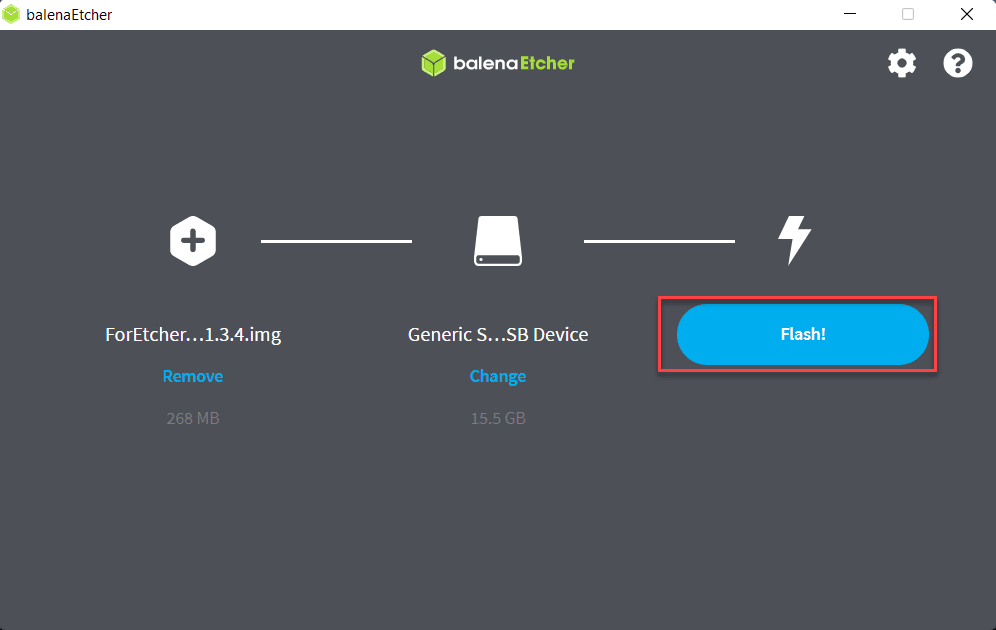
6. Click Flash.
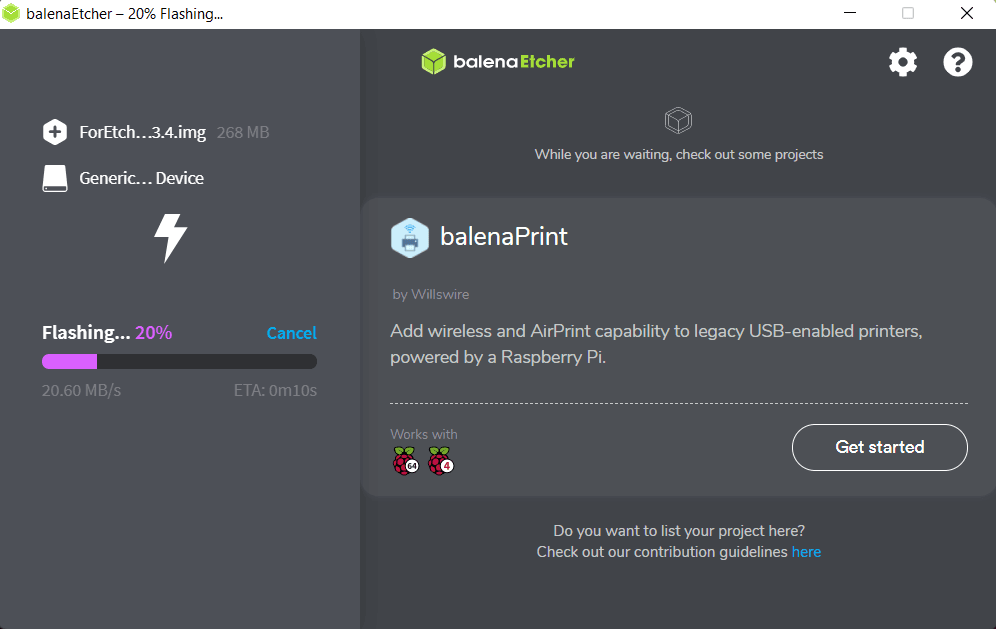
The writing process has started.
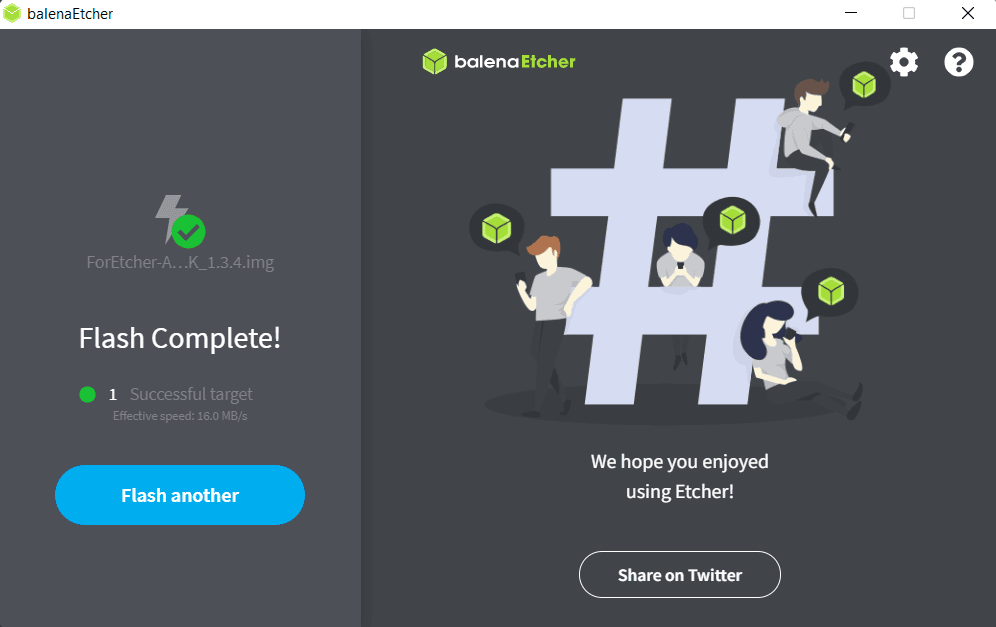
When the writing process is finished, you can eject the microSD card.
Now you can insert the microSD into the turned-off ASIC miner, and then, turn the ASIC miner on.
Installation guide S9 (S9i, S9j)
While current cryptocurrency prices keep wildly fluctuating, miners need any advantage they can get in order to stay on top of their game and keep making profits. With that in mind we set out to make something that will give them that advantage and decided to bring some love to our ASIC users by introducing Hiveon ASIC.
What is it and how it works
If we were to describe it in a nutshell, then Hiveon ASIC is a custom firmware that boosts an ASIC’s performance by increasing its output by approximately 1TH/s while staying at the same power consumption level. It allows the ASIC to get approximately 16.3–16.4TH/s on a standard power supply or up to 19TH/s on custom more “beefy” power supplies. Though this power consumption optimisation works only with pools that have implemented support for AsicBoost, a patent-pending technology that lowers power consumption while letting you maintain the same hashrate.
That’s a significant boost, but how is it achieved? Unlike the stock firmware, where you click and mine right away, Hiveon ASIC sets the frequency to each chip individually rather than a single value across all chips simultaneously. It controls the frequency of each chip allowing you to lower the frequencies on “bad” chips, and raise them on the “good” ones. This way you’re getting more hashrate with less consumption in watts enabling the chips to live longer without wearing them out as fast.
The chip tuning is as simple as choose a profile from a preset list with the desired power consumption level that gives you an approximation of the expected hashrate. Then the autotune script initiates and begins fine tuning each chip individually, checking for potential chip errors, checks optimal load, etc. This can easily take up to half an hour or more until the script finds the ideal parameters for each chip. Our firmware includes a 2% devfee while you’ll still be getting higher profit than with the stock firmware.
Installation options
There are no one-size-fits-all instructions, instead we’re going to cover three scenarios of installing or updating your machines with Hiveon ASIC. The following topics will be covered:
- Installing using ASICs via web interface — suitable for installing on a handful of machines for users who haven’t used Hiveon OS before
- Bulk installation — suitable for installing unto entire farms
- Updating existing ASICs via Hiveon OS’s web interface — suitable for those who’re already using Hive with their ASICs
- Bulk updating existing ASICs — suitable for updating entire farms in a few clicks
Option 1: Installing using ASIC’s web interface
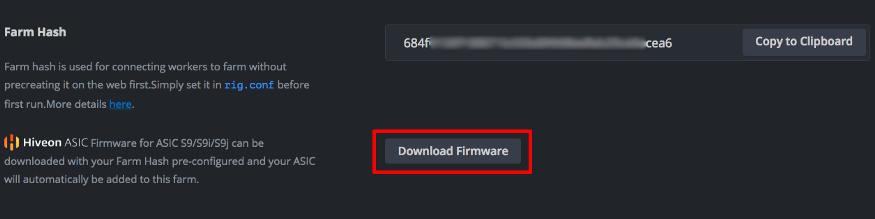
Go to your farm’s Settings tab, there you will see the Download Firmware button, click it to begin downloading the file locally.
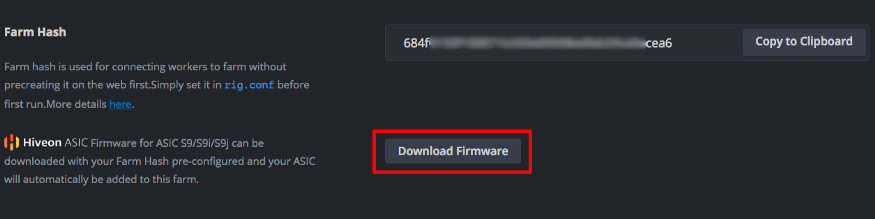
When your ASIC is powered up and assuming it’s on the same network with you, connect to it using a computer or a mobile device. Enter your miner’s IP address. Most miners come with DHCP enabled thus you do not have to manually set an IP address, for it. Instead look at the IP table on your router or use a scanning tool.
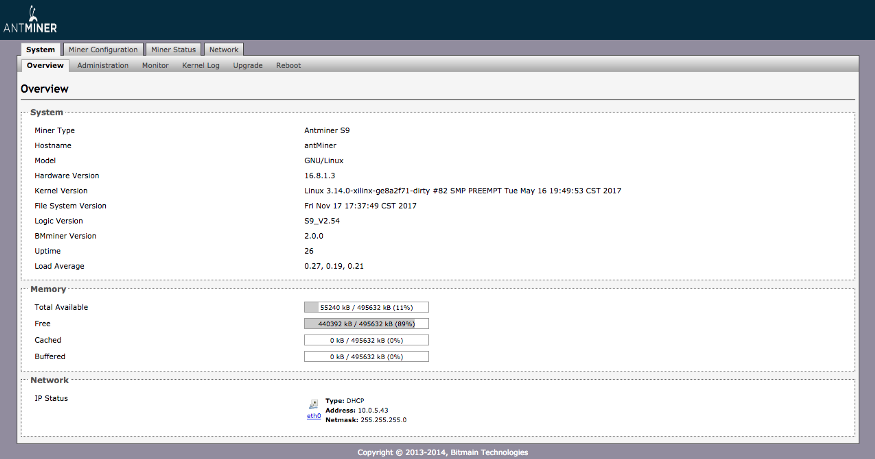
Log in into the miner. In our case we’re using an S9 as an example. The default username login is root and the password is root@. You’ll be logged in the system overview window. If this is your first time setting up an ASIC don’t forget change the password from the default in the Admin tab first.
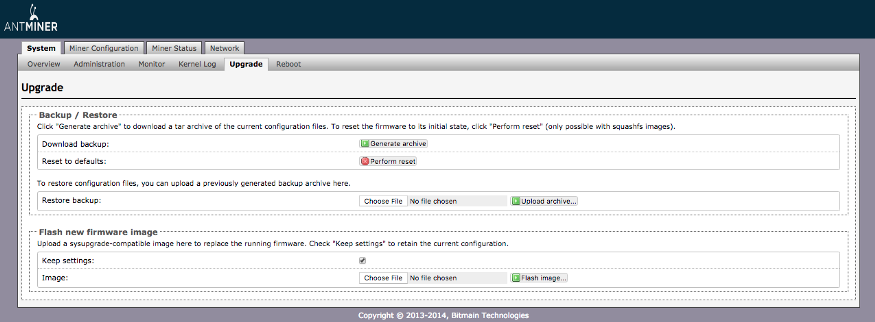
Go into the Upgrade tab, there you will see the Flash new firmware image section. Click the Choose File to choose the image you previously downloaded and then click the Flash image… button and wait for it to install. Now we’ll need to get your Farm Hash in the Hiveon OS web UI. Go to your farm’s Settings tab, there you will see your Farm Hash, copy it to clipboard.
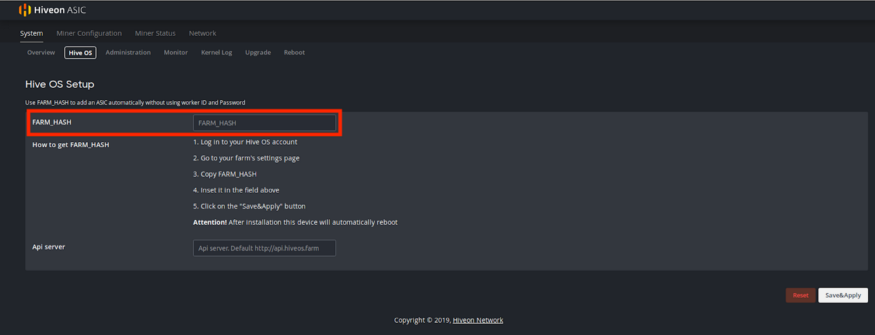
As soon as the ASIC was flashed and rebooted, reconnect to it and go to the Hiveon OS tab in the System window. Paste your Farm Hash in to the FARM_HASH field and click Save & Apply. Your ASIC will be added to your farm in Hiveon OS.
You’re done, now you can configure your ASIC.
Option 2: Bulk installation
To bulk install our firmware across multiple ASICs, you’ll need either a computer with Linux or a rig with Hiveon OS installed on it, that’s on the same network with your other ASIC machines. To install from a computer with Linux (or a rig running Hiveon OS), download the bulk install scripts first by running the following command:
apt-get install -y sshpass curl cd /tmp && curl -L — insecure -s -O https://raw.githubusercontent.com/minershive/hiveos-asic/master/hive/hive-asic-net-installer/download.sh && sh download.sh cd /tmp/hive-bulk-install
Once all the files are downloaded go to the /tmp/hive-bulk-install directory. You’ll need to add the ASICs’ IPs into ips.txt . If you know the list of IPs already then enter them one per line in ips.txt file. If the full list of IPs isn’t known to you, then you can scan your LAN and search for all Antminers using the following command:
ipscan.sh 192.168.0.1/24> ips.txt
Warning! The script will find all the ASICs in the network, not just S9, S9i, S9j, T9 or T9+. And you must not flash anything other than S9/T9 series with this firmware!
Now we’ll need to get your Farm Hash in the Hiveon OS web UI. Go to your farm’s Settings tab, there you will see the Download Firmware and copy the link. It will be pre-formatted to include your Farm Hash. For example:
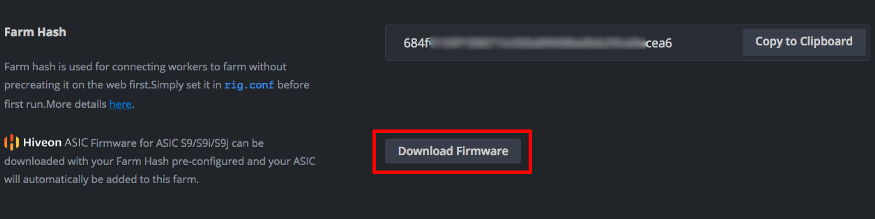
Enter this link in the config.txt file. It should look like this:
Once you’re done, run the firmware.sh script to install the custom firmware. The script will flash the ASICs from the IP list. ASICs that were already flashed with the custom firmware will be commented out in the list of the IPs. This is useful in case you need to suddenly stop the flashing procedure as this way the machines that got flashed already, will be excluded next time you run the script.
For more details regarding other ASIC installation options, please refer to this GitHub page.
Hiveon ASIC Auto tuner configuration
After installing the new firmware you can now login back into your ASIC miner. This time you’ll be greeted by the new Hiveon ASIC UI overview page. Lets look at Profiles and basic configs for the time being.
Attention! In order to use most of these options, you need to have a custom power supply connected to your ASIC. The factory PSU is not powerful enough to handle the load and your ASIC will turn off.
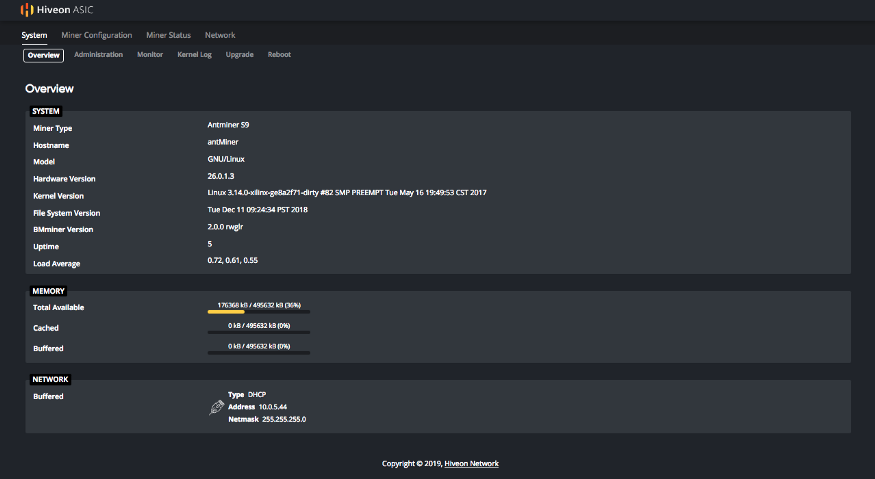
In order to choose the Profile you want, go to the Miner Configuration tab, then click the Auto tuner configuration tab. There you can choose the Profile that suits your needs best. A small disclaimer first: We don’t recommend choosing Manual mode unless you have sufficient skills in manually fine tuning an ASIC. We won’t be covering the manual procedure as this profile is too difficult to explain in a short comprehensive form.
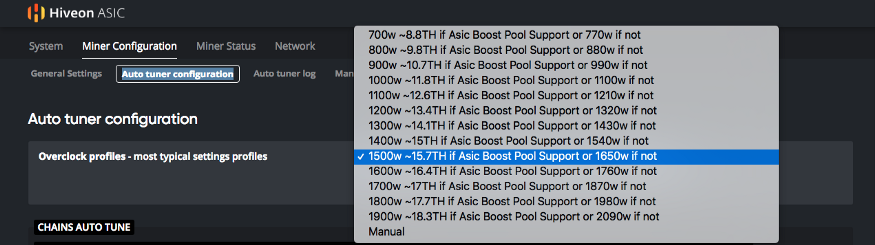
Then click the Apply Changes button at the bottom of the page and wait for the algorithm to finish auto tuning the ASIC. This may take up to an hour depending on the selected profile. Your hashrates may wildly fluctuate during the process — this is normal.
Updating options
Option 1: Updating using Hiveon OS’s web interface
Assuming you’re already using Hiveon OS with your ASICs, you’ll need to update them to the compatible firmware first. If your ASIC model is compatible, you’ll see a yellow Switch text near the OS version at the bottom of your worker Overview page.
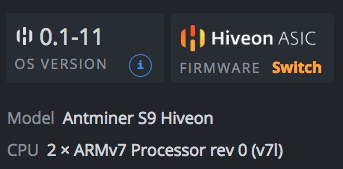
Click it and a new Change ASIC Firmware context window will pop-up. Then click the Select firmware dropdown list and choose the appropriate firmware version. In this example it’ll be the Antminer-S9-all-Hiveon. Click Apply.
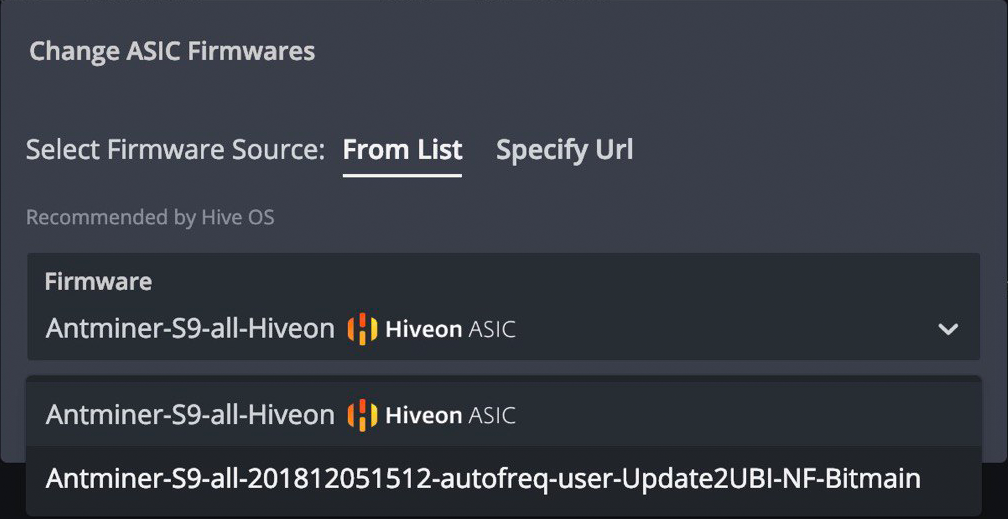
The ASIC will go offline and reboot, then it will re-appear as online shortly and it’s model name will change from Antminer S9 to Antminer S9 Hiveon (from T9 to T9 Hiveon accordingly). The firmware version will also change.
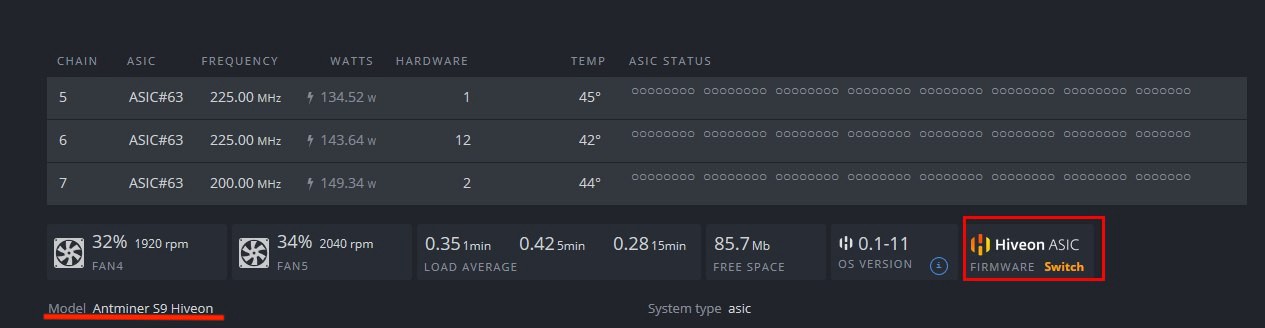
You’re done, now you can configure your ASIC using the auto tuner.
For more details regarding other ASIC installation options, please refer to this GitHub page.
Option 2: Bulk update
Assuming you’re already using Hiveon OS with your ASICs, you’ll need to update them to the compatible firmware first.
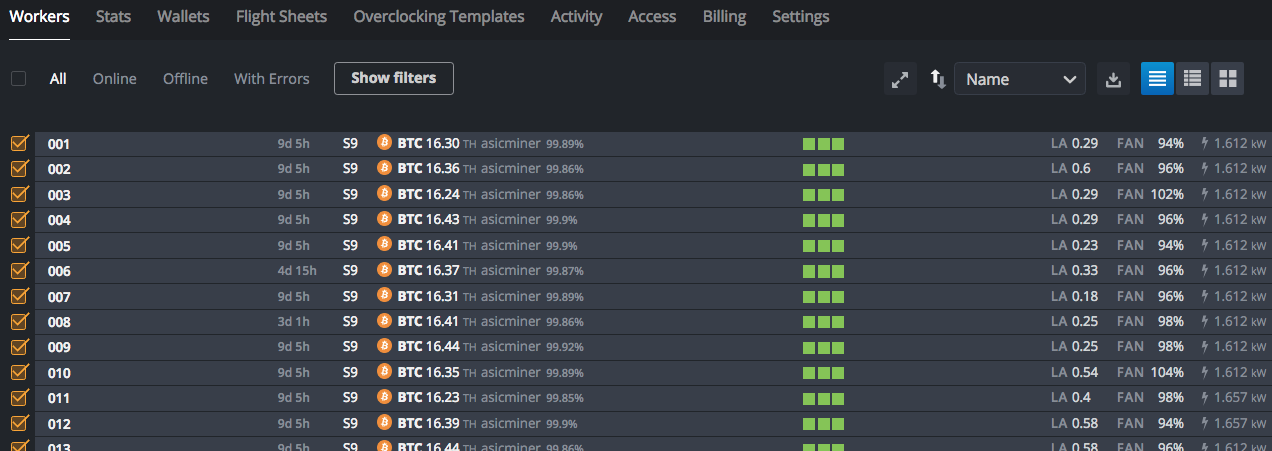
In the Workers tab, select the workers you want to update. You’ll see several actions appear in the top right corner of the screen.

Click the ASIC Firmware button and a new Change ASIC Firmware context window will pop-up. Then click the Select firmware dropdown list and choose the appropriate firmware version. In this example it’ll be the Antminer-S9-all-Hiveon. Click Apply.
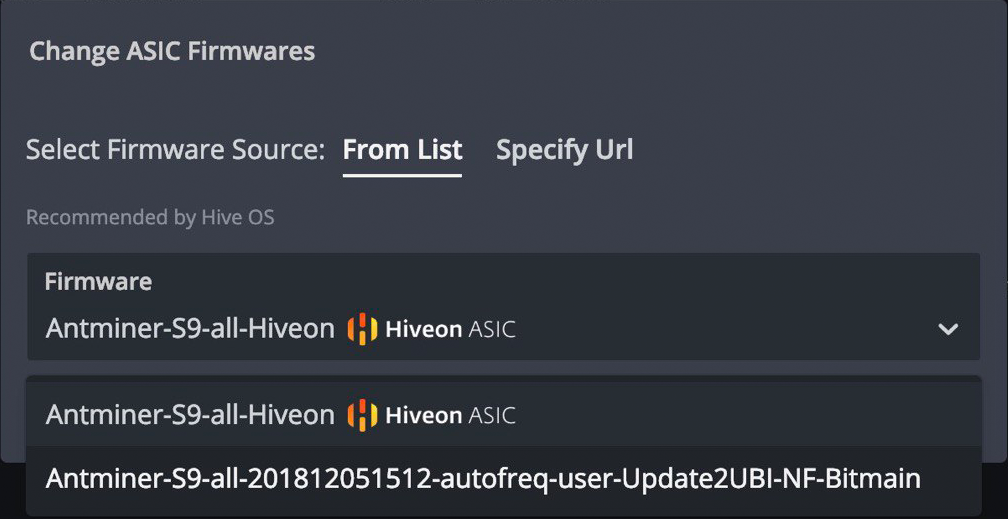
The ASICs will go offline and reboot, then they will re-appear as online shortly and their model names will change from Antminer S9 to Antminer S9 Hiveon (from T9 to T9 Hiveon accordingly). The firmware version will also change.
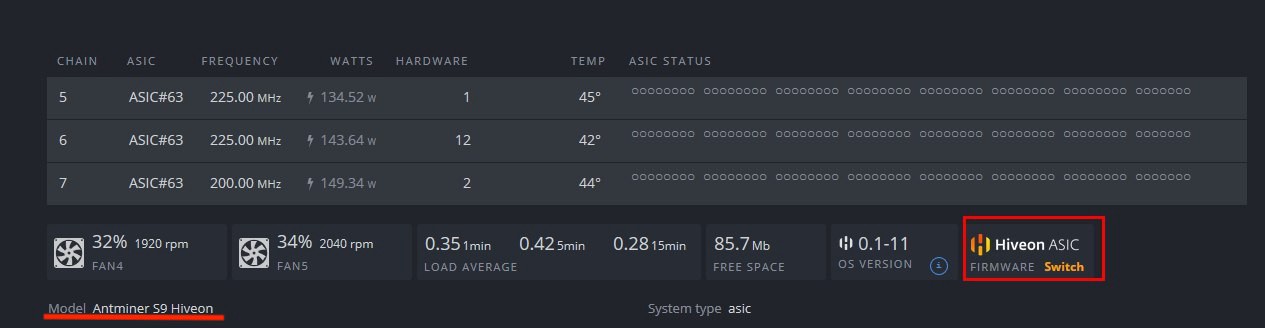
You’re done, now you can configure your ASIC using the auto tuner.
For more details regarding other ASIC installation options, please refer to this GitHub page.
Hiveon OS web UI Auto tuner configuration
Once your ASICs were successfully flashed, you can then set our pre-created auto tuning profiles. There you can choose the Profile that suits your needs best. A small disclaimer first: We don’t recommend choosing Manual mode unless you have sufficient skills in manually fine tuning an ASIC. We won’t be covering the manual procedure as this profile is too difficult to explain in a short comprehensive form.
Attention! In order to use most of these options, you need to have a custom power supply connected to your ASIC. The factory PSU is not powerful enough to handle the load and your ASIC will turn off.
In the Workers tab, select the workers you want to run the auto tuning script on.
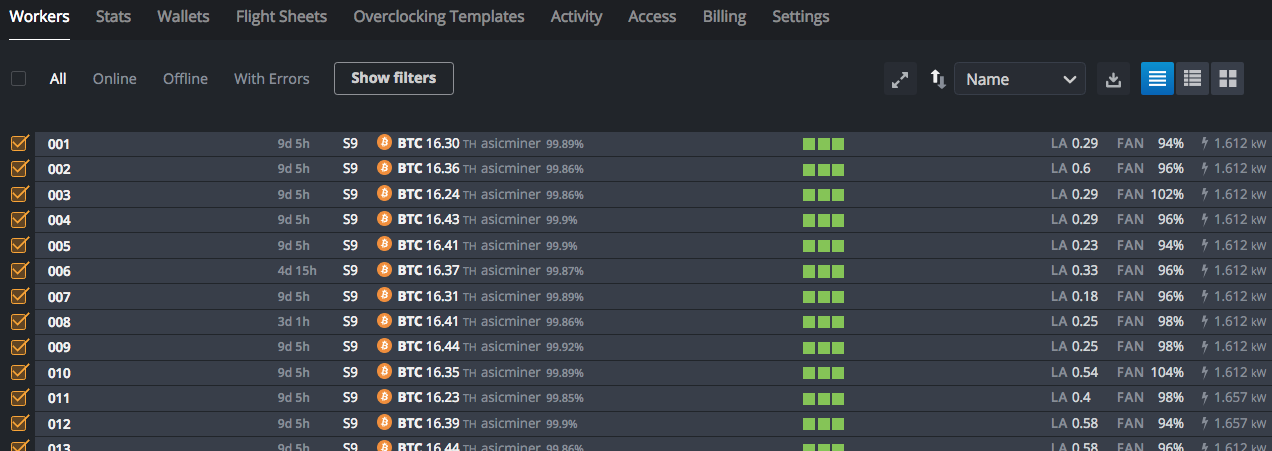
You’ll see several actions appear in the top right corner of the screen. Click the Overclocking button and a new context window will appear.

Select the profile you want then click the Apply Changes button at the bottom of the window and wait for the algorithm to finish auto tuning the ASIC. This may take up to an hour depending on the selected profile. Your hashrates may wildly fluctuate during the process — this is normal.
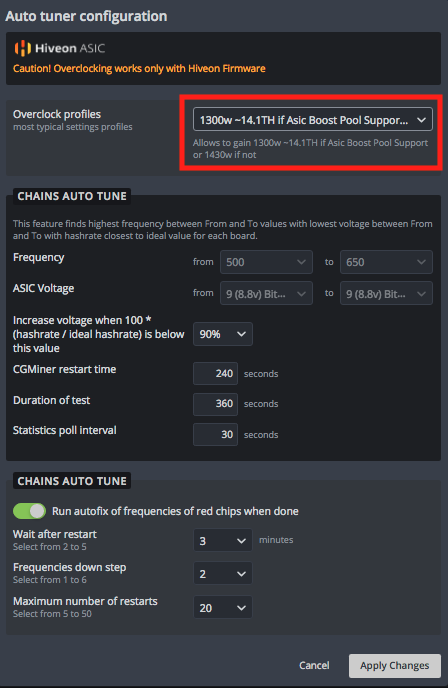
And you’re all done! Congratulations and happy mining!
ANTMINER S19jpro

▼ПОЛНАЯ ИНСТРУКЦИЯ от создания загрузочной microSD до настройки прошивки▼
1. Модель своего асика Вы уже выбрали, теперь нужно определить ВЕРСИЮ КОНТРОЛЬНОЙ ПЛАТЫ вашего асика (фото разных версий контрольных плат смотреть ниже . ). Выбираем архив с прошивкой BOOMBIT с версией вашей контрольной платы и СКАЧИВАЕМ. Далее обязательно СКАЧИВАЕМ инструмент для создания загрузочной microSD карты Balena Etcher.

2. Распаковываем zip архив с прошивкой BOOMBIT и распаковываем zip архив с программой Balena Etcher.
3. Далее нам понадобится microSD карта размером от(1Gb-16Gb), вставляем её в картридер.
4. Запускаем программу Balena Etcher, в ней выбираем распакованную прошивку BOOMBIT с форматом (.img) и выбираем свою microSD, жмём создать. Готово.
5. Далее выключаем асик, вставляем microSD карту (спереди[XILINX] либо сзади[BB] в зависимости от типа контрольной платы( XILINX или BB «BEAGLE BONE» ), карта microSD остаётся в асике.
6. Включаем асик, находим его ip через программу btctool, заходим (логин root пароль root), выбираем в прошивке пункт < Upgrade >и жмём кнопку < Perform reset >ГОТОВО
7. Далее настраиваем асик под свои параметры ( вписываем пул, воркер, и выставляем нужный вам разгон ), описание настройки самой прошивки ниже.
КАРТА microSD ОСТАЁТСЯ В АСИКЕ, ЕСЛИ ВЫНИТЬ КАРТУ microSD ТО АСИК ЗАПУСТИТСЯ НА РОДНОЙ ПРОШИВКЕ
• НЕ ВЛИЯЕТ НА ГАРАНТИЮ •
P.S — Прошивку для контрольной платы BB-(Beagle Bone) просто распаковываем и копируем все файлы на microSD карту. Карту нужно отформатировать в формат ( FAT32 )
ANTMINER S19_88chip

▼ПОЛНАЯ ИНСТРУКЦИЯ от создания загрузочной microSD до настройки прошивки▼
1. Модель своего асика Вы уже выбрали, теперь нужно определить ВЕРСИЮ КОНТРОЛЬНОЙ ПЛАТЫ вашего асика (фото разных версий контрольных плат смотреть ниже . ). Выбираем архив с прошивкой BOOMBIT с версией вашей контрольной платы и СКАЧИВАЕМ. Далее обязательно СКАЧИВАЕМ инструмент для создания загрузочной microSD карты Balena Etcher.
2. Распаковываем zip архив с прошивкой BOOMBIT и распаковываем zip архив с программой Balena Etcher.
3. Далее нам понадобится microSD карта размером от(1Gb-16Gb), вставляем её в картридер.
4. Запускаем программу Balena Etcher, в ней выбираем распакованную прошивку BOOMBIT с форматом (.img) и выбираем свою microSD, жмём создать. Готово.
5. Далее выключаем асик, вставляем microSD карту (спереди[XILINX] либо сзади[BB] в зависимости от типа контрольной платы( XILINX или BB «BEAGLE BONE» ), карта microSD остаётся в асике.
6. Включаем асик, находим его ip через программу btctool, заходим (логин root пароль root), выбираем в прошивке пункт < Upgrade >и жмём кнопку < Perform reset >ГОТОВО
7. Далее настраиваем асик под свои параметры ( вписываем пул, воркер, и выставляем нужный вам разгон ), описание настройки самой прошивки ниже.
КАРТА microSD ОСТАЁТСЯ В АСИКЕ, ЕСЛИ ВЫНИТЬ КАРТУ microSD ТО АСИК ЗАПУСТИТСЯ НА РОДНОЙ ПРОШИВКЕ
НЕ ВЛИЯЕТ НА ГАРАНТИЮ !