How To Add Ropsten Test Network To Metamask?

![]()
Getting started with creating a new Ropsten test network on Metamask; you must install the Metamask wallet on the PC or mobile phone.

For PC users, the wallet is available as an extension for Chrome browsers. Alternatively, it is available on mobile app stores for iOS or Android devices.
Create a new account by setting up a password and recovery phrase.
Afterward, you can log in to the Metamask wallet.
Open Chrome and click on Metamask from the extensions pinned on the navigation bar.
Once your Metamask wallet is opened, enter your password and tap UNLOCK to proceed into your Metamask wallet.
2. Add a new network

After tapping UNLOCK with your correct password, you can gain access to your Metamask wallet.
Now, proceed to add the Ropsten test network to your Metamask.
You can add the Ropsten test network by inputting its information manually.
To add a new Ropsten test network, click on the network drop-down box.
Select Add Network to input the information
3. Add the new Ropsten test network

After clicking ADD NETWORK, you can now input information to add the new Ropsten test network.
Alternatively, you can do this by going to the SETTINGS > Networks > Add Network
Now you can add the Ropsten test network to Metamask manually.
This includes its network name, RPC URL, chain ID, currency symbol, and explorer URL.
Copy and paste each value into its respective fields.
- Network Name: Ropsten Test Network
- New RPC URL: https://ropsten.infura.io/v3/
- Chain ID: 3
- Currency Symbol: ETH
- Blockchain Explorer URL: https://ropsten.etherscan.io
After completing the fields, tap save.
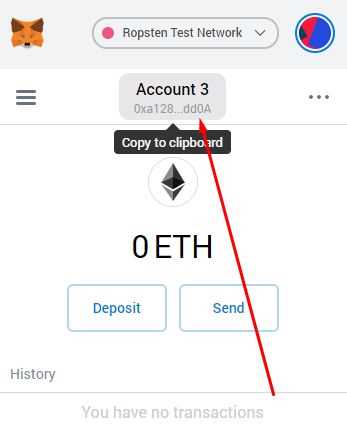
4. Receive Ropsten ETH

After tapping SAVE, you have successfully added Ropsten Test Network.
Your Metamask will automatically switch to the network.
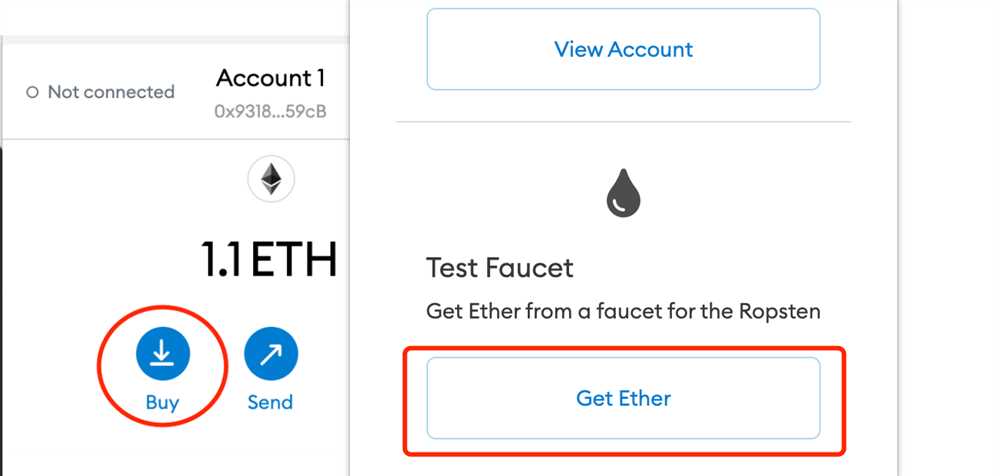
Afterward, you can now receive Ropsten Ethereum for free.
Here’s how to receive Ropsten Ethereum from your Metamask
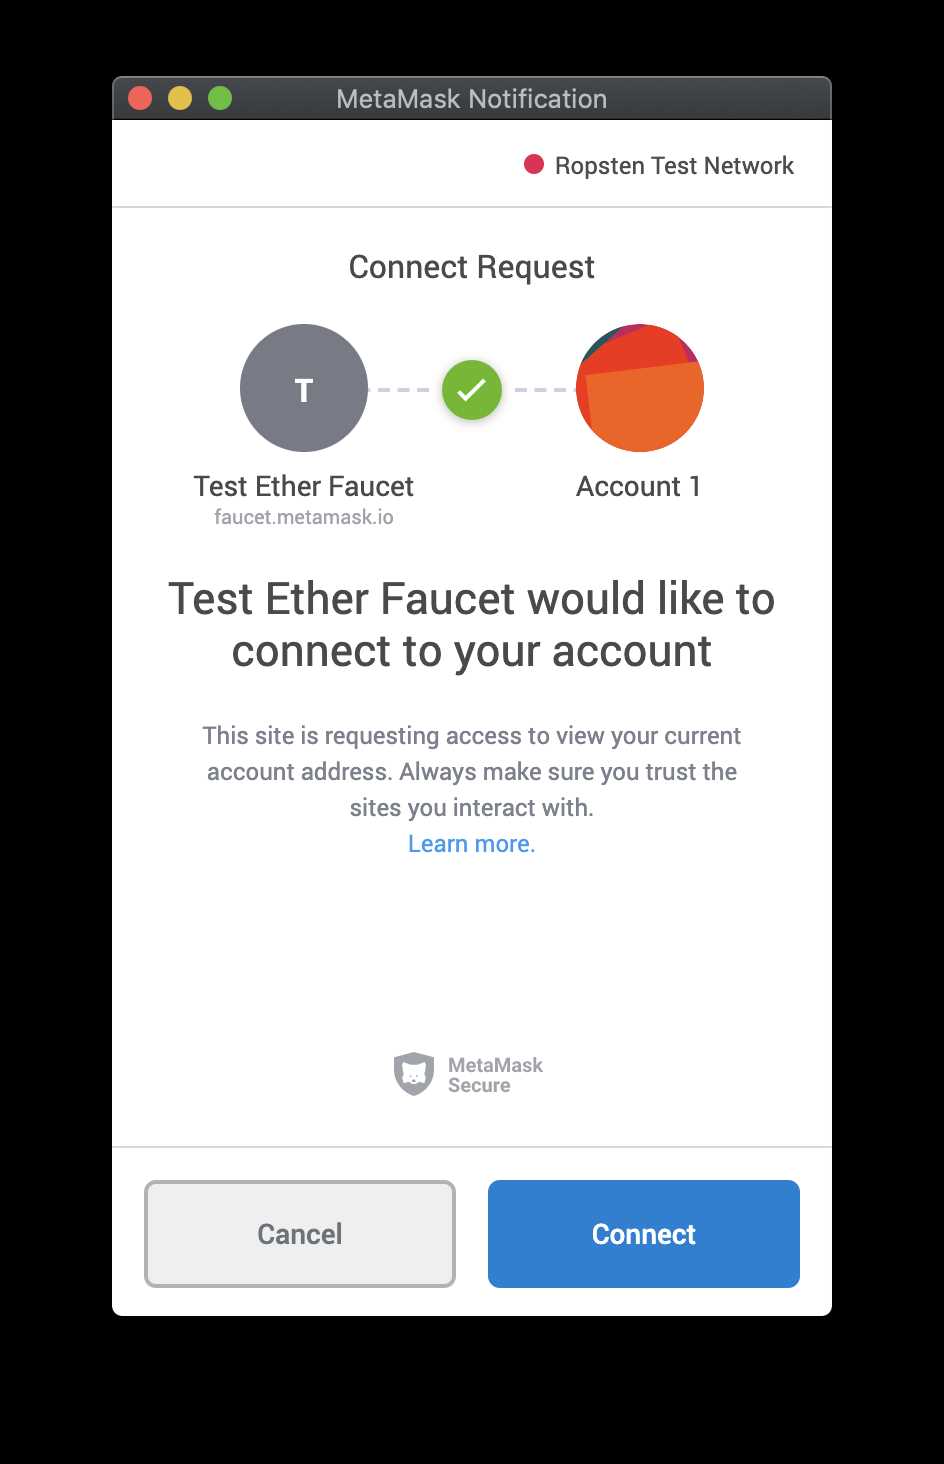
Open your dApp browser in Metamask. Then, you can get free Ropsten Ethereum by visiting the below faucets:
- https://faucet.metamask.io/
- https://faucet.ropsten.be/
- https://faucet.dimensions.network/
Request for Ropsten Ethereum by connecting or submitting your Ropsten Testnet wallet.
Now, you’ve successfully added a new Ropsten test network and also added Ropsten Ethereum.
Ropsten Testnet
- Network Name: Ropsten Test Network
- New RPC URL: https://ropsten.infura.io/v3/
- Chain ID: 3
- Currency Symbol: ETH
- Blockchain Explorer URL: https://ropsten.etherscan.io
Ethereum Mainnet
- Network Name: Ethereum Main Network
- New RPC URL: https://api.infura.io/vl/jsonrpc/mainnet
- Chain ID: 1
- Currency Symbol: ETH
- Blockchain Explorer URL: https://etherscan.io
Other Testnets
Kovan Testnet
- Network Name: Kovan Test Network
- New RPC URL: https://ropsten.infura.io/v3/
- Chain ID: 42
- Currency Symbol: ETH
- Blockchain Explorer URL: https://ropsten.etherscan.io
Rinkeby Testnet
- Network Name: Rinkeby Test Network
- New RPC URL: https://ropsten.infura.io/v3/
- Chain ID: 4
- Currency Symbol: ETH
- Blockchain Explorer URL: https://ropsten.etherscan.io
Goerli Testnet
- Network Name: Goerli Test Network
- New RPC URL: https://ropsten.infura.io/v3/
- Chain ID: 5
- Currency Symbol: ETH
- Blockchain Explorer URL: https://ropsten.etherscan.io
Conclusion
For blockchain developers, the Ropsten Testnet is an essential tool for developing applications on the Ethereum blockchain.
It allows blockchain development testing before launch on the Ethereum Mainnet.
Ropsten was launched in 2016, and it was succeeded by Rinkeby, Kovan, and Goerli.
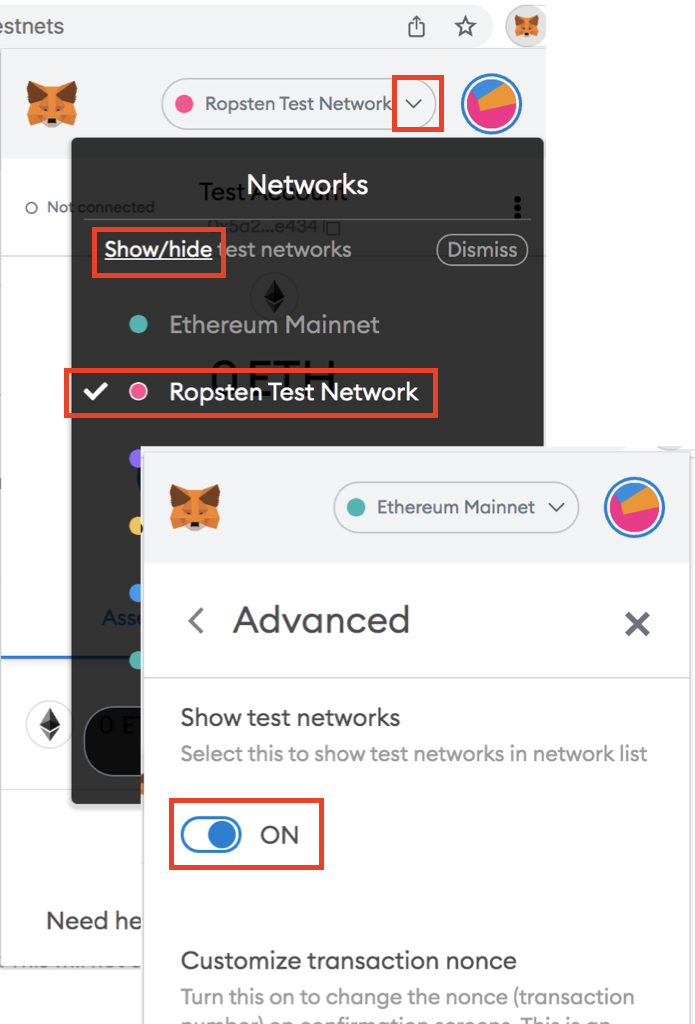
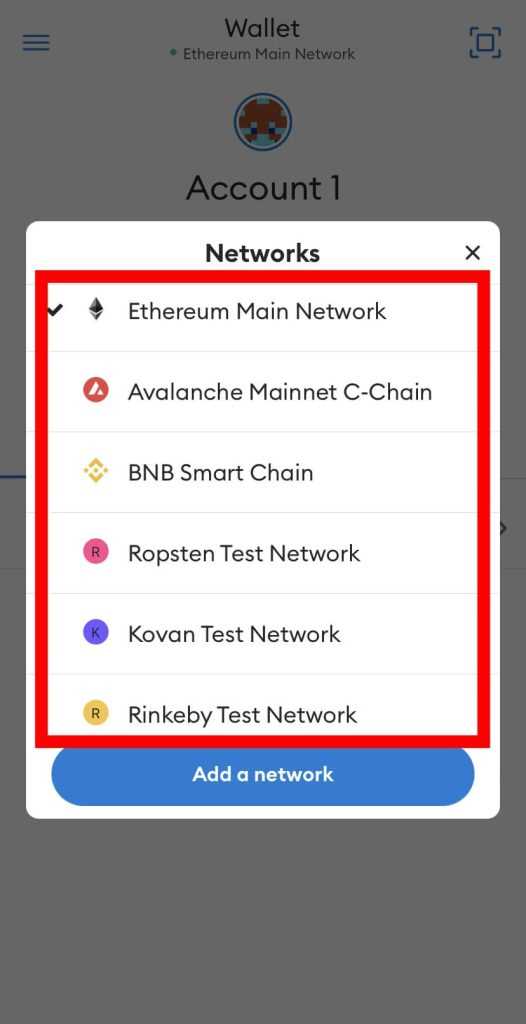
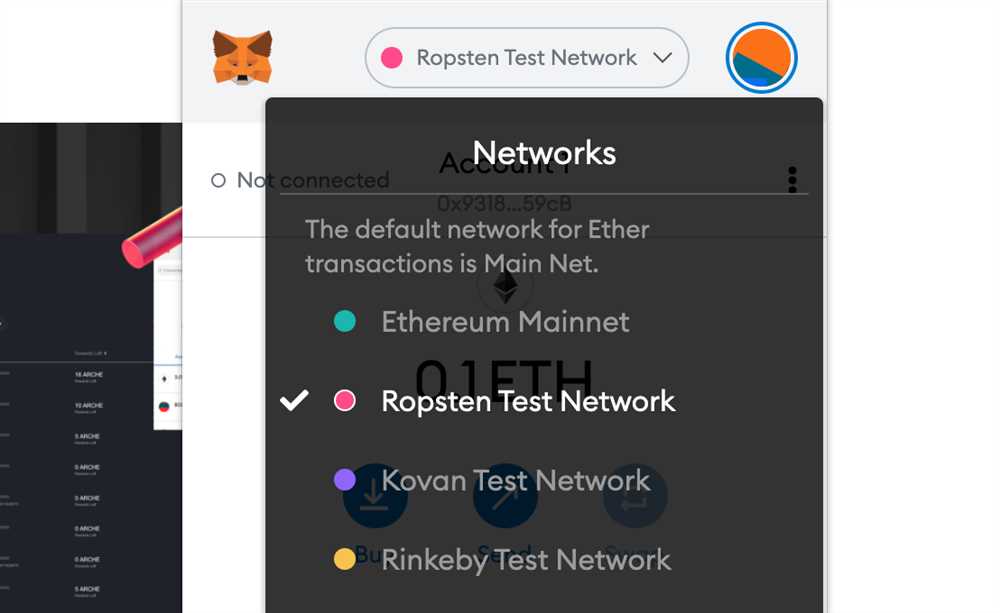
Meanwhile, you can also switch to Ropsten Test Network automatically by selecting it from the networks in Metamask.
- To select the Ropsten test network, click on the network drop-down box.
- You will see a list of Ethereum Mainnet and Testnet networks.
- Select Ropsten Test Network as your preferred network.
Now, you’ve selected Ropsten Test Network without having to add its info manually.
Тестовая сеть ropsten как добавить в метамаск
Ethereum Tutorials — Herong’s Tutorial Examples — v1.05, by Herong Yang
∟ Add «Ropsten Test Network» in MetaMask
This section provides a tutorial example on how to add a MetaMask test account on the Ropsten Test Network in order to receive free Ether money for testing.
With MetaMask extension for Chrome installed and my account on Ethereum ready, you can try to receive some free Ether money to test the MetaMask wallet.
Here what I tried to add «Ropsten Test Network» and create a test account for receiving free Ether money.
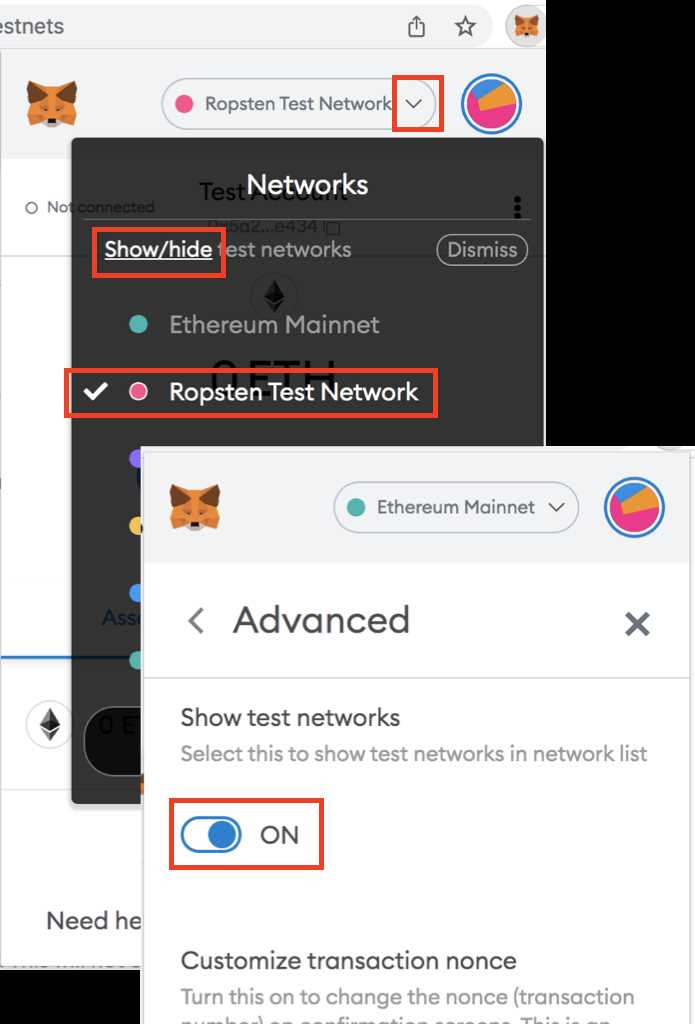
1. Open MetaMask extension and click on the dropdown icon of the network name. I see a list of Ether networks.
2. Click «[Show/Hide] test networks» link. I see the «Show test networks» switch.
3. Turn on the «Show test networks» switch. I see test works listed.
4. Select «Ropsten Test Network» as the current network.
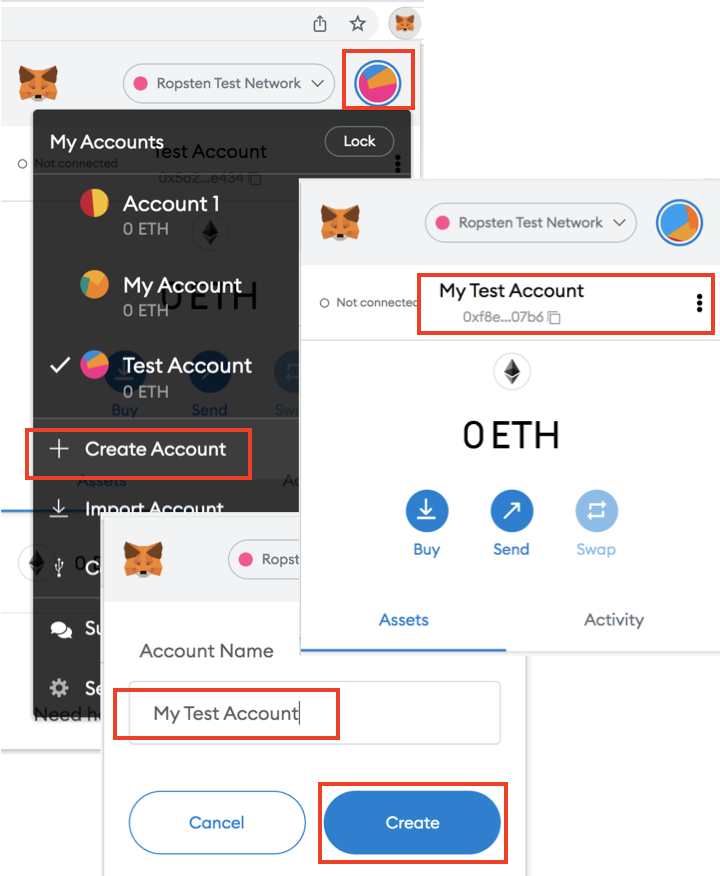
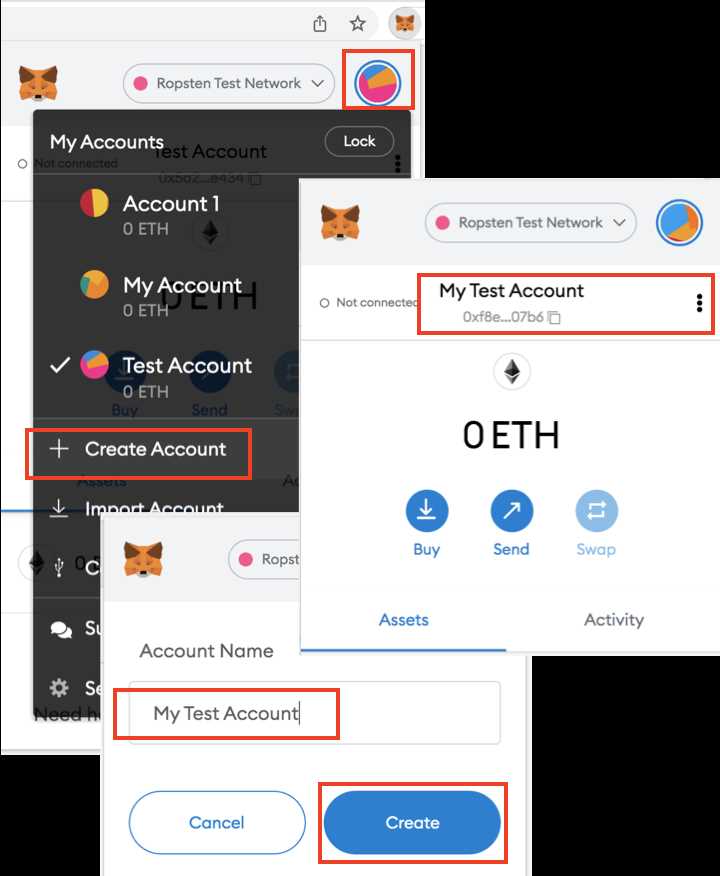
5. Click the «Account» icon next to «Ropsten Test Network». I see an action menu.
5. Click the «Account» icon next to «Ropsten Test Network». I see an action menu.
6. Click «Create Account» in the menu. I see a new account window.
7. Enter «My Test Account» as the account name. And click «Create». I see my test account created.
8. Open the account detail. I get the Ether address of the test account: 0xf8e50468eFD092D3B457B199f8b910b421e607b6.
See next tutorial on how to receive free Ether money from «Ropsten Test Network».
Ropsten RPC and Chain Settings
How to add Ropsten RPC to MetaMask via Metaschool RPCs?
Before adding your network, you will need to have MetaMask set up on your web browser or phone. If this is your first time, check out this easy guide on installing MetaMask
There are two ways to do this — the easier way is to add Ropsten RPC via Metaschool by clicking on the “Add to MetaMask” button below. The second way is to add manually. Steps for both have been detailed below.
Kickstart your Web3 developer journey
�� NFT on completion �� Self Paced Learning �� Strong Community
Take a Course Trusted by 140K+ developers
Add Ropsten on the MetaMask app manually
If you are not able to do it, here is a manual way.
Steps to Add Ropsten to MetaMask manually
- We will use the above mentioned information on Network name, RPC URL, Chain ID and Currency Symbol to add the network manually.
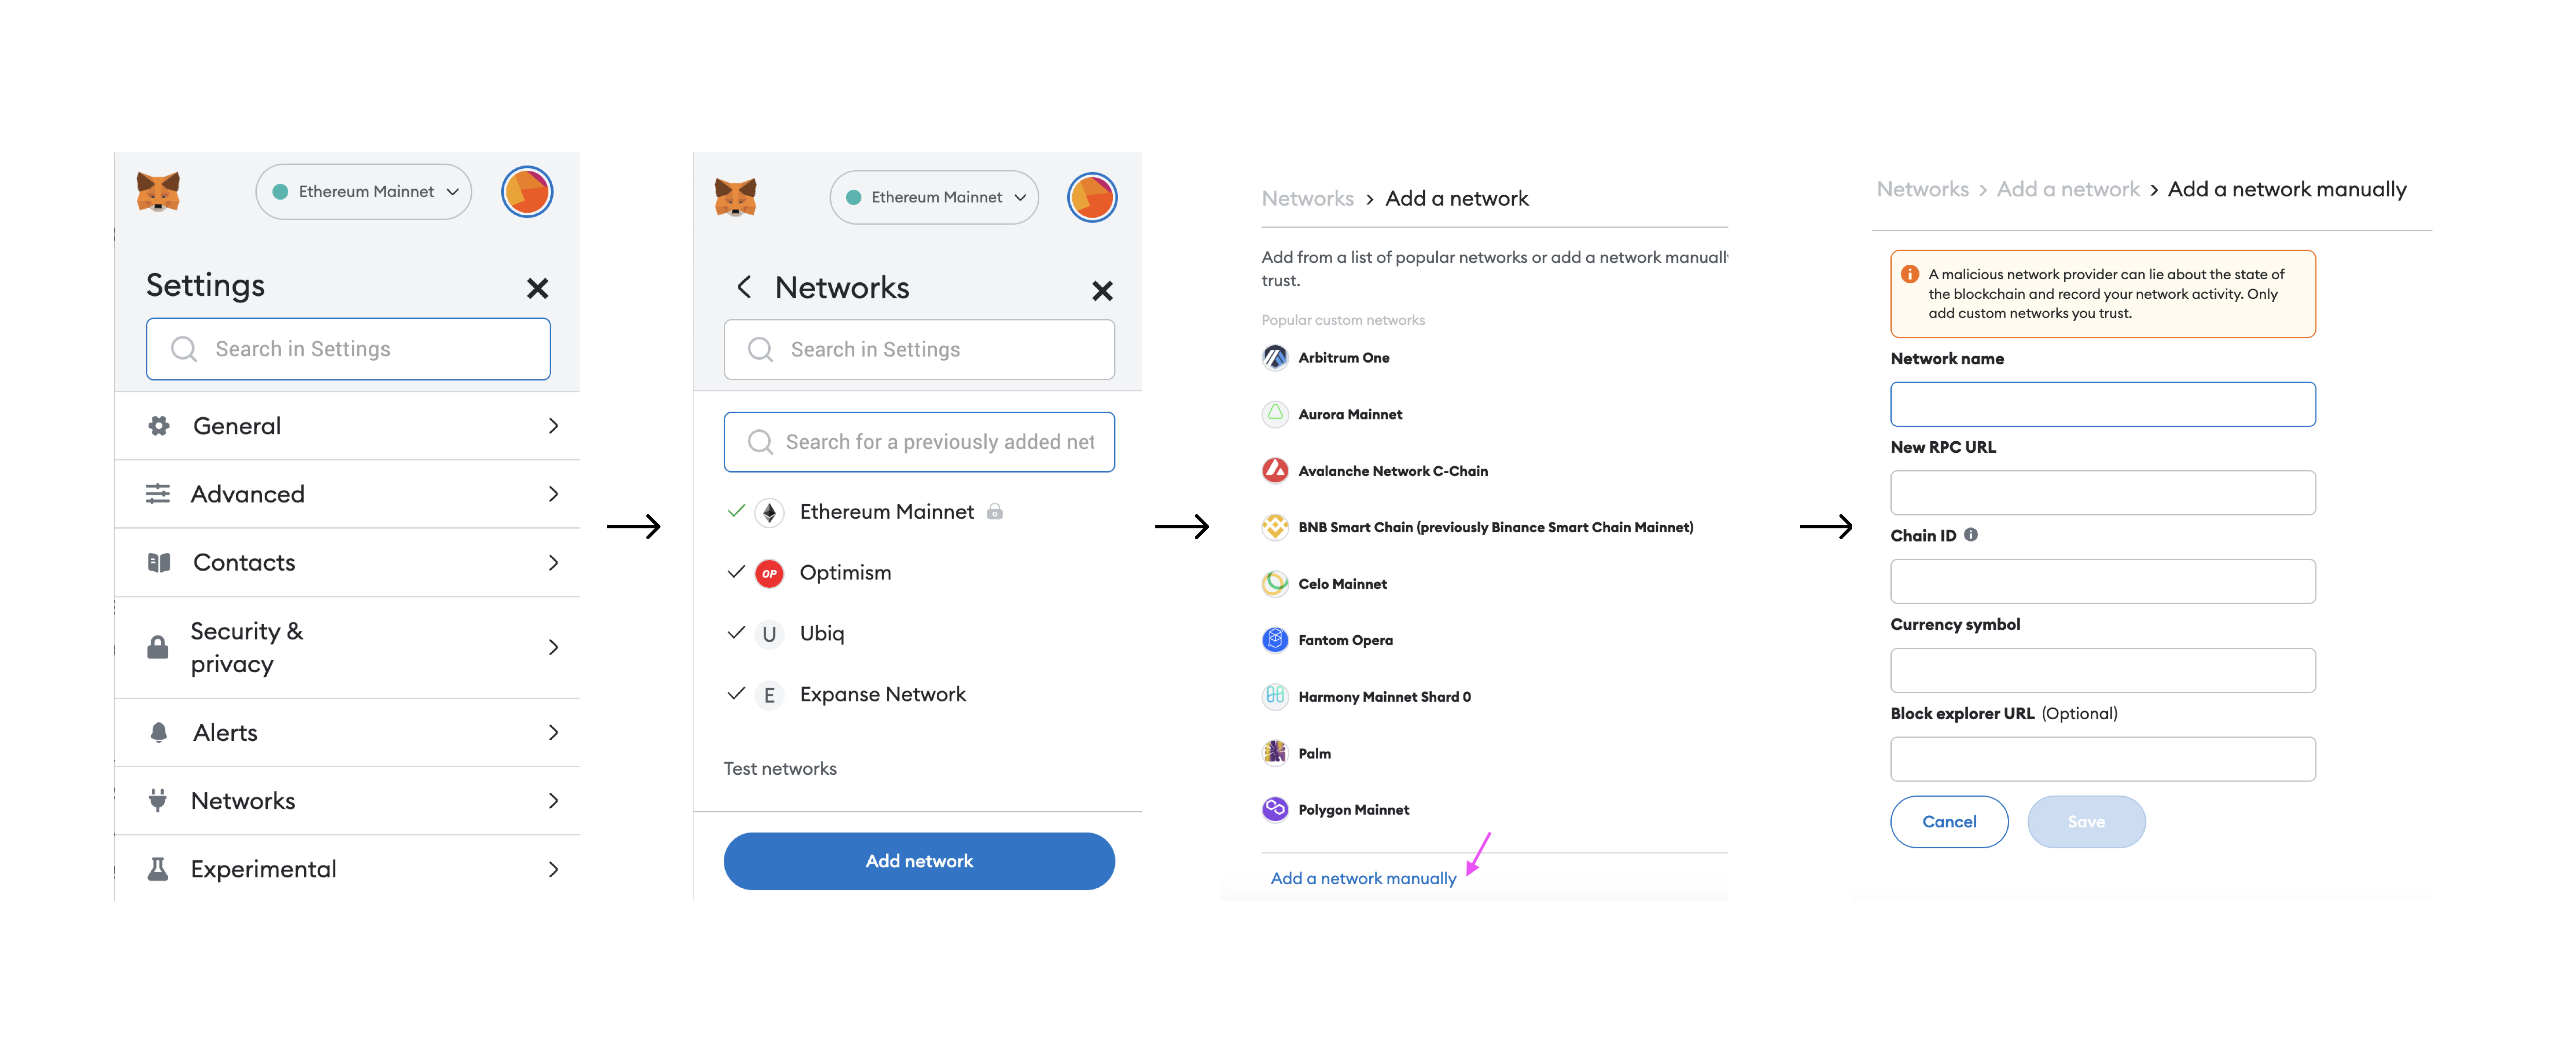
- Open MetaMask.
- Go to the top right circle icon, find where it says Settings, click on it. Now located where it says Networks, select that and click on where it says “Add Network” .
- You will be redirected to another page listing down several networks. If you don’t find your chosen network there, scroll down to the bottom of the page where it says “Add a Network Manually” . Click on it.
- You’ll be taken to a page that asks for Network Name, RPC URL, Chain ID and Currency Symbol. You can skip out the Blockchain Explorer field.
- Copy the values from the box above and paste them in the empty fields. Then hit “Save” . You will have successful added your choice of network to MetaMask manually.
- The success message will ask you to switch to your successfully added choice of network. Switch to it and when you can check on the top middle of the app, your network will be added.
How to switch networks on MetaMask
Switching networks can be important because only a few interoperable tokens exist in crypto today. Because MetaMask was essentially created to interact with the Ethereum blockchain, it has Ethereum as a default network wallet when you first download MetaMask.
Steps to switch networks on your MetaMask wallet

- Open your MetaMask Wallet extension/appp. Click on the mid top of the app where it mentions your default network i.e. Ethereum Mainnet.
- Drop down and select your choice of network.
- The wallet will load for a moment and connect you to your choice of network.
Why is Ropsten not showing on MetaMask?
Not all networks are automatically listed on the MetaMask interface. This is because the app only displays networks that are commonly used by the community.
If you want to add a network that is not listed on MetaMask, you can add it **manually or via Metaschool** by following the steps mentioned earlier. Just make sure to carefully enter the correct details for the network.
Does MetaMask support multiple chains?
Yes, MetaMask supports multiple chains or networks, including Ethereum, Binance Smart Chain, Polygon, and many more. When you create a new MetaMask wallet, it is automatically set up to work with the Ethereum network. However, you can easily switch between different networks by selecting the network you want.
In addition to the default networks, you can also add custom networks to MetaMask by providing the network’s details such as the network name, RPC URL, chain ID, symbol and block explorer URL as mentioned above. This allows you to use MetaMask with other blockchains that are not listed by default.
A Step-by-Step Guide to Set Up and Use the Ropsten Test Network with Metamask
Welcome to this beginner’s guide on how to set up and use the Ropsten Test Network with Metamask! If you’re new to Ethereum development or just want to explore and experiment with the blockchain technology, using a test network is a perfect place to start. The Ropsten Test Network is a popular testnet that closely mimics the Ethereum Mainnet, allowing developers to test their smart contracts and dApps without spending real Ether.
To get started, you’ll first need to install and set up Metamask, which is a browser extension that acts as a digital wallet and allows you to interact with the Ethereum network. Once installed, you can easily switch between different networks, including the Ropsten Test Network, without the need for additional accounts or wallets.
After installing Metamask, the next step is to configure it to connect to the Ropsten Test Network. Click on the Metamask icon in your browser toolbar and log in or create a new account. Once logged in, click on the network selection dropdown (usually displaying “Main Ethereum Network”) and choose “Custom RPC” at the bottom of the list. This will allow you to enter the details of the Ropsten network.
In the “New RPC URL” field, enter “https://ropsten.infura.io/v3/your-infura-api-key” where “your-infura-api-key” is the API key you obtained from Infura. Infura is a popular Ethereum infrastructure provider that allows you to easily interact with the Ethereum network without running your own node. Once you’ve entered the URL, click “Save” to save the configuration.
Now that you’re connected to the Ropsten Test Network, you can start using it to test your smart contracts and dApps. You can obtain test Ether from various faucets available online, which will allow you to simulate real transactions on the test network. Remember, though, that this Ether has no real value and cannot be exchanged for real Ether on the Mainnet.
With Ropsten Test Network and Metamask, you have a powerful toolset at your disposal to simulate and test your Ethereum projects. Take advantage of this environment to experiment, debug, and refine your smart contracts and dApps before deploying them to the live Ethereum network. Have fun exploring the world of Ethereum development!
What is the Ropsten Test Network?
The Ropsten Test Network is one of the test networks provided by the Ethereum blockchain. It is specifically designed for developers and users to test their Ethereum-based applications and smart contracts before deploying them on the main Ethereum network (also known as the mainnet).
Ropsten is a proof-of-work test network, which means that the consensus algorithm used to validate transactions is similar to the one used on the mainnet. This makes Ropsten a reliable environment for testing and ensuring that applications behave as expected before going live.
On Ropsten, users can create and interact with test accounts, send and receive test ether (ETH), deploy and test smart contracts, and simulate different scenarios to identify and fix any issues. This greatly helps developers in ensuring the functionality, security, and efficiency of their decentralized applications (dApps) and smart contracts.
Interacting with the Ropsten Test Network is made easy with tools like Metamask, a popular browser extension wallet that allows users to connect to Ethereum networks, including Ropsten. By connecting to Ropsten with Metamask, users can switch between different Ethereum networks, access the Ropsten faucet to get test ether, and perform various testing operations with their Ethereum-based applications.
Overall, the Ropsten Test Network provides a safe and reliable environment for developers and users to experiment, test, and debug their Ethereum applications and smart contracts, ensuring that they can confidently deploy them on the main Ethereum network.
Why Use the Ropsten Test Network?
When developing and testing Ethereum smart contracts and decentralized applications (dApps), it is crucial to have a secure and reliable environment. This is where test networks like Ropsten come in.
Ropsten is a test network specifically designed for Ethereum developers. It provides an environment that closely simulates the Ethereum mainnet, but with one key difference: Ropsten uses test Ether (ETH) instead of real Ether. This means that you can experiment and test your smart contracts and dApps without the risk of spending real money.
There are several benefits to using the Ropsten test network:
1. Cost-effective testing:
By using Ropsten, you can avoid unnecessary expenses associated with deploying and testing on the Ethereum mainnet. Since test Ether has no real value, you can freely execute transactions, deploy contracts, and interact with dApps without worrying about the cost.
2. Realistic simulation:
Ropsten closely replicates the Ethereum mainnet environment, allowing you to obtain accurate results during testing. This ensures that your smart contracts and dApps will perform as expected when deployed on the mainnet.
3. Rapid development cycles:
Ropsten enables you to quickly iterate and make changes to your smart contracts and dApps. You can experiment, test, and fix any issues without having to wait for confirmation times or deal with real-world limitations.
4. Community support:
Ropsten has a vibrant community of developers who actively use and contribute to the test network. This means that you can seek help, collaborate, and learn from others who are also working on Ethereum projects.
In conclusion, using the Ropsten test network is essential for Ethereum developers to ensure the reliability and security of their smart contracts and dApps. It enables cost-effective testing, realistic simulation, rapid development cycles, and community support. By utilizing Ropsten, you can confidently deploy your projects on the Ethereum mainnet with reduced risks and increased confidence.
Getting Started
Welcome to the beginner’s guide on setting up and using the Ropsten Test Network with Metamask! This guide will walk you through the steps necessary to get started with using the Ropsten Test Network, which is a test network for Ethereum built specifically for development and testing purposes. By using the Ropsten Test Network, you can experiment with Ethereum smart contracts and dapps without spending real Ether.
Step 1: Install Metamask
The first step is to install the Metamask extension in your favorite browser. Metamask is a web-based Ethereum wallet that allows you to interact with the Ethereum blockchain and decentralized applications. You can find and install Metamask from the official Metamask website or from the extension store of your browser.
Step 2: Create a Metamask Account
Once you have installed Metamask, open it and click on “Create a Wallet”. Follow the instructions to set up your Metamask account. Make sure to securely save your secret backup phrase, as it is required to recover your account if you lose access to it.
Step 3: Switch to the Ropsten Test Network

After creating your account, click on the Metamask extension icon in your browser’s toolbar and select “Settings”. In the settings menu, click on “Networks” and then select “Add Network”. Enter the following details to connect to the Ropsten Test Network:
| Network Name | New RPC URL | Chain ID |
|---|---|---|
| Ropsten Test Network | https://ropsten.infura.io/v3/your-infura-project-id | 3 |
Remember to replace “your-infura-project-id” in the RPC URL with your actual Infura project ID.
After entering the network details, click on “Save” to add the Ropsten Test Network to your Metamask accounts. Then, switch to the Ropsten Test Network by selecting it from the dropdown menu.
Now you are ready to start using the Ropsten Test Network with Metamask! You can send test Ether, deploy and interact with smart contracts, and test your dapps on this network without affecting the main Ethereum network or using real Ether.
Installing Metamask
To get started with using Ropsten Test Network, you will need to install Metamask. Metamask is a browser extension that allows you to interact with Ethereum-based decentralized applications (DApps).
Step 1: Install Metamask Extension

To install Metamask, open your preferred web browser and go to the official Metamask website. From there, you can click on the “Get Chrome Extension” button if you are using Google Chrome, or “Get Firefox Add-On” if you are using Mozilla Firefox.
Step 2: Add Metamask to Your Browser
Once you have clicked on the appropriate button for your browser, you will be redirected to the respective extension/add-on page. Click on the “Add to Chrome” or “Add to Firefox” button to add the Metamask extension to your browser.
Step 3: Create a Metamask Account
After installing the extension, you will see the Metamask icon in your browser toolbar. Click on the icon to open the Metamask popup window. From there, click on the “Get Started” button.
Next, you will be prompted to create a new Metamask account. Enter a strong password and click on the “Create” button. Make sure to store your password in a safe place, as it cannot be recovered if lost.
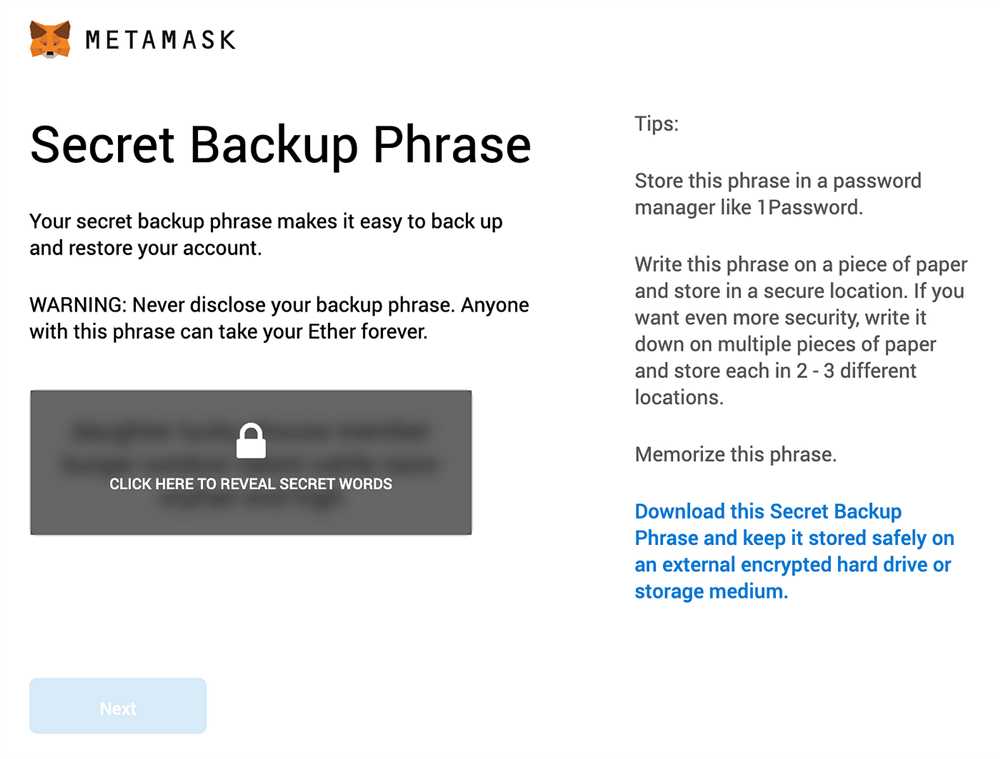
Step 4: Backup Your Seed Phrase

Once your account is created, you will be presented with a 12-word seed phrase. This phrase is used to recover your account in case you forget your password or lose access to your device. Write down the seed phrase and store it in a secure location. Do not share it with anyone.
Step 5: Connect to the Ropsten Test Network
With Metamask installed and your account created, you can now connect to the Ropsten Test Network. Click on the network dropdown menu in the Metamask popup window and select “Ropsten Test Network”.
| Network | Chain ID | Explorer |
|---|---|---|
| Ropsten Test Network | 3 | Ropsten Etherscan |
Congratulations! You have successfully installed Metamask and connected it to the Ropsten Test Network. You are now ready to start using Ropsten and experimenting with Ethereum-based DApps.
Creating a Wallet on Metamask
Metamask is a popular cryptocurrency wallet that allows users to securely store and manage their digital assets. To begin using Metamask, you will first need to create a wallet. The following steps will guide you through the process:
- Start by visiting the official Metamask website at https://metamask.io/.
- Once on the website, click on the “Get Chrome Extension” button if you are using Google Chrome. If you are using a different browser, you can choose from the available options such as Firefox, Opera, or Brave.
- After clicking on the appropriate button, you will be redirected to the respective extension store. Click on the “Add to Chrome” button (or the equivalent button for your chosen browser) to install the Metamask extension.
- Once the extension is installed, you will see the Metamask fox icon in your browser’s toolbar. Click on the icon to open the Metamask popup window.
- In the Metamask popup, click on the “Create a Wallet” button to start the wallet creation process.
- You will be prompted to set a strong password for your wallet. Make sure to choose a password that is not easily guessable and consists of a combination of letters, numbers, and symbols.
- After setting the password, click on the “Create” button to proceed.
- Next, you will be provided with a unique set of twelve words known as a seed phrase. This seed phrase acts as a backup for your wallet and can be used to restore access to your funds in case you forget your password.
- It is crucial to write down your seed phrase and store it in a secure location. Do not share this phrase with anyone as it can be used to access your funds without your permission.
- Once you have safely recorded your seed phrase, you will be asked to confirm it. This step ensures that you have correctly written down the words in the correct order. Select the words in the correct order and click on the “Confirm” button.
- Finally, your wallet will be created, and you will have immediate access to its functionality. You can now use your Metamask wallet to manage your digital assets, interact with decentralized applications (DApps), and participate in the Ropsten test network or other Ethereum networks.
Remember to keep your Metamask password and seed phrase safe and confidential. Losing this information may result in permanent loss of funds. It is also recommended to enable additional security measures such as two-factor authentication (2FA) for added protection.
Connecting to the Ropsten Test Network
Before you can start using the Ropsten Test Network with Metamask, you need to configure your Metamask wallet to connect to the network.
- Open the Metamask extension in your browser.
- Click on the Metamask icon located on the top-right corner of your browser.
- A window will appear showing your wallet balance and a list of supported networks. Click on the network dropdown menu.
- Scroll down and click on the “Ropsten Test Network” option. This will switch your wallet to the Ropsten Test Network.
- If you don’t see the “Ropsten Test Network” option, click on the “Custom RPC” option at the bottom of the dropdown menu.
- A new window will appear where you can enter the details of the Ropsten Test Network. Enter the following details:
- Network Name: Ropsten Test Network
- New RPC URL: https://ropsten.infura.io/v3/YOUR_INFURA_PROJECT_ID
- Chain ID: 3
- Click “Save” to save the changes and return to the main Metamask window.
- Your Metamask wallet is now connected to the Ropsten Test Network. You can start using the network to test your smart contracts or interact with decentralized applications.
Make sure to switch back to the main Ethereum network or your preferred network when you’re done testing on the Ropsten Test Network.
What is Ropsten Test Network?
Ropsten Test Network is a test network for the Ethereum blockchain. It allows developers to test their smart contracts and decentralized applications (DApps) without using real Ether.
What is an Infura API key?
An Infura API key is a unique identifier that allows you to access the Ethereum network without running your own node. It is required to connect to the Ropsten Test Network using Metamask.
Can I use the Ropsten Test Network for free?
Yes, using the Ropsten Test Network is free. You do not need to spend any real Ether to test your smart contracts or DApps on this network.