A Step-by-Step Guide to Create NFTs on Solana
NFT development has emerged as one of the top priorities in the world of web3. Among the many blockchains used for NFT development, Ethereum always comes on top. It is the trusted destination for smart contract development, which serves as the core of creating non-fungible tokens. On the other hand, you are here to find out how to create NFT on Solana blockchain. Why?
Solana has emerged as a promising solution to the problems of scalability and interoperability with Ethereum blockchain. Interestingly, Solana offers unique tools to help you with NFT development. For example, the Metaplex Candy Machine could help in creating NFTs on Solana within a few minutes. Let us find out more about the easiest step-by-step guide to creating NFTs on Solana blockchain.

Fundamentals of NFTs
Before moving further, it is important to reflect on the basics of NFTs and how they work. You can find answers to ‘Why should I create NFTs on Solana?’ by exploring the value of non-fungible tokens. NFTs or non-fungible tokens are unique crypto assets that have their own distinct on-chain signature.
If you want to build NFT marketplace on Solana , then you must know about the use of NFTs. Non-fungible tokens can serve as representatives of digital art, certificates, virtual collectibles, online tickets, and proof of ownership on blockchain networks. You must know that NFTs are not limited to a few unique images on the internet.
Misconceptions regarding the utility of NFTs have led to the rise of projects without any clear definition of utility. The actual value of NFTs is visible in how they can verify the uniqueness of a specific asset with cryptographic proof. Before creating Solana NFT projects , you should know that NFTs are available in different forms, such as MP3s, PDFs, JPEGs, MP4s, and PNGs. However, the files serve as the tangible aspects of the NFTs, which anyone could copy like other digital files. The real value of NFTs is in the cryptographic signature. Even if two NFTs have the same file, you can notice uniqueness of on-chain data.
You must also note that the file types mentioned previously are too large for blockchain storage. Therefore, you would have to rely on decentralized storage solutions for such NFT files. Subsequently, the NFT metadata includes links to the files in decentralized storage, and the NFT metadata goes to on-chain storage.
When you would use the Solana NFT maker tool, you would mint the NFTs or store the NFT metadata with unique cryptographic identifiers on the chain. If you want to create an NFT, then you would need an on-chain transaction. In addition, the details included in the NFT metadata would also differ according to the type of NFT standard. It is also important to remember that you have to include certain mandatory metadata details while some parameters are optional.
Want to get an in-depth understanding of non-fungible tokens (NFTs)? Enroll now in the NFT Fundamentals Course
Reasons to Use Solana for Creating NFTs
The discussion on creating NFTs with Solana blockchain would also require emphasis on the reasons for using Solana for creating NFTs. The answers to “ How do I start an NFT project on Solana? ” would draw your attention towards Solana and its value advantages. Solana is a popular non-EVM blockchain with the advantage of flexible programmability. As a non-EVM blockchain, Solana does not use tools like the ones you would find in Ethereum. For example, you can find different development tools in Solana and you cannot use Metamask in Solana.
Most important of all, Solana has its unique variations of smart contracts or programs. Solana programs work in the same way as Ethereum smart contracts. The ‘programs’ in Solana ensure that applications work in accordance with predefined rules. Solana programs can achieve the same by executing predefined actions upon fulfillment of predefined conditions. You can build NFT marketplace on Solana or create new collections with the help of Solana programs.
Interestingly, Solana programs are one of the dedicated NFT mint tools in Solana. In addition, Solana also provides another reason for developing NFTs with its independent token standard. Solana does not adhere to the ERC-721 and ERC-1155 standards for NFT development. On the contrary, it uses the SPL token standard for representing non-fungible tokens on the Solana chain.
The prominent advantages of Solana programs and SPL token standard provide enough reasons to consider the use of Solana for NFT development. In addition, Solana also offers the assurance of low transaction fees alongside high speed, which can support NFT development projects. However, it is also important to learn about the significance of Metaplex in providing opportunities for NFT development on Solana.
Start learning Non-Fungible Token with World’s first NFT Skill Path with quality resources tailored by industry experts Now!
What is the Use of Metaplex in Solana NFT Development?
Metaplex is a renowned NFT ecosystem that features marketplaces, games, arts, and collectibles. You can use the Metaplex protocol for Solana NFT projects to access different tools and standards for the development process. Most important of all, Metaplex also offers a solution for creating NFTs on Solana in a completely decentralized manner. You can think of Metaplex as a combination of different smart contracts and tools that provide flexible ways for creating NFTs. Metaplex provides access to two popular tools, such as the NFT Candy Machine and Metaplex Storefront.
Excited to develop an in-depth understanding of solidity’s best practices and the tools needed for developing and testing an NFT marketplace, Enroll now in the NFT Development Course
Step-by-Step Guide for Creating NFTs on Solana
You must be curious about the use of tools for flexible NFT development. Interestingly, the answers for ‘ How do I start an NFT project on Solana? ’ would direct you towards NFT Candy Machine. It is one of the most powerful tools that provide an easy way to create NFTs on Solana. Here is a detailed guide to the different steps for creating NFTs on Solana.
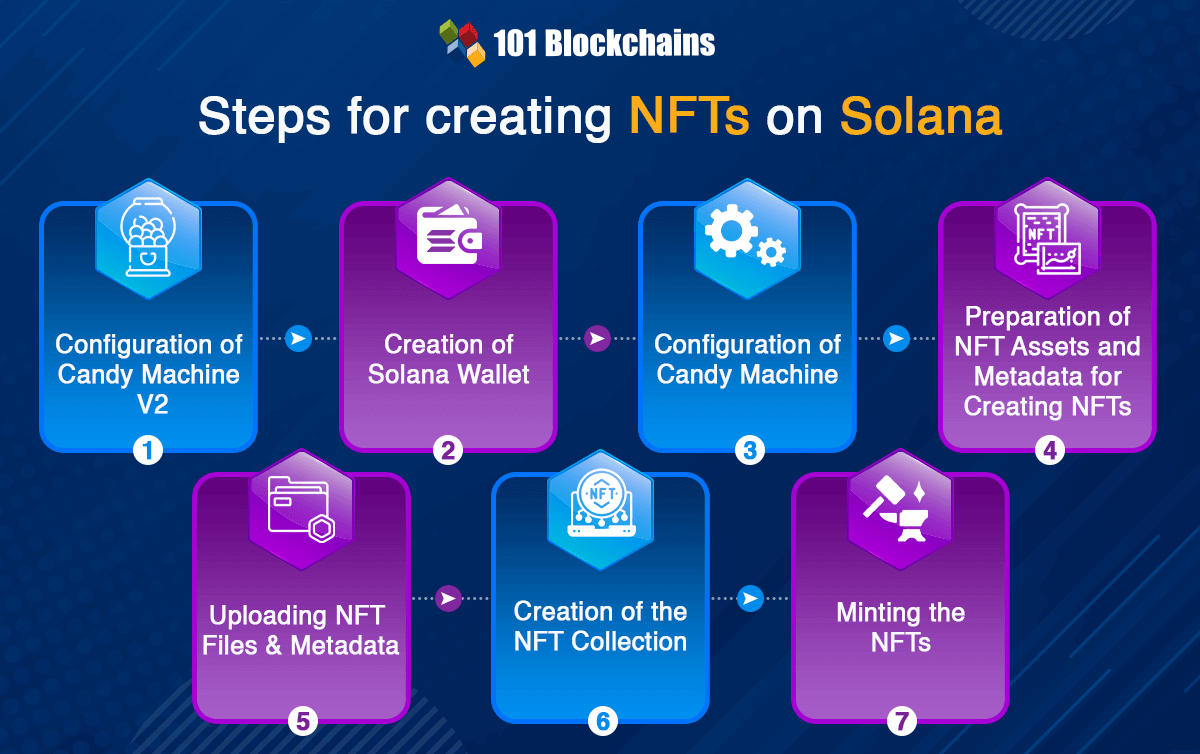
Configuration of Candy Machine V2
The first step to create NFT on Solana starts with the use of different tools. You would need important tools such as Git, NodeJS, TS-node, and the ‘yarn’ package manager. NodeJS can work as the JavaScript runtime. Yarn package manager could help in installation of required dependencies. Git can help in cloning the repository of code for creating NFTs. On top of it, the TS-node or TypeScript node would work as the execution environment. Once you have set up these tools, you would have to clone and install Metaplex through GitHub.
Creation of Solana Wallet
In the second step, you would have to focus on the importance of a Solana wallet. Why would you need a Solana wallet for creating NFTs? The wallet is an important requirement for execution of on-chain transactions to facilitate NFT minting. You can use a Solana NFT maker only if you have an adequate amount of SOL coins to cover the transaction fees required for minting NFTs. Interestingly, you can rely on the Solana tool suite for creating a local wallet without any major complications. However, it is important to remember that local wallets are vulnerable to secure threats and should be used only for development purposes.
Developers can interact with the local Solana wallet by using commands such as
solana –version solana address solana balance
Developers must focus on minting dummy NFTs on the Solana devnet without using real SOL tokens. On the contrary, you can utilize ‘test’ SOL tokens. You can get the test SOL tokens by using the command ‘solana airdrop 2’. It is also important to remember that you would need real SOL tokens for using the NFT Candy Machine on Solana mainnet.
Configuration of Candy Machine
Once you have created the Solana wallet and added two test SOL tokens, you can open the cloned project. You can build NFT marketplace on Solana mainnet by using GitHub repositories for the clone. The ideal place to start would involve finding out the location of the ‘example-candy-machine-upload-config.json’ file. You could also rely on Arweave for storing the NFT files. On the other hand, you can also explore many other options for configuration of Candy Machine. Arweave is only one of the particular configurations that offer easiest approach for creating NFTs.
Preparation of NFT Assets and Metadata for Creating NFTs
Even if you follow the simplest steps to create NFT on Solana , you would have to develop NFT files and metadata. With the right skills and knowledge, you can develop the assets on your own. On the contrary, you can also utilize example assets for creating NFT assets and metadata. You can find JSON files in the metadata of each NFT, and the image files can be represented as JPEGs and PNGs. You must also check the details of the JSON files to learn more about the NFT files and metadata.
Uploading NFT Files and Metadata
The next step in developing Solana NFT projects includes uploading your NFT files and metadata. You would have to utilize the ‘upload’ command to achieve the task of uploading NFT files and metadata. The command helps in uploading NFT images and JSON files in the metadata to the decentralized storage solution of your choice.
In addition, you can choose the command lines available in the Metaplex documentation with relevant modifications in the paths to suit your project requirements. You can conclude this step by deploying an instance of Candy Machine on the Solana devnet alongside uploading all the assets.
Creation of the NFT Collection
With almost everything ready to create your NFTs on Solana, you need only a specific command line in the Metaplex docs. You can modify the command line to align with the path of your NFT development project. It is important to remember that the ‘Candy Machine Collection’ command could help in preparing a collection of your NFTs.
You would also have the chance to assign your NFTs to the collection in the minting phase. Finally, you would have to verify the uploading of assets through Metaplex. Even if the upload verification process is not mandatory, you should complete it to ensure proper uploading of all your assets.
Minting the NFTs
The final step in the process of using the Solana NFT maker tools for creating your NFT collection involves NFT minting. You can create NFTs by copying the required command from Metaplex docs and changing it according to your file paths. In addition, it is important to note that you would have two distinct options for minting NFTs with Metaplex.
First of all, you can go for individual minting of Solana NFTs. On the other hand, you can also opt for batch or bulk minting of NFTs. The facility of batch or bulk minting helps in creating multiple NFTs within a single transaction. Once you have created the NFT collection successfully, you can take a look at them in the Solana devnet or explorer.

Explore the Possibilities of Creating Compressed NFTs
The most unique highlight of using Solana for creating NFTs is the facility to create compressed NFTs. You can find unique responses to “ How do I start an NFT project on Solana? ” in the form of compressed NFTs. Compressed NFTs involve the use of Merkle trees and state compression for reducing the storage cost of NFTs.
Rather than storing the metadata of NFTs in a Solana account, compressed NFTs use the ledger for metadata storage. As a result, the compressed NFTs can capitalize on the benefits of speed and security with the Solana blockchain. At the same time, compressed NFTs also support the reduction of overall storage costs. Most important of all, compressed NFTs follow the same structure for metadata as the uncompressed NFTs.
Get familiar with the basic and advanced Non-Fungible Token (NFT) terms with the NFT Flashcards
Final Words
The review of steps to create Solana NFT projects shows that you can rely on Metaplex and Candy Machine to achieve your objective. Candy Machine is a promising tool that removes the technical jargon from the NFT development process. On top of it, the Solana blockchain offers multiple advantages for the creation of NFT collections.
For example, it offers the benefits of low transaction fees and faster transaction finality. You can also explore the chances of creating compressed NFTs for saving costs with Solana NFT development. However, it is important to move beyond example NFTs for creating your own NFT collections with Solana. Learn more about the fundamentals of Solana and its different components to figure out the best practices for creating NFT collections on the Solana blockchain.

*Disclaimer: The article should not be taken as, and is not intended to provide any investment advice. Claims made in this article do not constitute investment advice and should not be taken as such. 101 Blockchains shall not be responsible for any loss sustained by any person who relies on this article. Do your own research!
About Author
Georgia Weston is one of the most prolific thinkers in the blockchain space. In the past years, she came up with many clever ideas that brought scalability, anonymity and more features to the open blockchains. She has a keen interest in topics like Blockchain, NFTs, Defis, etc., and is currently working with 101 Blockchains as a content writer and customer relationship specialist.

Categories
- AI & ChatGPT (69)
- Analyst Corner (30)
- Blockchain (56)
- Blockchain Surveys (8)
- Career Guide (44)
- Community Spotlights (10)
- Comparisons (68)
- Featured (5)
- FinTech (21)
- Guides (577)
- Interview Preparation (27)
- IoT (31)
- Metaverse (58)
- Newbies (33)
- News & Updates (113)
- NFT (41)
- Opinions (72)
- Profiles (9)
- Reviews (184)
- Startups (3)
- Uncategorized (10)
- Web3 (91)
Featured Posts
- Announcement: 101 Blockchains is a CPD Accredited Certification Provider
- How to become Certified Web3 Professional?
- How to become Certified Metaverse Professional?
- How to become a Certified NFT Professional?
- How to Become Certified Expert in Blockchain?
Recent Posts
- The Role of Accreditation in Blockchain Certification Programs
- What is inheritance in Solidity?
- What is a Bitcoin ETF, and How does it work?
- An Overview of Integer Overflow Attacks
- Announcement – NFT Development Course Launched
Solanart
Solanart — это решение для работы с NFT на блокчейне Solana. Вот сегодня и разберемся, что это за площадка. Кроме того, детально расскажем, как ей пользоваться ― зарегистрировать учетную запись, создать и запустить собственный NFT, а также торговать другими токенами.
Содержание
- Регистрация на площадке
- Создание и запуск NFT в продажу
- Продажа
- Покупка NFT
- Launchpad
- Перспективы Solanart
- Отзывы и комментарии
Все, кто хотя бы немного знаком с миром блокчейна, знают о Ethereum. В курсе пользователи и о проблемах сети. И вот появляется блокчейн Solana, призванный эти проблемы решить и ― заодно ― дать комьюнити более широкий набор возможностей. Такого же взрывного роста платформа, разумеется, не получила. Solana развивается поступательно. Очередным шагом этого развития стало открытие собственной NFT-площадки.
Solanart запустили летом 2021 года. Площадка стала первым подобным проектом в соответствующей сети. Она обеспечивает пользователей полным набором инструментов для операций с NFT:
- создание;
- хранение;
- продажа;
- покупка;
- обмен.
Почти год, это был самый крупный маркетплейс на Solana. Но к лету 2022-го Solanart уступил лидерство другому маркетплейсу ― Magic Eden.
Регистрация на площадке
Процесс авторизации на Solanart полностью аналогичен другим крипто-биржам и NFT-площадкам:
- В первую очередь создаем кошелек поддерживающий валюту сети ― SOL. Маркетплейс рекомендует использовать Solflare, но подойдет любой кошелек с поддержкой Solana.
- Покупаем несколько коинов SOL и переводим их на созданный счет.
- Подключаем кошелек к платформе.
Чтобы выполнить третий пункт, просто заходим на титульную страницу Solanart и нажимаем кнопку «Connect Wallet». Она расположена в правом верхнем углу страницы.
После успешного преодоления этих простых шагов получаем полностью активный аккаунт с возможностью покупать, продавать и обменивать невзаимозаменяемые токены. Однако, для создания собственного NFT придется пройти ещё одну процедуру.
Создание и запуск NFT в продажу
Ключевое отличие Solanart от того же OpenSea, помимо технической реализации, ― это модерация выкладываемого контента. Если на большинстве других площадок достаточно подключить кошелек и сразу начать выкладывать собственные NFT, то здесь все сложнее.
Для созданию и зауска невзаимозаменяемого токена ― после подключения кошелька к Solanart ― необходимо заполнить специальную заявку. Она расположена по адресу solanart.io/apply/listing .

Форма включает 12 пунктов, заполнение которых займет порядка десяти минут. Ничего сложного там нет, но все же подробно разберем каждый шаг. Чтобы приступить, на стартовой странице нажимаем кнопку «Start» или клавишу «Enter».
Шаг первый
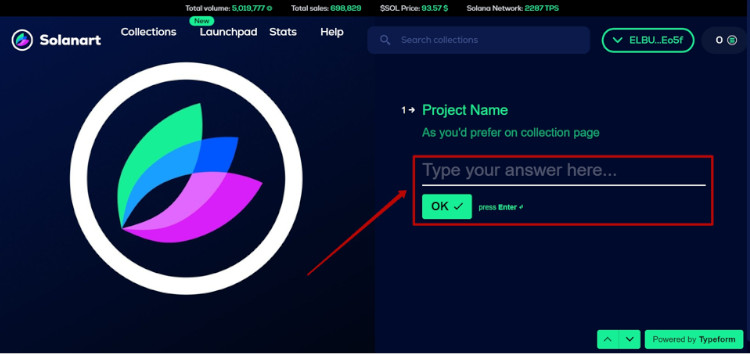
Отправная точка к созданию собственного NFT ― «Project Name». Здесь придумываем и указываем имя будущей коллекции. Именно оно будет отображаться на главной странице. Использовать можно латиницу, кириллицу, а также цифры. Но желательно пользоваться английским языком. Вписав наименование в соотвующую строку, нажимаем кнопку «OK».
Шаг второй

Второй пункт ― «Project Description». Текстовое поле, куда вписываем описание коллекции. Например, кратко рассказываем о замысле проекта, содержании или тематике контента и так далее. Здесь также лучше писать на английском языке. Если уровень владения языком низок, просто пользуемся онлайн-переводчиком. Затем жмем «OK».
Шаг третий

Третье текстовое поле называется «Project Supply». Здесь указываем, каким образом будет поддерживаться и развиваться будущая коллекция. Заполнив поле нажимаем кнопку «OK». Пункт необязателен.
Шаг четвертый
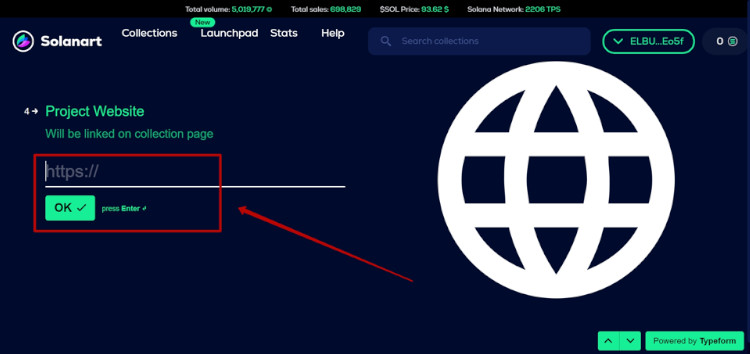
«Project Website», как можно понять по названию, ― это страница проекта в сети. Под этим имеется ввиду отдельная страница на стороннем ресурсе. Целый сайт для этого заводить не обязательно. Можно, например, создать группу в социальной сети и наполнить ее превьюшками содержимого коллекции. Ссылка на такую страницу будет также отображаться в коллекции.
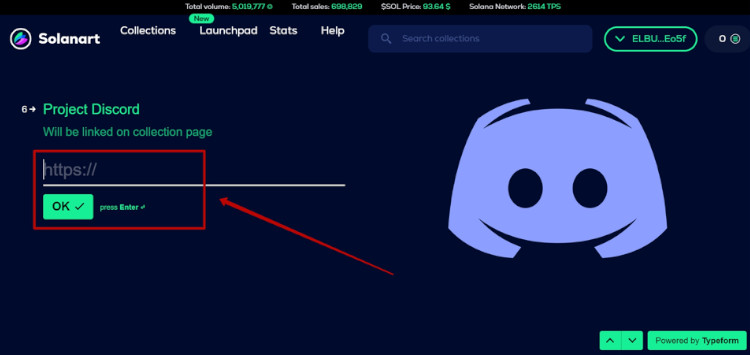
Шаг пятый и шестой
Пятое и шестое поле ― «Project Twitter» и «Project Discord» ― это ссылки на аккаунт проекта в Твиттере и Дискорде соответственно. Пункт необязательный, но желательный. Наличие отдельного аккаунта коллекции в этих сетях поднимают медийность будущих токенов в глазах администрации маркетплейса. Соответственно, это дополнительный плюс к шансу, что созданные NFT допустят на площадку.
Шаг седьмой
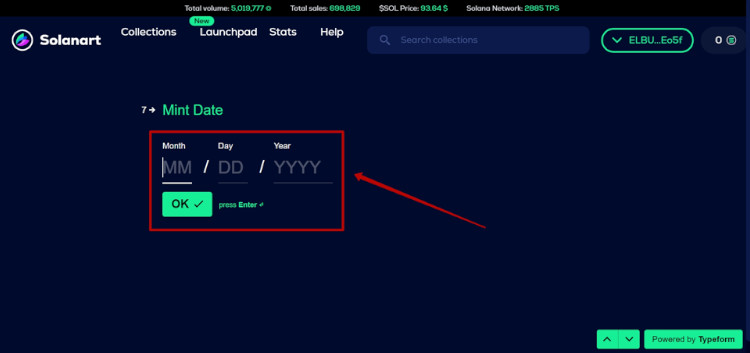
«Mint Date» ― это дата «чеканки» новых токенов. Можно указать текущее число, месяц и год, а можно запланировать выпуск на конкретную дату. День рождения, например.
Шаг восьмой
Следующее поле ― «Profile image of your project» ― уже не текстовое. Здесь нужно загрузить обложку будущей коллекции. Соответственно, это должно быть изображение.
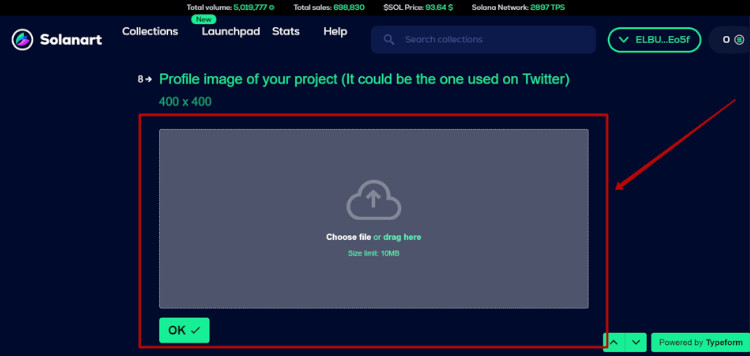
Чтобы загрузить обложку, нажимаем «Choose File» и выбираем нужное изображение. Картинку требуется сделать размером 400×400 пикселей. Максимальный размер файла ― 10 мегабайт. Допустимо использовать ту же обложку, что и в Твиттере.
Шаг девятый
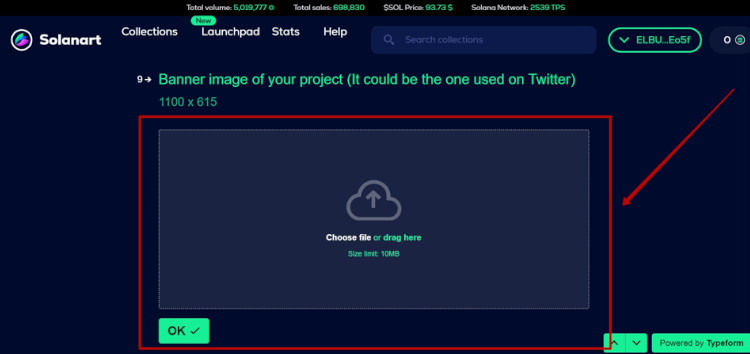
Следующее поле для загрузки изображения находится под пунктом «Banner image of your project». Это баннер, которым будет венчаться титульная страница коллекции. Последовательность действий по выгрузке и требования к файлу совпадают с предыдущим пунктом, но с одной поправкой. Формат изображения должен равняться 1100×615 пикселей.
Шаг десятый
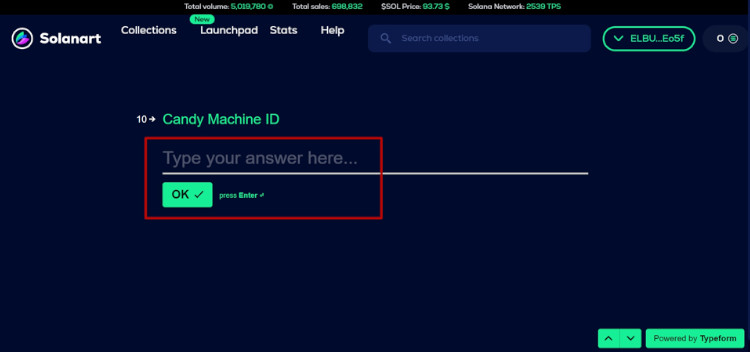
Пункт «Candy Machine ID» пропускаем. Он не нужен тем, кто хочет просто создать собственный NFT. Опция необходима в том случае, когда планируется открыть другим пользователям возможность создавать токены «под маркой» автора.
Шаг одиннадцатый

«Contact Email», как опять же можно понять по названию пункта, ― это контактный адрес электронной почты. Вводим внимательно и без ошибок. Почта должна быть рабочей и активной. Это ― один из путей связи администрации ресурса с автором.
Шаг двенадцатый
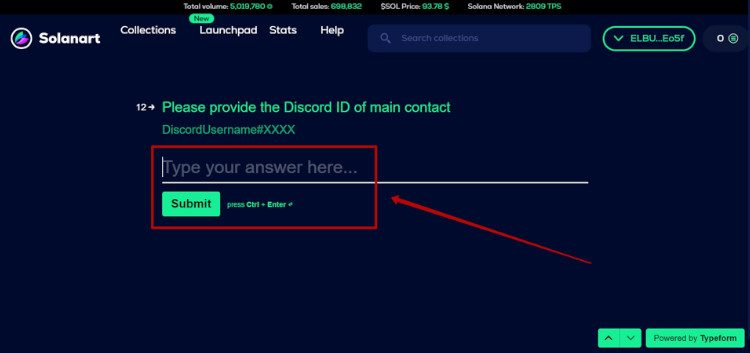
Последнее текстовое поле формы ― это личный адрес автора в Дискорде. Пункт обязателен и элементарно удобен. Через Дискорд уточнить детали и получить информацию гораздо быстрее, чем посредством электронной почты.
Отправка заявки
Заполнив все поля проверяем Точность указанных данных. Если все верно, нажимаем кнопку «Submit». Заявка уйдет на рассмотрение, которое займет 2-3 дня. По крайней мере, так сказано на сайте. Ответ с решением о допуске придет на указанную в соответствующем поле электронную почту.
Продажа

Если у администрации маркетплейса не возникнет претензий, коллекция появится в разделе «My NFTs» на вкладке «Collected». Подача заявки и чеканка токенов не требует платы ни в каком виде.
А вот размещая созданный NFT на торговой площадке уже придется заплатить несколько SOL за транзакцию. Чтобы отправить токен в продажу, выбираем его из списка и активируем соответствующую опцию. Останется выставить цену и оплатить операцию. Стоимость актива определяет сам автор.
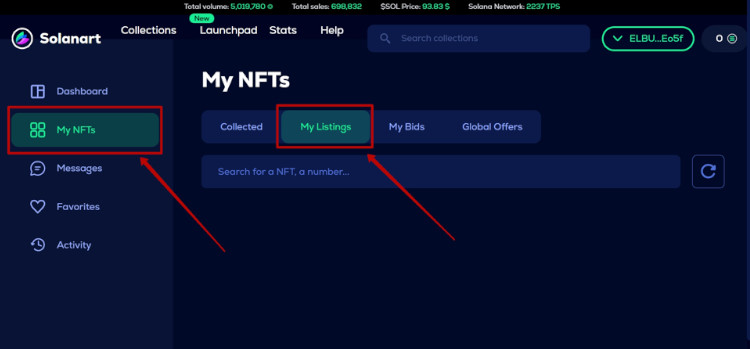
Невзаимозаменяемые токены, выставленные на продажу, отображаются в том же разделе на вкладке «My Listings».
Покупка NFT
Разумеется, Solanart позволяет не только продавать NFT, но и покупать их. При определенной доле везения на перепродаже невзаимозаменяемых токенов можно получать хорошую прибыль. Но здесь слишком много зависит от удачи, так что не стоит рассматривать это как гарантированный заработок.
Процесс покупки NFT гораздо проще, чем процесс создания. Для начала выбираем желаемый арт. На стартовой странице собраны актуальные работы и авторы. Кроме того, можно воспользоваться поиском и найти конкретную коллекцию или автора.
Когда решение принято, остается просто нажать кнопку «Buy now». С кошелька спишется стоимость токена и еще 3% от нее в качестве комиссии площадки. Купленный актив отправится в коллекцию. Теперь с ним можно делать что угодно.
Launchpad
Launchpad ― это своеобразная программа помощи новым проектам. В этом разделе публикуются стартапы, которые еще находятся на стадии разработки. Пользователи могут вложить средства в развитие проекта, выступив таким образом в роли инвестора. Авторы ― чаще всего ― в качестве благодарности продают свои NFT таким пользователям по цене ниже рынка.
Можно и подать собственную заявку на участие в Launchpad. Это также делается через специальную форму. Анкета аналогична той, что заполняется при создании NFT. Но здесь нужно дополнительно указать:
- цели проекта и его дорожную карту;
- источники финансирования помимо инвестиций через Launchpad;
- маркетинговую стратегию;
- информацию об авторе или команде авторов.
Перспективы Solanart
Долгое время площадка занимала ведущее место среди NFT-маркетплейсов на блокчейне Solana. Однако, за последний месяц Solanart сдал позиции пропустил вперед конкурента в лице Magic Eden. Возможно, это временное явление, но звоночек тревожный. Все же сегодняшний сабж развивается медленнее соперника ― Launchpad появился буквально только что, а мобильного приложения и вовсе до сих пор нет.
И хотя Solanart по-прежнему остается крупной площадкой с тысячами транзакций в день, перспективы этого маркетплейса весьма туманны.
How To Create NFT on Solana With IPFS
In case you slept through all of 2021, NFTs (non-fungible tokens) are hot. They have evolved from “random jpegs” to self-contained applications, access tokens, communities, and more. With increased creativity and expanding support across multiple blockchains, NFTs don’t look to be going away any time soon.
While Ethereum might be the first blockchain one thinks of when talking about NFTs, there are plenty of other chains out there to consider. I previously wrote about creating NFTs on the Flow blockchain, but an increasingly popular choice is Solana. Solana recently overtook Ethereum in total transaction volume in November of 2021, and Rarity Sniper (a tool for creating rarity rankings on NFT collections) moved to support Solana in 2021 after initially supporting Ethereum only.
With that as our background, let’s take a look at how to create an NFT collection on Solana using Pinata and IPFS. This is an especially interesting tutorial because Solana has been closely linked to Arweave, but many projects prefer IPFS for its rapid content access and reliability. Metaplex, a project built to make creating NFT projects on Solana easier is has IPFS support baked in, and this includes the ability to use Pinata to store content and serve that content through a dedicated IPFS gateway.
Setting Up The Development Environment
- Node.js version 16.13.0 or newer is recommended
- Git version 2.32.0 or newer
- Yarn version 1.22.17 or newer
- ts-node version 10.4.0 or newer
- solana cli
For what it’s worth, we will be following much of the instructions on Metaplex’s website with some modifications that allow us to upload content to IPFS through Pinata.
Preparing The Assets
This tutorial is not going to go through the process of generating assets for your NFT project. That’s a totally separate endeavor that has to happen before the contract can be deployed to Solana. So, assuming you have the art created, we’ll walk through how to prep this for upload to IPFS through Metaplex.
The first step is to create a folder for your NFT project assets. From the command line, that will look like this:
mkdir nft-project Enter fullscreen mode
Exit fullscreen mode
Inside that folder, create another folder called assets. In the assets folder, you will add all of your images. It’s important that each of your images be labeled in a base 0 index format. That means the first image would be 0.png and the second would be 1.png and so on.
Once your images are in the folder, you will need to create the metadata for these images. If you have any experience with Ethereum NFT metadata, you’ll feel right at home with Solana NFT metadata. The structure is nearly identical. Let’s took a look at a basic JSON metadata file structure for NFTs on Solana:
< "name": "Number #0001", "symbol": "NB", "description": "Collection of 10 numbers on the blockchain. This is the number 1/10.", "image": "0.png", "attributes": [ , , , ], "properties": < "creators": [], "files": [] >, "collection": > Enter fullscreen mode
Exit fullscreen mode
Just like with the Ethereum metadata standard, the Solana metadata standard has a name, image, and description. Additionally, you can include attributes (just like with ETH), a symbol, and collection details. In Ethereum projects, the token symbol is generally assigned at contract deployment and not in the metadata. Another difference is the properties portion of the Solana metadata. This is required and it allows you to include an array of files for your NFTs. You have to have at least one file in that array which points to the same asset as the image property, but you can include other files that make up your entire NFT. This is a really interesting concept that should be explored further, but for the sake of this post, we will only be operating with single asset NFTs.
Ok, so we know we have images in the folder. We know those images need to be named in a specific way. And we know that we need JSON metadata files. How are we now going to get those JSON files created and added to the assets folder. You could do this manually, but with a 10,000 NFT project, that would be nearly impossible.
Let’s write a script to create the metadata files.
From your command line, make sure you are in the nft-project folder. We will create a new file called metadata-generator.js by running this command: touch metadata-generator.js .
In your code editor, open that new file. It’s empty, but we’ll fill it in now. We need to loop through all of the images in our assets folder and create a unique JSON file for each. We need to name and save that JSON file in the same assets folder. To do this, we will make use of the Node.js fs which is built into Node.js.
In your metadata-generator.js file add this code:
const fs = require('fs'); const imageDir = fs.readdirSync("./assets"); imageDir.forEach(img => < const metadata = < name: `Image $`, description: "An image in the NFT collection", symbol: "YOUR NFT COLLECTION SHORT SYMBOL", image: img, seller_fee_basis_points: ROYALTIES_PERCENTAGE_BASIS_POINTS, properties: < files: [< uri: img, "type": "image/png" >], category: "image", creators: [< address: "YOUR_SOL_WALLET_ADDRESS", share: 100 >] > > fs.writeFileSync(`./assets/$`, JSON.stringify(metadata)) >); Enter fullscreen mode
Exit fullscreen mode
To run your script and generate the metadata, you should run this command from the root your project folder: node metadata-generator.js .
When the script is finished, you’ll have an assets folder that has images and JSON files together.
Using Metaplex
Metaplex is a tool that makes launching an NFT project on Solana much easier. Rather than having to write your own smart contract like you would have to do with Ethereum, Metaplex has pre-written contracts that projects can plug into. To make this work, Metaplex has to be able to access the files associated with the NFTs, then it needs to be able to upload those files and associated them with each token to be minted.
Metaplex has support for IPFS through a few services, but we’ll be focusing on using Pinata.
We will be following the standard Metaplex Candy Machine guide found here. The first step is going to be to clone Metaplex. Run the following command in your terminal:
git clone https://github.com/metaplex-foundation/metaplex.git ~/metaplex Enter fullscreen mode
Exit fullscreen mode
We are cloning the directory into the home directory so that we don’t have to remember where the project was cloned. Inside the new metaplex repo is code to support the JavaScript CLI we will be making use of. So, we need to install dependencies for that CLI code.
yarn install —cwd ~/metaplex/js/
Now, let’s make sure the install worked. Remember, we installed ts-node? We’re going to use that now to run a command for the metaplex cli.
ts-node ~/metaplex/js/packages/cli/src/candy-machine-v2-cli.ts --version Enter fullscreen mode
Exit fullscreen mode
This should print out a version if everything was installed properly. Now, we need to make sure the Solana CLI is working. Run this command to get the version number:
solana --version Enter fullscreen mode
Exit fullscreen mode
If that works, you’re good to go. If not, double check that you have installed the Solana CLI Toolkit. Next, we’re going to use that CLI to create devnet wallet. The Solana devnet is where we can experiment without fear of incurring any real financial impact.
Run this command to create your new devnet wallet and store the keys:
solana-keygen new --outfile ~/.config/solana/devnet.json Enter fullscreen mode
Exit fullscreen mode
Now, we can set the default keypair for our Solana CLI interactions:
solana config set --keypair ~/.config/solana/devnet.json Enter fullscreen mode
Exit fullscreen mode
Finally, let’s let the CLI know that we intent to interact with the devnet:
solana config set --url https://api.devnet.solana.com Enter fullscreen mode
Exit fullscreen mode
To confirm this all worked as expected, we can fetch the configuration for Solana like this:
solana config get Enter fullscreen mode
Exit fullscreen mode
This should print out the configuration information. If so, you’re ready to get airdropped some SOL!
This is, of course, devnet SOL, but it’s still necessary to interact with the devnet. Run this command:
solana airdrop 2 Enter fullscreen mode
Exit fullscreen mode
When that is complete, you can run this command to verify your devnet wallet has the SOL:
solana balance Enter fullscreen mode
Exit fullscreen mode
You should see that your devnet wallet has 2 SOL.
With all of the initial Solana and Metaplex installation and configuration done, we will move on to configuring out NFT drop.
Drop Configuration
This is the most important part of the entire drop, so you should read about it in full here. Metaplex uses a tool called Candy Machine for NFT drops like this, and it’s important to make sure your project is configured properly.
In the root of your project, create a JSON file called config.json . Then, enter a configuration like this:
Enter fullscreen mode
Exit fullscreen mode
This may feel like a lot, but this is actually just the minimum configuration required. There’s a lot more you can add. Don’t worry, though. We’re keeping it simple. You only need to change five things in this file. The first change is to set the storage property to point to pinata.
Then, you need to decide if you are going to use a Pinata Dedicated Gateway or not. Doing so will give you and anyone who loads your NFTs the best possible performance. But, while recommended it’s not required. If you do decide to get a Dedicated Gateway, you’ll need to upgrade to the Professional Plan in Pinata.
Next, you need to get a JWT for Pinata API access. To do so, click the dropdown menu in the top-right, click API Keys, then generate a new API Key. You can either select specific endpoints the key should have access to (pinFileToIPFS) or you can make it an admin key which has full access. This is up to your security preferences, but the key must have access to pinFileToIPFS. You can read more about scoped API keys here.
When you’ve created your key a modal will display your API Key, API Secret, and your JWT. We only need the JWT, so copy that and paste it into the pinataJwt configuration file property’s value.
If you created a Dedicated Gateway, you can paste in your Dedicated Gateway’s URL in the pinataGateway section of the config file. If you did not upgrade and do not have a Dedicated Gateway, you should update that property to look like this:
pinataGateway: null Enter fullscreen mode
Exit fullscreen mode
Finally, you just need to set the number of items in your NFT collection for the number property and the price in SOL for the price property.
That’s all you need. Now, there’s a lot more you can do, but I want to point out something that a lot of projects probably want to do, and that’s hide the NFT assets until after a reveal date. This is possible with Metaplex and Candy Machine with hidden settings. You can read about that here. We won’t be doing that in this tutorial. The NFT project in this tutorial will represent a mint with immediate reveal.
The final thing you’ll want to change in the config file is the solTreasuryAccount. This should probably point to your devnet wallet address, but it can be any Solana wallet address. To get your devnet wallet address, you can run this in the command line:
solana address Enter fullscreen mode
Exit fullscreen mode
We’re about ready to upload some assets and create our NFT contract!
Uploading To Pinata and Solana
We’ve finished all the prep work. It’s time to upload. Fortunately, this is really simple.
In the root of the project directory, run this command in the command line:
ts-node ~/metaplex/js/packages/cli/src/candy-machine-v2-cli.ts upload \ -e devnet \ -k ~/.config/solana/devnet.json \ -cp config.json \ -c nft-project \ ./assets Enter fullscreen mode
Exit fullscreen mode
This command will take your config file parse it so that Metaplex knows how to upload your files and how to get the NFT mint info onto Solana. You’ll see in your command line each upload of your asset folder’s metadata and your asset folders images. Depending on how many files you are uploading this process could take a long time.
When the process is done, you’ll need to do one more thing. You’ll need to verify the upload. This helps you know if everything is ready to go and if your NFTs can be minted. You just need to run this command:
ts-node ~/metaplex/js/packages/cli/src/candy-machine-v2-cli.ts verify_upload \ -e devnet \ -k ~/.config/solana/devnet.json \ -c nft-project Enter fullscreen mode
Exit fullscreen mode
If all goes well, you should see a message that includes Ready to deploy!. This means your project is ready to go.
Your NFT drop is ready for minting! But what do we do now? You probably want to create a website to allow for minting. Fortunately, the Metaplex code base has us covered.
Creating a Minting App
Remember, we cloned the the full repository for Metaplex? We cloned that into our home directory. So, from your command line, let’s change to our home directory and into the metaplex project, directly into the sample React app:
cd ~/metaplex/js/packages/candy-machine-ui Enter fullscreen mode
Exit fullscreen mode
You’ll need to install the dependencies like this:
yarn install
Then, open the project in your code editor. You’ll see a .env file in that folder. You should update it to look like this:
REACT_APP_CANDY_MACHINE_ID=YOUR CANDY MACHINE ID REACT_APP_SOLANA_NETWORK=devnet REACT_APP_SOLANA_RPC_HOST=https://api.devnet.solana.com Enter fullscreen mode
Exit fullscreen mode
Remember, we used the Candy Machine ID to look up our project on the Solana Explorer? We are going to paste that same ID where is says YOUR CANDY MACHINE ID.
Now, you can run the app with:
yarn start Enter fullscreen mode
Exit fullscreen mode
When the app load, you should see:
You will be able to choose a Solana wallet to connect with. Regardless of which wallet you choose, you’ll need to make sure it has some devnet SOL in it. Remember when we airdropped ourselves some devnet SOL? We can also do that with another address. Connect your wallet, make sure you’re on devnet, then copy the wallet address. From the command line run:
solana airdrop 2 YOUR_ADDRESS Enter fullscreen mode
Exit fullscreen mode
Once this is complete, you should have SOL in your browser-based wallet and can now mint one of your new NFTs. To do so, just click the Mint button:
You’ll need to confirm the transaction. When you do so, the minting process should only take a few seconds. Once it’s complete, your new NFT should show up in your wallet’s NFT collection.
The image you see of your NFT is being loaded from Pinata. Depending on if you provided a Dedicated Gateway URL in your config file, the NFT is loading through your custom gateway or a public IPFS gateway. Note: If you provided a Dedicated Gateway URL in the config, your NFT asset will not only load quicker but will be cached so that all subsequent loads are instant. You can see this in the example below using Phantom Wallet. The two NFTs that are stuck loading are using a public IPFS gateway. The two that load almost instantly are loaded through a Dedicated Gateway.
Wrapping Up
The benefits of using IPFS for the storage of NFT assets are well-documented. IPFS offers quick retrieval (especially when using a Pinata Dedicated Gateway), IPFS offers content addressability, and IPFS is portable. Ownership of NFTs can transfer in both the token sense and the media sense.
However, it has not always been easy to use IPFS with Solana NFT projects. Hopefully, this tutorial helps change that. Hopefully, it can lead to more creative projects.
Happy pinning, and happy drop days!
Как создать нфт на солане
Solana NFT Marketplace — это онлайн-платформа, разработанная на блокчейне Solana, специально для торговли невзаимозаменяемыми токенами (NFT). Solana — это высокопроизводительный блокчейн, который обеспечивает быстрые транзакции с низкими комиссиями.
Solana NFT Marketplace предоставляет возможность создания, продажи, покупки и обмена цифровых активов в виде уникальных NFT, таких как цифровые искусственные произведения, виртуальные земли, коллекционные карточки, игровые предметы и другие цифровые объекты.
Пользователи могут загружать свои NFT на платформу, устанавливать цены, продавать их другим участникам, а также просматривать и приобретать NFT, созданные другими художниками и разработчиками. Solana NFT Marketplace обеспечивает прозрачность, безопасность и надежность с помощью технологии блокчейн и смарт-контрактов.
Такие платформы позволяют художникам, разработчикам игр и другим творческим лицам продавать свои уникальные цифровые активы напрямую покупателям, минуя посредников и традиционные рынки. Solana NFT Marketplace является одним из множества маркетплейсов, работающих на блокчейне Solana, и предлагает уникальные возможности для торговли и владения NFT.
Как создать NFT на Solana
Для создания NFT на блокчейне Solana вы можете следовать следующим шагам:
- Установите кошелек Solana. Вы можете использовать официальный кошелек Solana или другие кошельки, совместимые с блокчейном Solana.
- Получите SOL (местную криптовалюту Solana). Вы должны иметь некоторое количество SOL для оплаты комиссий за транзакции и создание NFT.
- Выберите платформу для создания NFT на Solana. Некоторые популярные платформы включают Solanart, Solible, Magic Eden и другие. Перейдите на выбранную вами платформу.
- Подключите свой кошелек Solana к платформе. Обычно это делается путем нажатия на кнопку «Подключить кошелек» и выбора Solana в списке поддерживаемых сетей.
- Создайте свой NFT. На платформе вы обычно будете предоставлять информацию о вашем NFT, такую как название, описание, изображение или видео, цена и другие детали. Следуйте указаниям платформы для заполнения всех необходимых полей.
- Загрузите медиа-файлы. Вы должны предоставить изображение или видео, которое будет использоваться в вашем NFT. Обычно платформа предоставляет возможность загрузить файлы непосредственно с вашего компьютера.
- Установите цену и другие параметры. Укажите цену продажи вашего NFT и другие параметры, такие как разрешение торговли или аукционные условия.
- Подтвердите создание NFT. После заполнения всех необходимых полей и загрузки медиа-файлов платформа запросит ваше подтверждение для создания NFT. Убедитесь, что у вас достаточно SOL для оплаты комиссии за создание NFT, и подтвердите транзакцию.
- Дождитесь подтверждения транзакции. После отправки транзакции на блокчейн Solana вам может потребоваться некоторое время для подтверждения и включения вашего NFT в блокчейн. После этого ваш NFT будет доступен для просмотра и покупки другими участниками.
Обратите внимание, что каждая платформа может иметь некоторые отличия в процессе создания NFT на Solana, поэтому важно следовать инструкциям, предоставляемым выбранной платформой.