How to Send BUSD From MetaMask to Binance?

![]()
Have you searched for the easiest way to transfer BUSD from your MetaMask wallet to your Binance wallet? The quest concludes here. This guide is your easiest-to-understand handbook on the Internet, packed with all the necessary details.
Sending BUSD from MetaMask to Binance is a straightforward process. You simply need your Binance wallet address to transfer BUSD from your Metatask wallet.
However, the most important consideration is that you must connect your MetaMask wallet to the Binance Smart Chain Network.
MetaMask is a popular cryptocurrency wallet that gives users total control over their funds. MetaMask facilitates all crypto-related transactions, including the sale of cryptocurrency and the completion of requested transfers.
MetaMask assures that operating on a Binance-based stable currency, BUSD, is as simple as any other coin. Follow along as we reveal how.
Contents hide
Step by Step Guide on Transferring BUSD From MetaMask to Binance
Having gathered sufficient information, let’s discuss the easiest approach for moving BUSD from MetaMask to Binance. The whole procedure is not as difficult as people believe, and our list of detailed steps will make everything straightforward for you.
Although nearly similar, certain elements differ when the steps for desktop and smartphone users are considered. Don’t worry; we’ll offer distinct guides ensuring that sending BUSD from MetaMask happens in a breeze irrespective of your preferred medium.
Transferring BUSD: Guide For Desktop Users
Step 1: Launch Binance and Head Over to the Fiat and Spot Wallet

Kick off the transaction process by logging into your Binance account. As there are no desktop compatible apps as of now, you’ll need to open a browser and access the official website.
While you’re inside your Binance profile, locate and click on the “Wallet” button. It usually sits on the top-right menu.
Walk through the list options and click on the one that says “Fiat and Spot.” It will help you access your Binance crypto wallet.
Step 2: Click on the Deposit Button

As you start browsing your Fiat and Spot wallet, you’ll notice a list of cryptocurrencies alongside their respective balances. From here, hover over to the top of the page and hit the “Deposit” option.
Step 3: Copy the Crypto Address

Clicking on the “Deposit” button will again land you on a page with several more options to choose from. You’ll need to specify and pick the cryptocurrency you’re after and receive the corresponding network address.
Search and hit the option that says “Coin” and specify the desired cryptocurrency from the dropdown menu.
Remember that it is crucial to use the same network on which your MetaMask operates. As we’re concerned about receiving BUSD here, pick “BEP20” and proceed.
After that, copy the crypto address by clicking the “copy” icon located next to it.
Step 4: Visit MetaMask And Pick Your BUSD

Have you grabbed the crypto address already? If yes, head over to your MetaMask profile. In case you’re using Chrome for this purpose and have an extension, click on it. Alternatively, you can visit the official website of MetaMask and sort the installation part right away.
The list of other supported browsers includes Firefox, Edge, and Brave.
Once done, use the credentials and log yourself in.
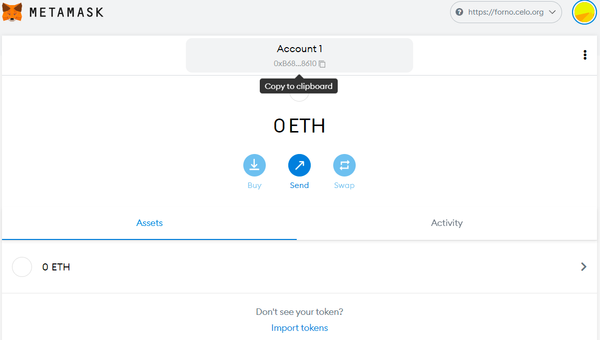
From the home page, click open “Assets,” followed by selecting BUSD.
Step 5: Paste the Copied Crypto Address

Here you’ll employ the copied crypto address and use it to initiate transfers from MetaMask.
Find and open the “Add Recipient” page, navigate to the search bar and paste the crypto address.
Step 6: Input the Desired Amount

In this step, you will need to specify the BUSD amount that you want to transfer. Needless to say, it is essential you enter a value that’s within your available resources.
Alongside that, keeping “Gas Fees” under notice is important. The value is automatically set by MetaMask and has a limit per transaction.
Do you have everything sorted already? Cool, click on the “Next” button.
Step 7: Authorize the Transaction

Clicking on the “Next” button will pop-open a page in the top left corner. It loads up with transaction details covering information like your specified amount, calculated gas fee, and the subtotal amount.
Click Confirm, and wait for the process to conclude.
Transferring BUSD: Guide For Smartphone Users
Step 1: Launch the MetaMask App

Accessing your MetaMask profile is the first step. Whether you are using an Android or iOS device, go to the application dock, locate Metatask, and open it.
Use the required credentials to log into your profile.
Step 2: Open Binance Mobile App
After that, head over to your device’s app list and look for Binance. Tap to open it and get yourself logged in.
Step 3: Click on the Wallet Icon

As the main screen loads, find and click the wallet icon. Typically, it resides in the bottom right corner.
Step 4: Hit Deposit

Next, you’ll come across two options: “Deposit” and “Buy With Cash.” Select Deposit, and proceed.
Step 5: Find BUSD

When you click the Deposit option, the application will take you to a new page with a long range of options. Next, switch to the Crypto tab. You can now search for BUSD. You can either browse the complete list or use the search bar, enter BUSD, and choose BUSD from the search results.
Step 6: Choose Your BUSD Network

After selecting BUSD from the list, selecting the matching network will be the next step. Choose the option that says “BNB Smart Chain (BEP20).”
Step 7: Copy Your Wallet’s Digital Address

You’ll then see a page displaying information about your BUSD deposit account. The same will be used to complete the transaction. However, for doing that grabbing the deposit address is crucial. Simply, click the copy icon positioned directly next to the address and you’re good to go.
Step 8: Head Over and Relaunch the MetaMask App
After copying the address, temporarily quit the Binance app and open MetaMask. From there you’ll continue dealing with the next set of instructions.
Step 9: Locate and Click BUSD

Within the MetaMask application, locate the BUSD option and click on it. A quick reminder: you must connect your MetaMask to the Binance Smart chain network.
Select “Send” from the BUSD menu before proceeding.
Step 10: Paste the Copied Address

Paste the Binance wallet address that you previously copied into the offered section followed by clicking the “Next” button.
Step 11: Pick the Desired Amount
You will be reminded to choose the amount you want to transfer on the subsequent page. A balance indicator just below it will inform you of the available balance. Click Next after you’re pleased with all your inputs.
Note: Each transaction requires a certain amount of BNB as a gas fee. So it is crucial to make sure that you’ve got enough BNB left after picking the desired amount so that the translation takes place with no hassle whatsoever.
Step 12: Click on the Send Button
After verifying all the data, touch the Send button. It is located at the bottom of the screen. Wait for the procedure to complete, and you’re done.
Well, that’s how simple it is to transfer BUSD from MetaMask to Binance. But before you close the curtain, it is always wise to confirm that everything went as planned. Examine your existing BUSD balance on your MetaMask profile to see if it has changed the way it should.
Next up, browse the wallet area inside the Binance app. The portfolio should show the transferred amount. You’re good to go if it does, and the process is now completed.
Frequently Asked Questions
Can you send BUSD to Binance? The answer is an obvious yes. Once you have access to the wallet address, sending BUSD to Binance is straightforward. However, before initiating the transfer, you should confirm that the platform in question is compatible with the Binance Smart Chain Network.
How to Check the Transaction Status When you Send BUSD from MetaMask to Binance? The good thing about BUSD transaction status is that these are usually easy to monitor. Once you’ve initiated the transfer, head over to the “Activity” section on MetaMask to view the history. Moreover, launching the Binance app and navigating the “Wallet” menu under Fiat and Spot option will easily help you access the “Transaction History”.
How Long Does It Take To Transfer BUSD from MetaMask to Binance? Due to Metamask’s network traffic, it is difficult to determine the time required to transfer BUSD from MetaMask to Binance. The transaction is likely to get processed within an hour the majority of the time. However, the time required may vary depending on the traffic volume.
Wrapping Up
And that concluded the BUSD transfer details. If you’ve taken the time to read this article, you’re already aware that transferring BUSD from MetaMask to Binance is a piece of cake. Once you have a copy of the link to your Binance wallet, you may use it to complete transactions in minutes.
BUSD transfers do feature seamless flexibility, allowing you to choose the required amount. However, given the current cost structure, you mustn’t empty your wallet, or else you will not meet the fee requirements, and the transaction will decline.
About Us
Coinapult is a community of crypto believers, and we are here to spread the word about cryptocurrency. Our mission is to provide you with educational information that will help you explore the revolutionary blockchain technology that will change the world for the better. We believe that cryptocurrencies will become mainstream, and we want to be at the forefront of this movement by providing you with all the information you need to get started.
Как отправить busd с метамаска на бинанс

В период, когда Binance ввел лимитное ограничение на общий размер баланса в $10 000, а слухи вокруг банкротств крупнейших бирж (HTX, Kucoin, OKX и т.д.) продолжали нагнетаться — горячий кошелек Metamask стал для многих людей спасением, ведь на нем можно хранить неограниченное количество средств, главное не потерять seed-фразу.
В данном материале мы рассмотрим процесс перевода средств с Metamask в сети BSC. Интересно, что с пополнением средств практически ни у кого не возникает проблем, а вот с выводом они появляются. У большинства всплывает фраза: «недостаточно средств для оплаты газа». Под «газом» подразумевается комиссия. С учетом того, что при переводе средств с биржи на Меtamask комиссия взимается в нативном токене, для многих становится сюрпризом фраза про отсутствие средств. Но обо всём по порядку.
Для наглядности приведём пример, по его аналогии можно отправлять средства с Метамаска на любой счет в сети binance smart chain.
��Задача: Перевести монеты DOT (Polkadot) с Метамаск на биржу Бинанс в сети binance smart chain.
��Процесс по шагам:
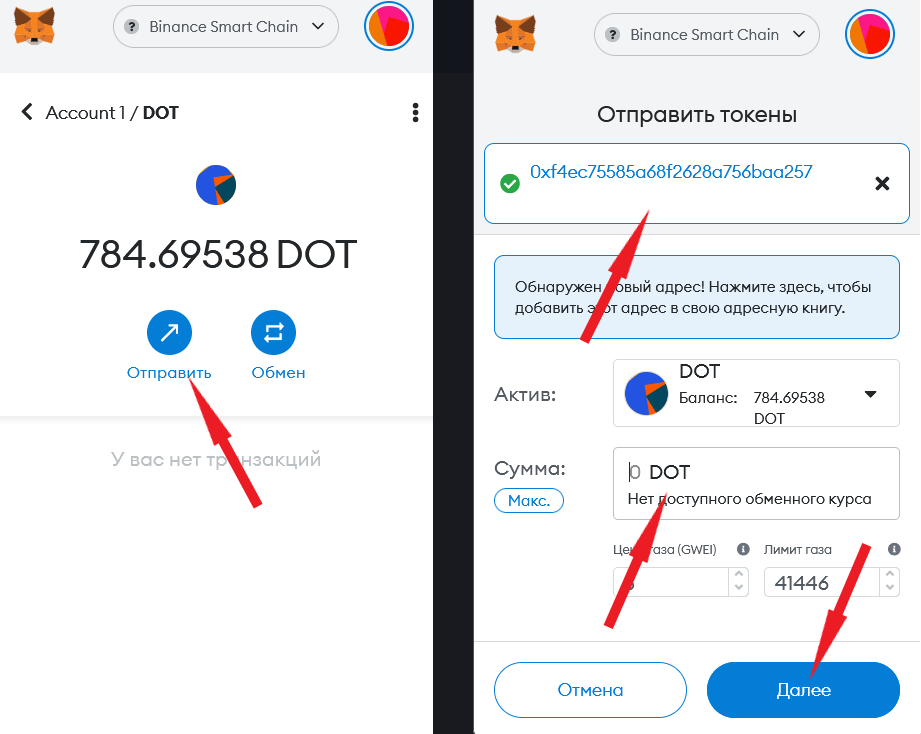
- Авторизуемся в Metamask (мы используем браузерное расширение), выбираем сеть BSC.
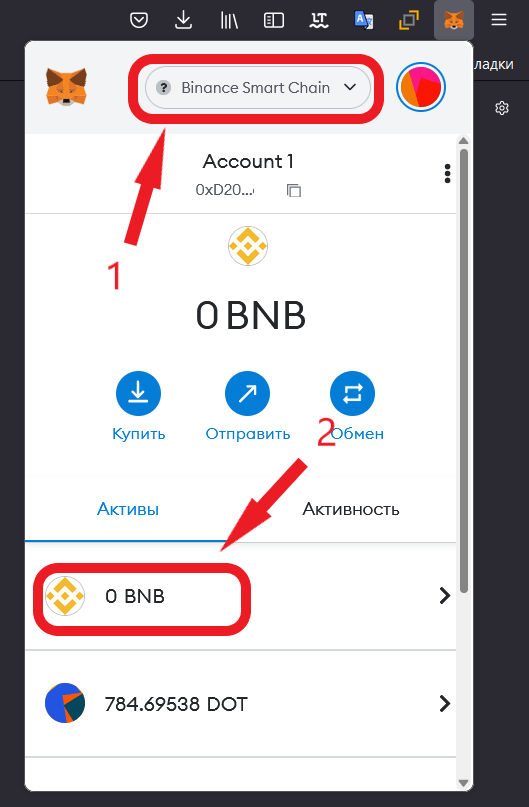
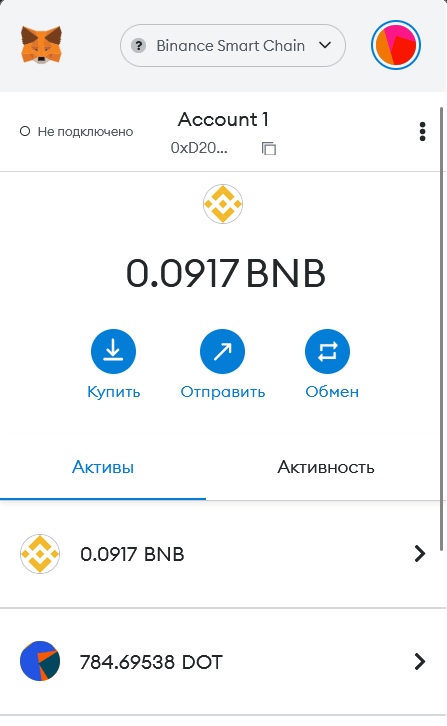
- Видим, что количество BNB на нашем счете равно нулю. Причем здесь BNB, если нам нужно перевести монеты DOT (или любые другие)? Дело в том, что комиссия в сети BSC оплачивается в токенах BNB. Поэтому нам нужно иметь хотя бы небольшое количество данных монет на счете. Откуда взять BNB? Данную монету можно купить или обменять (из имеющихся, к примеру обменять небольшую часть dot на bnb) в самом Metamask. Но мы для примера купили их на спотовом рынке через Binance, а затем отправили на Metamask.
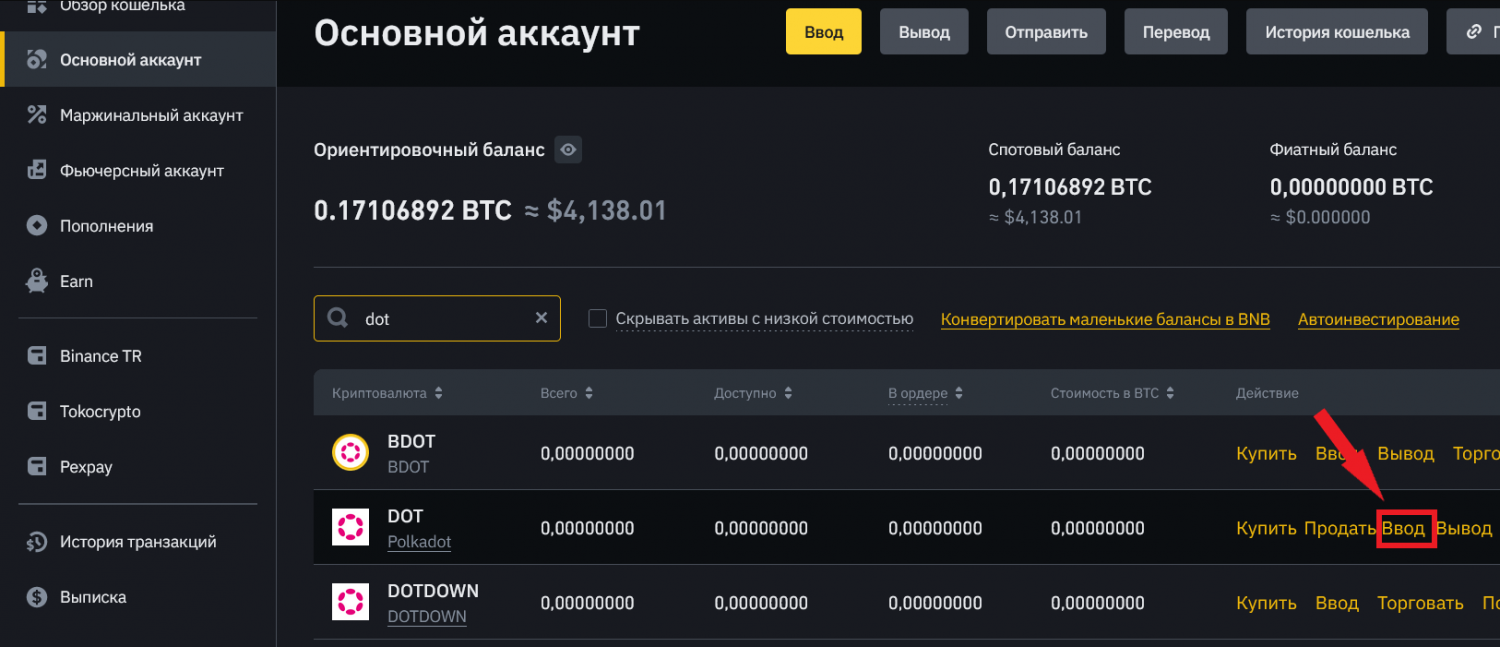
- Теперь нам нужны реквизиты, куда планируется осуществить перевод. Заходим на сайт или в мобильное приложение Binance, выбираем основной аккаунт, находим нужную монету и выбираем блок «Ввод».
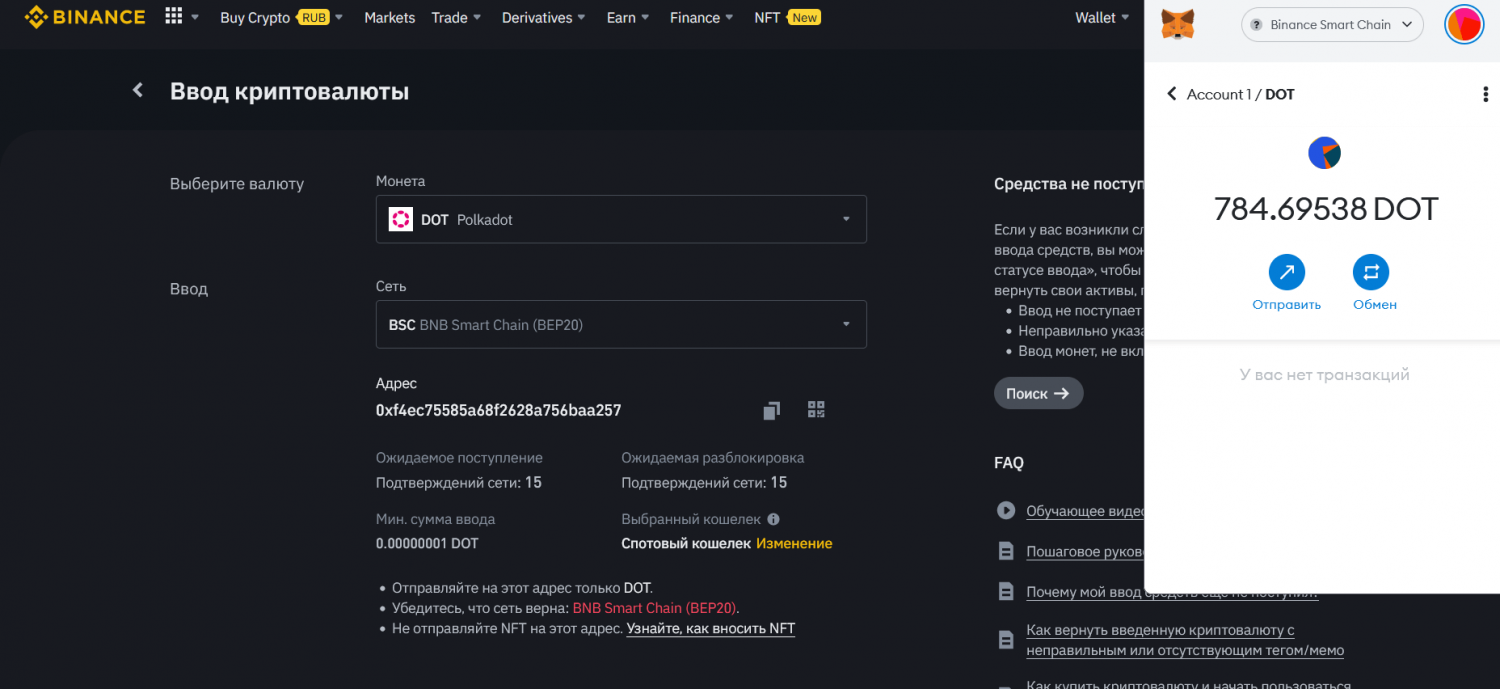
- Выбираем сеть BEP20, после чего появится адрес, нужно его скопировать.
- Возвращаемся к Metamask, выбираем нужную сеть и токен, нажимаем на кнопку отправить. На открывшейся странице указываем скопированный ранее адрес, затем вписываем сумму монет, которую хотим перевести. Ниже появится информация о цене за газ (GWEI), финальный размер комиссии будет указан позже. Поэтому следует нажать на далее.
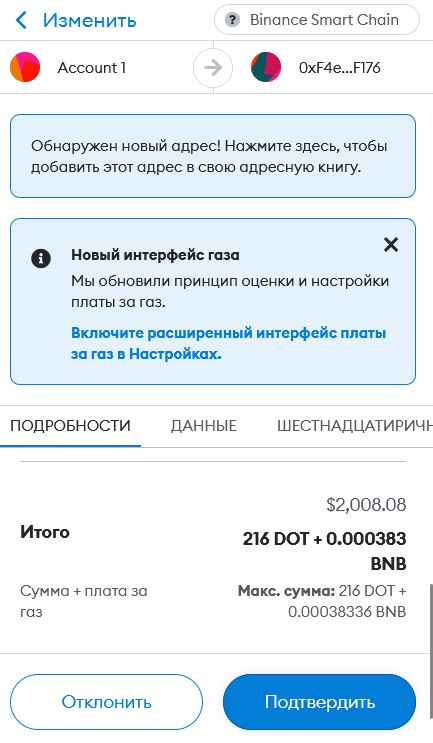
- Размер комиссии зависит от загруженности сети. В нашем случае за перевод 216 монет ДОТ (на тот момент чуть больше 2000 долларов) комиссия составила 0.000383 BNB (в районе $0.10)
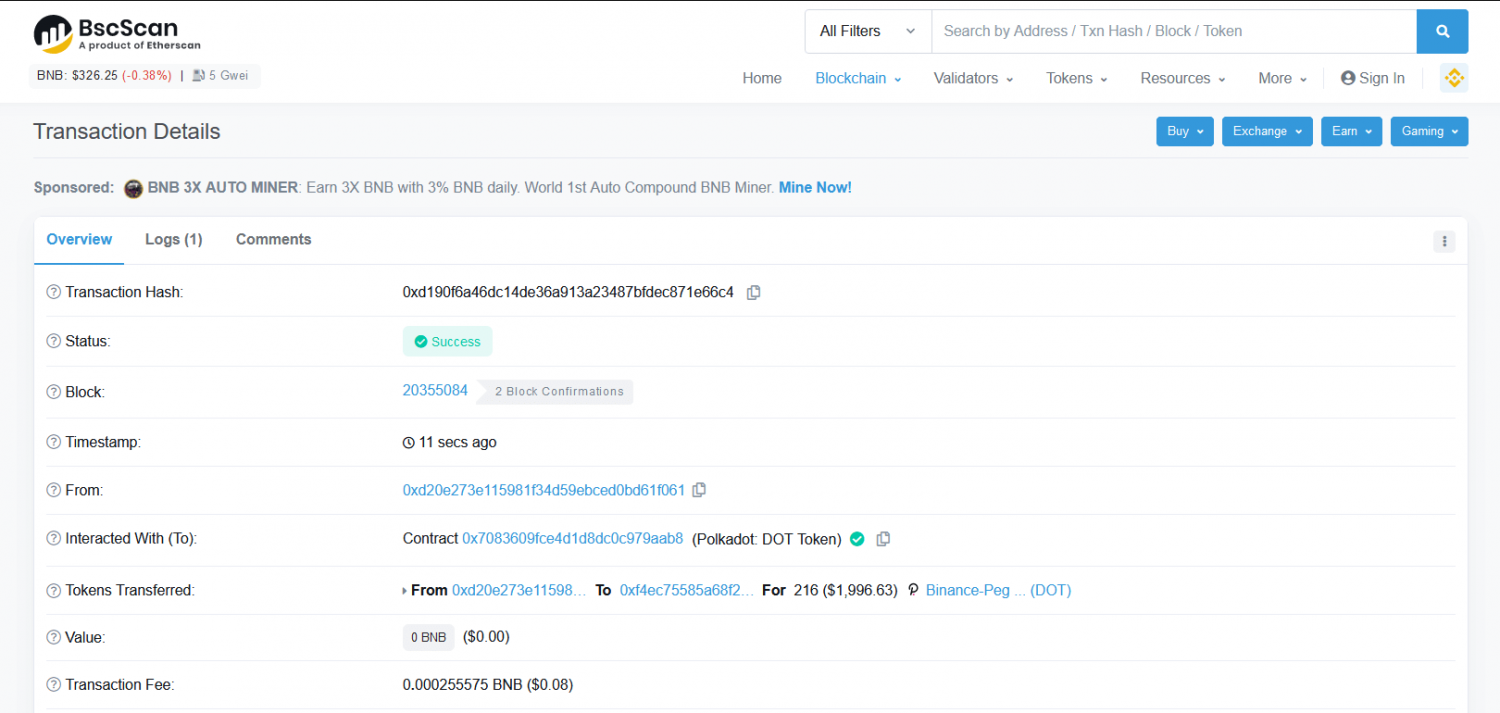
- Средства на биржу Бинанс поступили в течение 1 минуты, транзакцию можно проверить на сайте bscscan.com.
Как видим, процесс предельно прост, главное не ошибиться с адресом и сетью — что является самой распространенной причиной утери средств ��.
(1) Installing and setting up MetaMask
MetaMask can be downloaded on Chrome and Firefox, or on iOS and Android if you’re a mobile user. For the purposes of this tutorial, we’ll use the Firefox version, but the instructions will be more or less the same for every platform.
Firstly, you’ll want to head over to the MetaMask Download page. From there, select whichever platform you’re using, and follow the steps to install it on your device. Easy!
Next, follow along with the setup specified by the app. Go ahead and click Create a Wallet. Write down the backup seed phrase somewhere secret (preferably not on an Internet-connected device). Without this phrase, your funds can’t be recovered if your device is damaged or lost. Confirm that you’ve written them down on the next page.
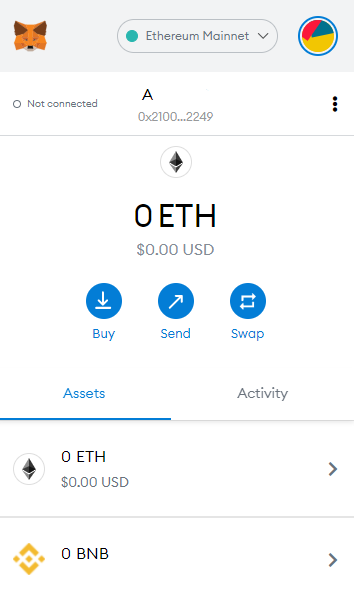
And that’s it! You should now see your wallet, ready to send and receive funds.
The freshly-initialized MetaMask wallet.
(2) Configuring the wallet
You might notice straight away that we’re still dealing with an Ethereum wallet. At best, this won’t work with Binance Smart Chain DApps. At worst, you could lose funds by sending them to addresses you can’t actually use.
Let’s change that. We want to access the Settings to point the wallet towards Binance Smart Chain nodes.
Select Settings from the dropdown menu.
On the Settings page, we want to locate the Networks menu.
The Networks menu.
We want to click Add Network in the top-right corner to manually add the Binance Smart Chain one — it doesn’t come packaged with MetaMask. It’s important to note that there are two networks we can use here: the testnet or the mainnet. Below are the parameters to fill in for each.
(3) Mainnet (This is the one you are probably looking for)
Network Name: Smart Chain
ChainID: 56
Symbol: BNB
Block Explorer URL: https://bscscan.com
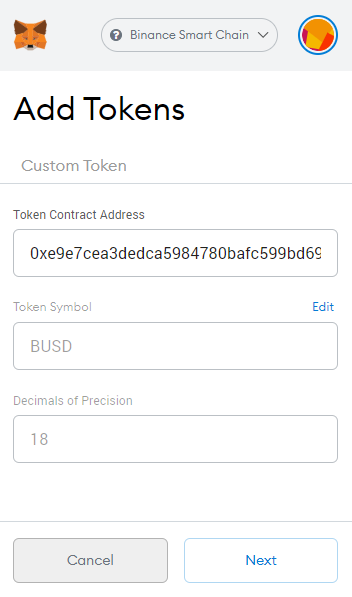
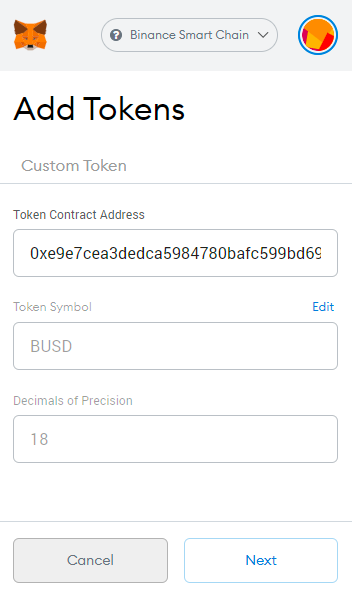
2. Adding BUSD and KOI tokens
(1) Adding BUSD Token
A. Select the Smart Chain main network at the top of the wallet and click the “Add Token” button
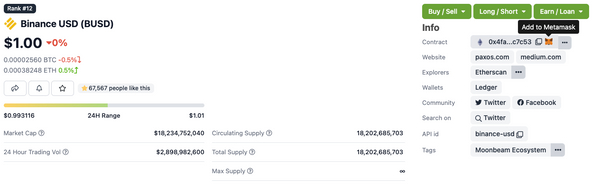
B. Find the contract address of BUSD (0xe9e7cea3dedca5984780bafc599bd69add087d56) in the bscscan.com browser, copy it to the Token Contract Address, and click NEXT
C. Click “Add Token” to add the BUSD token displayed in the wallet
(2) Adding KOI Token
A. Click Add Token at the bottom of the wallet
B. Find the contract address of KOI (0x49158d0c9d39d74b57c3dcb14a442211745777f4) in the bscscan.com browser, copy it to the Token Contract Address, and click NEXT
C. Click “Add Token” to add the KOI token displayed in the wallet
D. Both BUSD and KOI were successfully added to MetaMask’s wallet.
How to Add BUSD in Metamask Binance Smart Chain Wallet

Have you sent your BUSD to the Metamask wallet and it’s not showing in Metamask. The BUSD withdrawal successful but is not showing in Metamask. Here is a step-by-step solution to fix BUSD that is not showing in the Metamask wallet by adding BUSD in Metamask wallet. Every token has a specific contract address, which defines that specific cryptocurrency. You just have to use that and add your token in Metamask to see your deposited cryptocurrency like BUSD.
You can buy BUSD from Binance exchange or if you want to buy with INR you can use WazirX, Bitbns.
Interested in new ICOs? Bookmark our this page and get updated with potential upcoming ICOs.
How to add BUSD in Metamask
Every token has a contract address by which they get their notation and their existence. Just like that, you have to add every token with their contract address in Metamask. Metamask then lists that token and shows it to you. If you already had deposited the tokens like in this case BUSD you will see your tokens. First, if the token isn’t there in Metamask that means it’s hidden. Use the guide to add a token in Metamask Binance smart chain wallet.
Here is a step-by-step guide to Add BUSD in Metamask Binance Chain Wallet
Step I – Open your Metamask wallet. Change the network to Binance Smart Chain.
Step II – Click on Add Token and then add 0xe9e7cea3dedca5984780bafc599bd69add087d56 as contract address. Now, everything else in the form will get automatically get filled. The token symbol will get automatically picked if it’s the popular one like BUSD.
Click Add token to add BUSD to Metamask wallet
Step III – Now click on the Next and it will automatically get updated. After that, your BUSD token will be visible to your Metmask wallets.
Add BUSD contract address to show token in Metamask Binance Smart Chain wallet
Key Takeaway
You can add as many tokens in Metamask binance smart chain wallet just by using those token’s contract addresses. Use the above step-by-step guide to add BUSD in Metamask wallet or any other token. Search the token name at https://bscscan.com/ and then copy the contract address from there. Use this contract address in the Metamask wallet to make that token visible to you.
Related posts:
USDT/Tether is created on the OMNI chain. OMNI chain is.
Hi, welcome to this ultimate guide on how to use.
Binance recently airdropped TWT tokens to its users who had.
Covalent consider themselves richest blockchain data on the internet. Anyone.
MetaMask is a plugin for Google Chrome browser. It can.
Harvest Finance is staking and yielding platform that let users.
How to add BUSD to your MetaMask
The first NFT LAND Sale on Polkastarter is here. Let’s get everything ready for March 8.
- Share on Twitter
- Share on Facebook
- Share on LinkedIn
- Share on Pinterest
- Share via Email
- Copy link
The Cryptoverse NFT LAND sale will be on BUSD on BNB Chain (BNB), so in order to participate, you’ll need to add BUSD to your MetaMask wallet.
If you are not sure how to buy BUSD, we’ve got you!
Here’s a quick tutorial on how you can buy BUSD to participate in the Cryptoverse sale on March 8.
Before you Start
You will need the BUSD token to participate in the Sale and to hold BNB in order to pay the network fees.
The next step will be how to add it to your MetaMask wallet and make sure its connected and funded before participating in the Polkastarter x Cryptoverse NFT LAND sale.
How to add BUSD in Metamask
First of all, if you don’t have a MetaMask account here’s a quick tour of your first steps:
1. Download MetaMask from their official website.
They have a browser extension that works on Chrome, Firefox, Brave and Edge, and a mobile iOS and Android app.
2. Create a wallet by following the instructions.
Once you get to the backup seed phrase, make sure to write it down on a piece of paper rather than storing it on your computer or phone.
3. Congratulations!
You’ve just created a MetaMask account. It should look something like this:
How to add the BNB Chain Network (Binance Smart Chain) to MetaMask
The first thing you’ll need to do is change your Network to BNB Chain Network (Binance Smart Chain), follow this link to learn how.
Then, you’ll need to add BUSD token to your wallet.
There are two ways you can do it:
1. Click on ‘Add token’ and copy-paste the BUSD token contract address: 0xe9e7CEA3DedcA5984780Bafc599bD69ADd087D56
2. You can go to CoinGecko and on BUSD page click on the MetaMask icon to automatically add it to your wallet.
Now that the BUSD token is visible on your MetaMask wallet you’re ready to start!
To participate in the NFT LAND Sale, you’ll need to send the BUSD token to your MetaMask and make sure you have BNB there to cover all the necessary fees.
Here’s how you can do that:
1) Buy BUSD via an exchange. The token is listed on many exchanges such as Binance, Gate.io, KuCoin, and Pancakeswap.
2) Send it to your Metamask account on the BNB Chain Network. Where it says “Address”, put your address.
Check the image below to know how to find your address
3) Send BUSD to your MetaMask
4) All Done! Now you can participate in Cryptoverse NFT LAND Sale on Polkastarter. ��
About Polkastarter
Polkastarter is the fully decentralized protocol for launching new ideas. Our curation process and industry access enable us to offer the best new projects in blockchain and digital assets.
With Polkastarter, decentralized projects can raise awareness, build a loyal community, and receive long-term support. Users of the platform will be able to participate in a secure and compliant environment and use assets both in and beyond the current ERC20 standard, namely BNB and Polygon (MATIC) tokens.
Connect with us and learn more about Polkastarter
Website | Twitter | Discord | Telegram | Instagram | Newsletter
Похожие публикации:
- Адреса сбербанка в москве где есть ячейки
- Как посмотреть срок действия закрытого ключа сертификата
- Какие банки переводят валюту за рубеж сегодня
- Льготные кредит на группу лиц это как
whoa there, pardner!
Your request has been blocked due to a network policy.
Try logging in or creating an account here to get back to browsing.
If you’re running a script or application, please register or sign in with your developer credentials here. Additionally make sure your User-Agent is not empty and is something unique and descriptive and try again. if you’re supplying an alternate User-Agent string, try changing back to default as that can sometimes result in a block.
You can read Reddit’s Terms of Service here.
if you think that we’ve incorrectly blocked you or you would like to discuss easier ways to get the data you want, please file a ticket here.
when contacting us, please include your ip address which is: 178.132.110.95 and reddit account
Как вывести busd с метамаск на бинанс
MetaMask — это популярное расширение для браузера, которое позволяет вам управлять своими криптовалютными активами и взаимодействовать с децентрализованными приложениями на блокчейне Ethereum. Если у вас есть BUSD (Binance USD) на вашем аккаунте MetaMask и вы хотите вывести его на Binance, то мы расскажем вам, как это сделать.
Шаг 2: Откройте Binance.com и войдите в свой аккаунт.
Шаг 4: В поисковой строке найдите BUSD и выберите «BEP20 (BSC)» в качестве сети. Затем нажмите «Вывести».
Шаг 5: Вставьте адрес вашего кошелька MetaMask в поле «Адрес кошелька Binance Smart Chain». Убедитесь, что вы выбрали правильную сеть.
Шаг 6: Введите сумму BUSD, которую вы хотите вывести, и укажите комиссию за транзакцию. Обратите внимание, что комиссия будет списана с вашего аккаунта Binance.
Шаг 7: Проверьте все данные и нажмите «Вывести».
Шаг 8: Подтвердите транзакцию в MetaMask, проверьте все данные еще раз и нажмите «Подтвердить».
Шаг 9: После подтверждения транзакции в MetaMask ваши BUSD будут отправлены на ваш кошелек Binance. Обратите внимание, что транзакция может занять некоторое время, прежде чем будет завершена.
Как перевести BUSD c MetaMask на Binance
Первым шагом является открытие своего бумажника MetaMask и проверка баланса BUSD. Убедитесь, что у вас достаточно BUSD для перевода на Binance.
Далее, зайдите на свой аккаунт на Binance и найдите раздел «DEPOSITS». Вам может потребоваться поискать специальную вкладку для BUSD, поскольку биржа поддерживает множество различных токенов.
После нахождения раздела «DEPOSITS» скопируйте ваш адрес кошелька BUSD на Binance. Обычно это длинная строка символов, начинающаяся с «0x». Не делайте никому известным ваш адрес кошелька, чтобы избежать потери средств.
Теперь вернитесь в MetaMask и нажмите на кнопку «SEND». В поле «Recipient Address» вставьте адрес кошелька BUSD на Binance, скопированный на предыдущем шаге.
Затем укажите количество BUSD, которое вы хотите отправить на Binance. Обратите внимание, что некоторая сумма будет удержана в качестве комиссии за транзакцию.
После заполнения всех полей, нажмите кнопку «NEXT» и подтвердите транзакцию в MetaMask. Обычно это требует ввода вашего пароля MetaMask.
После подтверждения транзакции ваш BUSD будет отправлен на ваш баланс на Binance. Обычно это занимает несколько минут, но может занять дольше в зависимости от загруженности сети Ethereum.
Теперь у вас есть понимание о том, как перевести BUSD с MetaMask на Binance. Не забудьте проверить свой баланс на Binance, чтобы убедиться, что перевод прошел успешно.
| Шаг | Действие |
|---|---|
| 1 | Откройте MetaMask и проверьте баланс BUSD |
| 2 | Зайдите на свой аккаунт на Binance и найдите раздел «DEPOSITS» |
| 3 | Скопируйте адрес кошелька BUSD на Binance |
| 4 | Вернитесь в MetaMask и нажмите на кнопку «SEND» |
| 5 | Вставьте адрес кошелька BUSD на Binance в поле «Recipient Address» |
| 6 | Укажите количество BUSD для отправки и нажмите «NEXT» |
| 7 | Подтвердите транзакцию в MetaMask |
| 8 | Дождитесь, пока BUSD поступит на ваш баланс на Binance |
Установка MetaMask
- Откройте ваш веб-браузер и перейдите на официальный сайт MetaMask.
- Нажмите на кнопку «Установить MetaMask», чтобы загрузить расширение для вашего браузера.
- После загрузки расширения, установите его, следуя инструкциям на экране.
- Когда установка будет завершена, в правом верхнем углу вашего браузера появится иконка MetaMask.
- Нажмите на иконку MetaMask, чтобы открыть расширение.
- Выберите «Создать кошелек» и следуйте инструкциям по созданию нового кошелька, включая сохранение секретной фразы.
- Когда ваш кошелек создан, вам будет предложено установить пароль для его защиты.
- После установки пароля вы будете перенаправлены в ваш кошелек MetaMask, где вы сможете проверить баланс своих токенов и управлять ими.
Теперь у вас есть установленный и готовый к использованию кошелек MetaMask. Вы можете приступить к переводу и управлению вашими токенами на Binance и других платформах.
Создание и настройка аккаунта в MetaMask
- Загрузите и установите расширение MetaMask для вашего браузера.
- После установки откройте MetaMask и нажмите на кнопку «Создать кошелек».
- Создайте уникальную фразу восстановления, состоящую из 12 слов (seed phrase), которая будет использоваться для восстановления доступа к вашему кошельку в случае необходимости.
- Подтвердите фразу восстановления, введя слова в указанном порядке.
- Задайте пароль для доступа к вашему кошельку. Убедитесь, что пароль является надежным и неизвестен другим людям.
- После создания аккаунта, вам будет предложено выбрать сеть. Выберите Binance Smart Chain в качестве сети.
- Далее вам будет предложено создать токен BUSD. Нажмите «Добавить токен» и укажите адрес контракта BUSD на Binance Smart Chain: [адрес контракта].
- После добавления токена BUSD, вы сможете видеть баланс BUSD на своем аккаунте в MetaMask.
Перевод BUSD на аккаунт MetaMask
Перед тем, как вывести BUSD с MetaMask на Binance, необходимо убедиться, что аккаунт MetaMask настроен и имеет достаточно средств для перевода. Если у вас еще нет аккаунта MetaMask, вам необходимо создать его, следуя инструкциям на официальном сайте MetaMask.
После того, как аккаунт MetaMask создан и настроен, вы можете перейти к переводу BUSD на свой аккаунт MetaMask. Для этого выполните следующие шаги:
- Выберите BUSD из списка доступных валют и укажите адрес вашего аккаунта MetaMask в поле «Адрес получателя».
- Введите сумму, которую вы хотите вывести, и нажмите кнопку «Отправить».
- Подтвердите транзакцию на Binance с помощью двухфакторной аутентификации или других методов подтверждения безопасности.
После завершения транзакции вы должны увидеть средства BUSD на своем аккаунте MetaMask. Это может занять некоторое время в зависимости от времени обработки транзакции на блокчейне.
Теперь вы можете использовать свои BUSD на аккаунте MetaMask для покупки, продажи или отправки на другие адреса Ethereum.
Подключение MetaMask к бирже Binance
| Шаг 1: | |
| Шаг 2: | |
| Шаг 3: | Скопируйте свой адрес кошелька Binance, на который хотите вывести BUSD. |
| Шаг 4: | В метамаске откройте свой кошелек и выберите вкладку «Отправить». |
| Шаг 5: | В поле «Адрес получателя» вставьте адрес кошелька Binance, скопированный на шаге 3. |
| Шаг 6: | Укажите сумму BUSD, которую хотите вывести, и нажмите кнопку «Отправить». |
| Шаг 7: | Подтвердите транзакцию в MetaMask и дождитесь ее подтверждения. |
| Шаг 8: |
- Войдите в свой аккаунт на MetaMask, используя ваш пароль и фразу восстановления.
- После входа в кошелек нажмите на кнопку «Отправить».
- В разделе «Адрес получателя» вставьте адрес вашего кошелька на Binance, куда вы хотите вывести BUSD.
- Укажите количество BUSD, которое вы хотите вывести. Убедитесь, что баланс вашего кошелька MetaMask достаточен для этой операции.
- Выберите подходящую комиссию за транзакцию. Обычно рекомендуется выбирать среднюю или высокую комиссию, чтобы транзакция была быстрее подтверждена блокчейном.
- Нажмите кнопку «Далее» и подтвердите транзакцию на вашем кошельке MetaMask.
- Подождите, пока транзакция будет подтверждена блокчейном. Это может занять некоторое время, в зависимости от загруженности сети.
- Когда транзакция будет успешно подтверждена, ваши BUSD будут отправлены на ваш аккаунт на Binance Exchange.
Убедитесь, что вы правильно указали адрес получателя и проверьте свой аккаунт на Binance, чтобы убедиться, что BUSD поступили на ваш счет. Транзакции с криптовалютами нельзя отменить, поэтому будьте осторожны при вводе адреса получателя.
Помните, что комиссии за переводы могут варьироваться в зависимости от загруженности сети и выбранной вами комиссии, поэтому рекомендуется быть внимательным при выборе комиссии и проверять ожидаемое время подтверждения транзакции.